This tutorial introduces the Blazor framework by guiding you in building a simple Web application with C#. It will also show you how to integrate your Blazor application with Auth0 in order to secure it. You can find the full application code in this GitHub repository.
What Is Blazor?
Blazor has been gaining in popularity, especially after the release of .NET Core 3.0, which enriched it with many interesting features. Subsequent versions of .NET consolidated its foundations, and the interest around it is growing so much that Microsoft is betting a lot on its future. But what is Blazor exactly?
Blazor is a programming framework to build client-side Web applications with .NET. It allows .NET developers to use their C# and Razor knowledge to build interactive UIs running in the browser. Developing client-side applications with Blazor brings a few benefits to .NET developers:
- They use C# and Razor instead of JavaScript and HTML.
- They can leverage the whole .NET functionalities.
- They can share code across the server and client.
- They can use the .NET development tools they are used to.
In a nutshell, Blazor promises .NET developers to let them build client Web applications with the development platform they are comfortable with.
The hosting models
Blazor provides you with two ways to run your Web client application: Blazor Server and Blazor WebAssembly. These are called hosting models.
The Blazor Server hosting model runs your application on the server within an ASP.NET Core application. The UI is sent to the browser, but UI updates and event handling are performed on the server side. This is similar to traditional Web applications, but the communication between the client side and the server side happens over a SignalR connection. The following picture gives you an idea of the overall architecture of the Blazor Server hosting model:
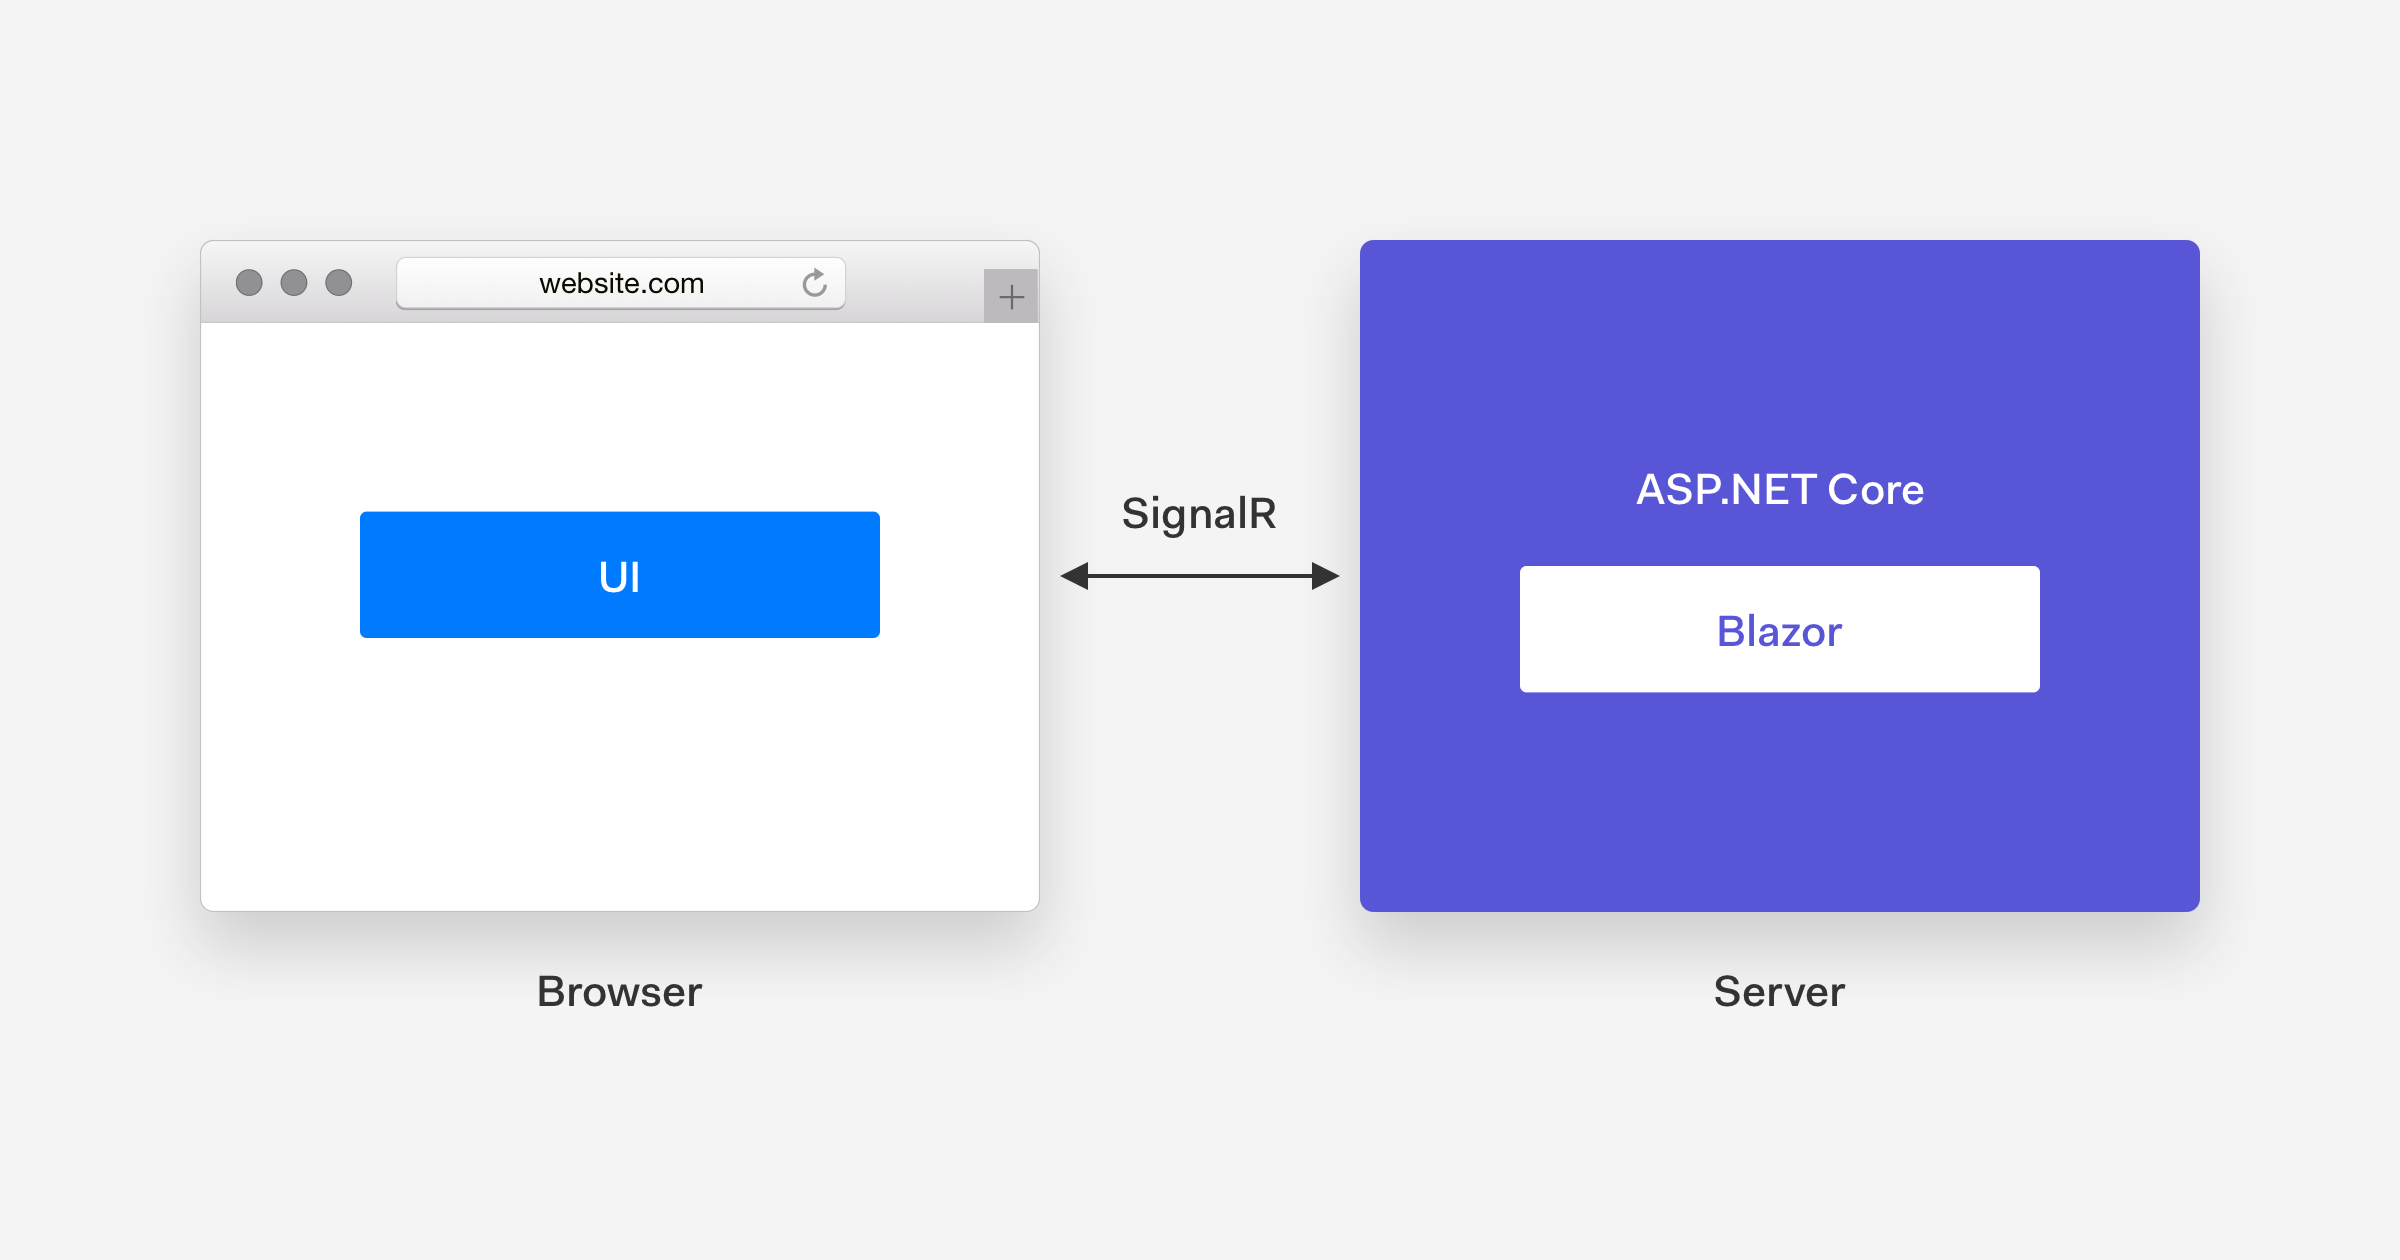
The Blazor Server hosting model provides a few benefits, such as a smaller download size of the client app and compatibility with older browsers. However, it has some drawbacks compared to a classic Single Page Application (SPA), such as a higher latency due to the roundtrip between the client and the server for most user interactions and the challenging scalability in high-traffic scenarios.
The Blazor WebAssembly hosting model, also known as Blazor WASM, lets your application run entirely on the user's browser. The full code of the application, including its dependencies and the .NET runtime, is compiled into WebAssembly, downloaded by the user's browser, and locally executed. The following picture describes the hosting model of Blazor WebAssembly:
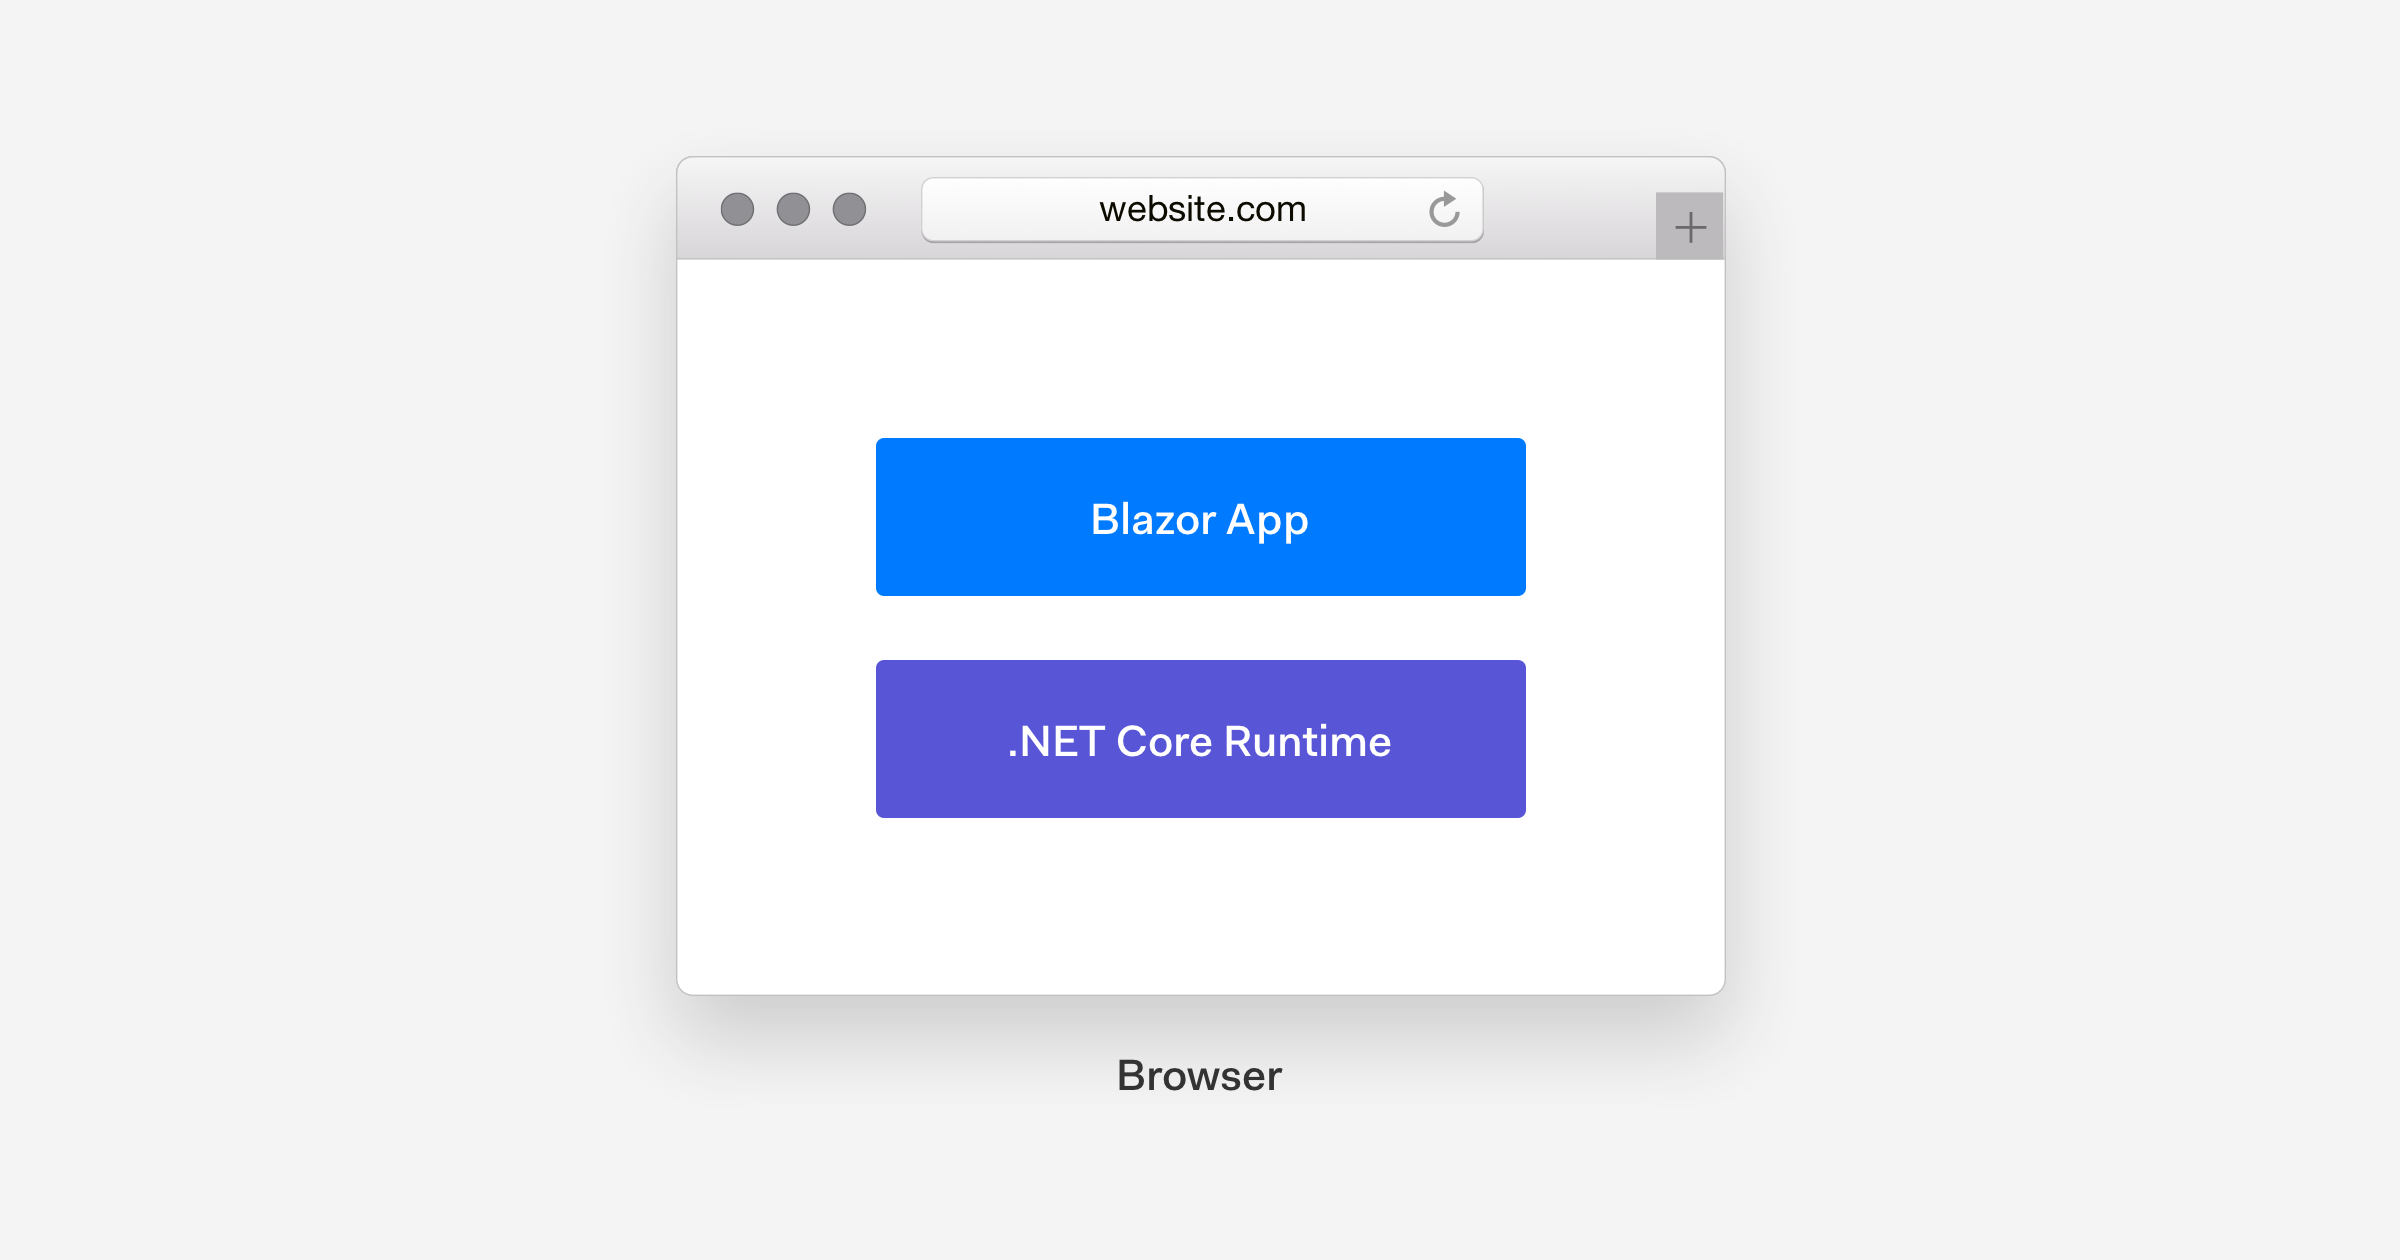
The benefits provided by the Blazor WebAssembly hosting model are similar to those provided by Single Page Applications. After the download, the application is independent of the server, apart from the needed interactions. Also, you don't need an ASP.NET Core Web server to host your application. You can use any Web server, since the result of the WebAssembly compilation is just a set of static files.
On the other side, you should be aware of the drawbacks of this hosting model. The Blazor WebAssembly hosting model requires that the browser supports WebAssembly. In addition, the initial download of the application may take some time.
“You don't need an ASP.NET Core Web server to host Blazor WebAssembly applications.”
Tweet This
Blazor roadmap
Blazor promises a great opportunity for .NET developers. Microsoft's goals on the Blazor project are very ambitious, especially for Blazor WebAssembly. In their vision, not only will Blazor WebAssembly become the main hosting model, but it will also drive a great revolution in the development of clients.
The Blazor WebAssembly hosting model will include Single Page Applications compiled into WebAssembly, Progressive Web Apps, hybrid mobile applications, Electron-based desktop applications, and native applications.
Prerequisites
Before starting to build your Blazor application, you need to ensure you have installed the right tools on your machine. In particular, you need .NET 6.0 SDK or above. You can check if you have the correct version installed by typing the following command in a terminal window:
dotnet --version
You should get the value
6.0.100If you are going to use Visual Studio, be aware that you need to use at least Visual Studio 2019 16.8 or Visual Studio for Mac 8.9.
Note: If you update Visual Studio to the latest version, you will get the required .NET SDK bundled.
Building a Blazor Server Application
To get started with Blazor, you will build a simple quiz application that shows a list of questions with multiple answers and assigns you a score based on the correct answers you provide. You will create this application using the Blazor Server hosting model. If you are interested in building and securing the same application by using the Blazor WebAssembly, please check out this article.
So, create a basic Blazor Server project by typing the following command in a terminal window:
dotnet new blazorserver -o QuizManager
This command uses the
blazorserverQuizManager- The
folder: it contains the models and the services implementing the business logic.Data - The
folder: this contains the Razor components that generate the HTML views. In particular, this folder contains thePages
Razor page, which acts as the starting point of the Web UI._Host.cshtml - The
folder: it contains Razor components and other elements shared among pagesShared
Creating the model and the service
As a first step, delete the files inside the
DataQuizItem.cs// Data/QuizItem.cs namespace QuizManager.Data { public class QuizItem { public string Question { get; set; } public List<string> Choices { get; set; } public int AnswerIndex { get; set; } public int Score { get; set; } public QuizItem() { Choices = new List<string>(); } } }
This class implements the model for each item of the quiz. It provides a question, a list of possible answers, the zero-based index of the correct answer, and the score assigned when the user gives the correct answer.
In the same
DataQuizService.cs// Data/QuizService.cs namespace QuizManager.Data { public class QuizService { private static readonly List<QuizItem> Quiz; static QuizService() { Quiz = new List<QuizItem> { new QuizItem { Question = "Which of the following is the name of a Leonardo da Vinci's masterpiece?", Choices = new List<string> {"Sunflowers", "Mona Lisa", "The Kiss"}, AnswerIndex = 1, Score = 3 }, new QuizItem { Question = "Which of the following novels was written by Miguel de Cervantes?", Choices = new List<string> {"The Ingenious Gentleman Don Quixote of La Mancia", "The Life of Gargantua and of Pantagruel", "One Hundred Years of Solitude"}, AnswerIndex = 0, Score = 5 } }; } public Task<List<QuizItem>> GetQuizAsync() { return Task.FromResult(Quiz); } } }
This class defines a quiz as a list of
QuizItemQuizService()GetQuizAsync()QuizNow, move to the root of your project and edit the
Program.cs// Program.cs using Microsoft.AspNetCore.Components; // ...other using clauses... var builder = WebApplication.CreateBuilder(args); // Add services to the container. builder.Services.AddRazorPages(); builder.Services.AddServerSideBlazor(); // 👇 existing code //builder.Services.AddSingleton<WeatherForecastService>(); builder.Services.AddSingleton<QuizService>(); // ☝️ new code var app = builder.Build(); // ...existing code...
With this change, you registered the
QuizServiceCreating Razor components
Now that you've created the model and the service of the application, it's time to implement the UI. Blazor leverages Razor as a template processor to produce dynamic HTML. In particular, Blazor uses Razor components to build up the application UI. Razor components are self-contained units of markup and code that can be nested and reused even in other projects. They are implemented in files with the
.razor“Razor components are the basic UI elements in a Blazor application.”
Tweet This
To show the quiz to the user and let them interact with it, you need to implement a specific view as a Razor component. So, move to the
PagesCounter.razorFetchData.razorQuizViewer.razor// Pages/QuizViewer.razor @page "/quizViewer" @using QuizManager.Data @inject QuizService QuizRepository <h1>Take your quiz!</h1> <p>Your current score is @currentScore</p> @if (quiz == null) { <p><em>Loading...</em></p> } else { int quizIndex = 0; @foreach (var quizItem in quiz) { <section> <h3>@quizItem.Question</h3> <div class="form-check"> @{ int choiceIndex = 0; quizScores.Add(0); } @foreach (var choice in quizItem.Choices) { int currentQuizIndex = quizIndex; <input class="form-check-input" type="radio" name="@quizIndex" value="@choiceIndex" @onchange="@((eventArgs) => UpdateScore(Convert.ToInt32(eventArgs.Value), currentQuizIndex))"/>@choice<br> choiceIndex++; } </div> </section> quizIndex++; } } @code { List<QuizItem> quiz; List<int> quizScores = new List<int>(); int currentScore = 0; protected override async Task OnInitializedAsync() { quiz = await QuizRepository.GetQuizAsync(); } void UpdateScore(int chosenAnswerIndex, int quizIndex) { var quizItem = quiz[quizIndex]; if (chosenAnswerIndex == quizItem.AnswerIndex) { quizScores[quizIndex] = quizItem.Score; } else { quizScores[quizIndex] = 0; } currentScore = quizScores.Sum(); } }
Take a look at the code of this component. Its first line uses the
@page/quizViewer@usingQuizManager.DataQuizItemQuizService@injectQuizServiceQuizRepositoryAfter these initializations, you will find the markup defining the UI. As you can see, this part is a mix of HTML and C# code whose purpose is to build the list of questions with the respective possible answers represented as radio buttons.
The final block of the component is enclosed in the
@codeQuizViewerOnInitializedAsync()UpdateScore()GetQuizAsync()QuizRepositoryUpdateScore()currentScoreNow, go to apply the final touch by moving in the
SharedNavMenu.razor// Shared/NavMenu.razor <div class="top-row ps-3 navbar navbar-dark"> <div class="container-fluid"> <a class="navbar-brand" href="">QuizManager</a> <button title="Navigation menu" class="navbar-toggler" @onclick="ToggleNavMenu"> <span class="navbar-toggler-icon"></span> </button> </div> </div> <div class="@NavMenuCssClass" @onclick="ToggleNavMenu"> <nav class="flex-column"> <div class="nav-item px-3"> <NavLink class="nav-link" href="" Match="NavLinkMatch.All"> <span class="oi oi-home" aria-hidden="true"></span> Home </NavLink> </div> <div class="nav-item px-3"> <NavLink class="nav-link" href="quizViewer"> <span class="oi oi-list-rich" aria-hidden="true"></span> Quiz </NavLink> </div> </nav> </div> @code { private bool collapseNavMenu = true; private string? NavMenuCssClass => collapseNavMenu ? "collapse" : null; private void ToggleNavMenu() { collapseNavMenu = !collapseNavMenu; } }
The
NavMenu.razorQuizViewerYou're not going to change the App component implemented by the
App.razor// App.razor <Router AppAssembly="@typeof(App).Assembly"> <Found Context="routeData"> <RouteView RouteData="@routeData" DefaultLayout="@typeof(MainLayout)" /> <FocusOnNavigate RouteData="@routeData" Selector="h1" /> </Found> <NotFound> <PageTitle>Not found</PageTitle> <LayoutView Layout="@typeof(MainLayout)"> <p role="alert">Sorry, there's nothing at this address.</p> </LayoutView> </NotFound> </Router>
This component attaches the Blazor routing system to your application by using the built-in Router component. It enables navigation among the pages of your application, distinguishing when the page is found from when it does not exist. For more information about the Blazor routing system, check the official documentation.
⚠️ If you are using a Mac, please, read! ⚠️
At the time of writing, Mac users are affected by an issue when running an ASP.NET Core application via the .NET CLI. You may get the following dialog window when run :

This is due to a known issue with the .NET CLI on macOS. The current workaround requires that you open the
QuizManager.csproj<UseAppHost>false</UseAppHost><!-- QuizManager.csproj --> <Project Sdk="Microsoft.NET.Sdk.Web"> <PropertyGroup> <TargetFramework>net6.0</TargetFramework> <Nullable>enable</Nullable> <ImplicitUsings>enable</ImplicitUsings> <!--👇 new element ---> <UseAppHost>false</UseAppHost> </PropertyGroup> </Project>
If you use Visual Studio, you are not affected by this issue.
Running your Blazor Server application
Now you have your quiz application, so launch it by typing the following command in a terminal window:
dotnet run
If this is the very first time you run an ASP.NET Core application, you should trust the HTTPS development certificate included in the .NET Core SDK. This task depends on your operating system. Please, take a look at the official documentation to apply the proper procedure.
You may also be requested to allow the application to access the developer certificate key.
After a few seconds, you should get your application up and running. Take a look at your terminal window to get the address your application is listening to. In my case, I got the address
, and I will refer to it throughout the article.https://localhost:7290
Starting with .NET 6.0, any ASP.NET project created through a template is assigned a random port between 5000 and 5300 for HTTP and between 7000 and 7300 for HTTPS. See this document for more information.
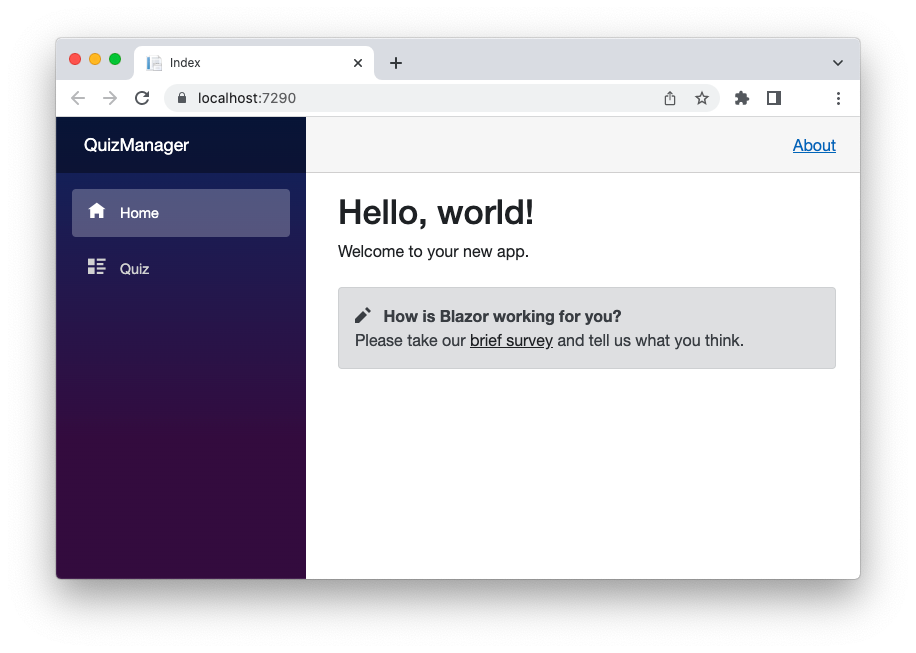
So, if you open your browser at that address, you should get access to the home page, as shown in the following picture:
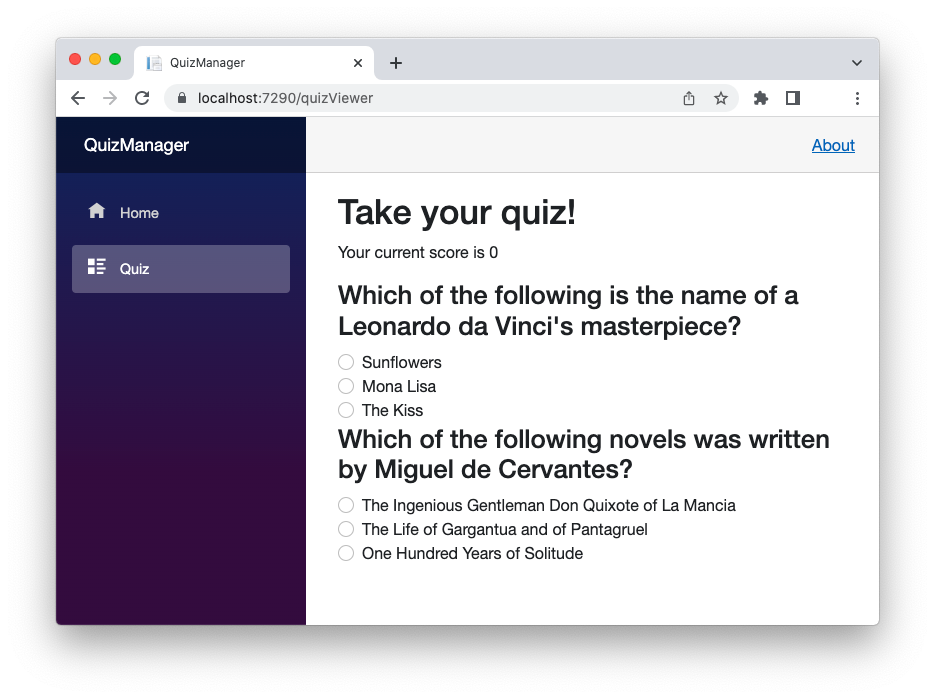
Selecting the Quiz item in the navigation menu, you should get the interactive quiz you built so far. It should look like the following picture:
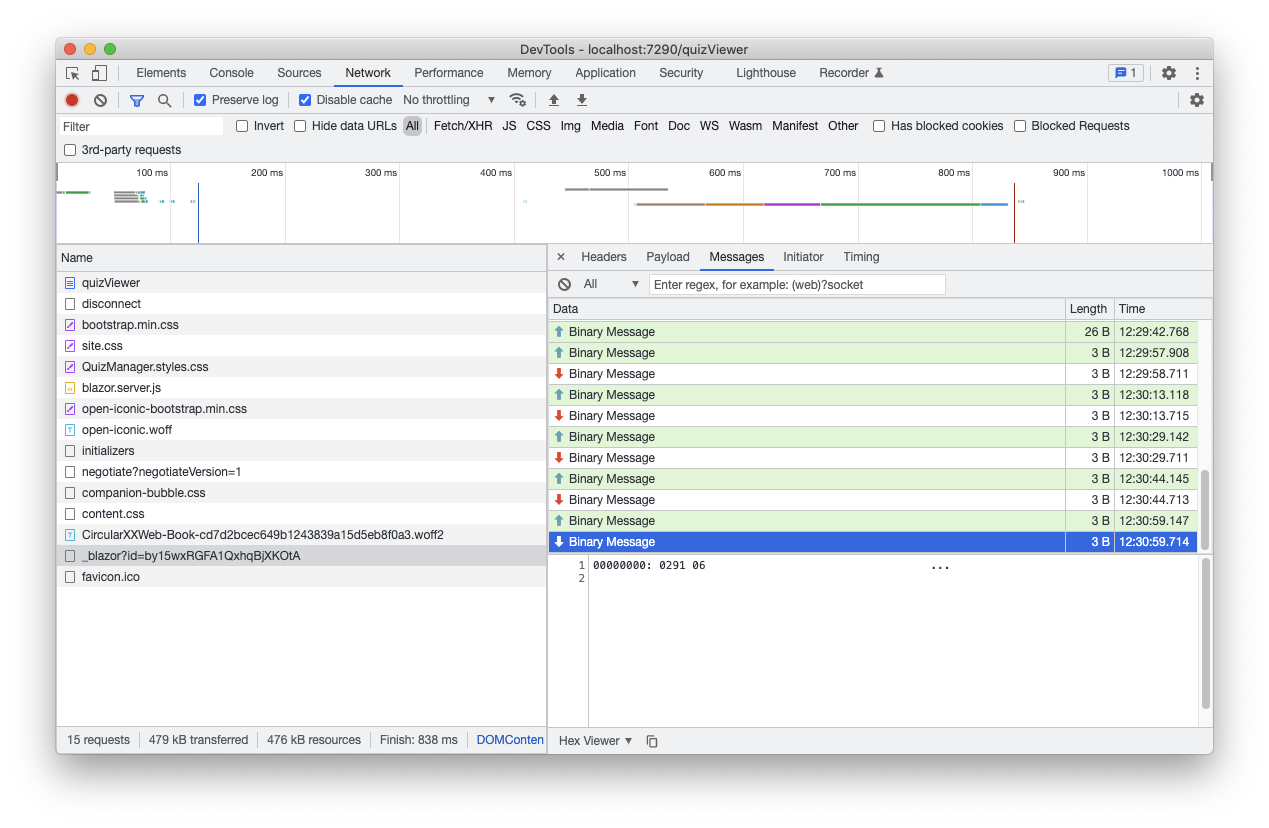
If you open the developer tools of your browser, click on the Network tab, and refresh, you will discover that the communication between the client side and the server side of your application doesn't use HTTP, but it is a bi-directional binary communication managed by SignalR. The following picture shows the WebSocket channel in Chrome developer tools:
Securing the Application with Auth0
Now you have a working quiz Web application implemented as a Blazor Server application. In order to secure this application, you will learn how to integrate it with Auth0 services.
Creating the Auth0 application
The first step to secure your Blazor Server application is to access the Auth0 Dashboard to register your Auth0 application. If you don't have an Auth0 account, you can sign up for a free one now.
Try out the most powerful authentication platform for free.
Get started →Once in the dashboard, move to the Applications section and follow these steps:
- Click on Create Application.
- Provide a friendly name for your application (for example, Quiz Blazor Server App) and choose Regular Web Applications as an application type.
- Finally, click the Create button.
These steps make Auth0 aware of your Blazor application and will allow you to control access.
After the application has been registered, move to the Settings tab and take note of your Auth0 domain and client id. Then, in the same form, assign the value
https://localhost:<YOUR_PORT_NUMBER>/callbackhttps://localhost:<YOUR_PORT_NUMBER>/<YOUR_PORT_NUMBER>https://localhost:7290/callbackhttps://localhost:7290/The first value tells Auth0 which URL to call back after the user authentication. The second value tells Auth0 which URL a user should be redirected to after their logout.
Click the Save Changes button to apply them.
Configuring your Blazor application
Open the
appsettings.json// appsettings.json { "Logging": { "LogLevel": { "Default": "Information", "Microsoft.AspNetCore": "Warning" } }, "AllowedHosts": "*", "Auth0": { "Domain": "YOUR_AUTH0_DOMAIN", "ClientId": "YOUR_CLIENT_ID" } }
Replace the placeholders
YOUR_AUTH0_DOMAINYOUR_CLIENT_IDIntegrating with Auth0
Now, install the Auth0 ASP.NET Core Authentication SDK by running the following command in your terminal window:
dotnet add package Auth0.AspNetCore.Authentication
The Auth0 ASP.NET Core SDK lets you easily integrate OpenID Connect-based authentication in your app without dealing with all its low-level details.
If you want to learn a bit more, this blog post provides you with an overview of the Auth0 ASP.NET Core SDK.
After the installation is complete, open the
Program.cs// Program.cs using QuizManager.Data; using Auth0.AspNetCore.Authentication; // 👈 new code var builder = WebApplication.CreateBuilder(args); // 👇 new code builder.Services .AddAuth0WebAppAuthentication(options => { options.Domain = builder.Configuration["Auth0:Domain"]; options.ClientId = builder.Configuration["Auth0:ClientId"]; }); // 👆 new code // Add services to the container. builder.Services.AddRazorPages(); // ...existing code... app.UseRouting(); app.UseAuthentication(); // 👈 new code app.UseAuthorization(); // 👈 new code app.MapBlazorHub(); app.MapFallbackToPage("/_Host"); app.Run();
Following the highlighted code, you added a reference to the
Auth0.AspNetCore.AuthenticationAddAuth0WebAppAuthentication()appsetting.jsonUseAuthentication()UseAuthorization()Now your application has the infrastructure to support authentication via Auth0.
Securing the server side
In order to prevent unauthorized users from accessing the server-side functionalities of your application, you need to protect them. So, open the
Index.razorPagesAuthorize// Pages/Index.razor @page "/" @attribute [Authorize] <PageTitle>Index</PageTitle> <h1>Hello, world!</h1> Welcome to your new app. <SurveyPrompt Title="How is Blazor working for you?" />
Add the same attribute to the
QuizViewer.razor// Pages/QuizViewer.razor @page "/quizViewer" @attribute [Authorize] @using QuizManager.Data @inject QuizService QuizRepository // ...existing code...
This ensures that the server-side rendering of your pages is triggered only by authorized users.
Creating login and logout endpoints
As said before, in the Blazor Server hosting model, the communication between the client side and the server side does not occur over HTTP, but through SignalR. Since Auth0 uses standard protocols like OpenID and OAuth that rely on HTTP, you need to provide a way to bring those protocols on Blazor.
To solve this issue, you are going to create two endpoints,
/login/logoutSo, add the Login razor page to the project by typing the following command in a terminal window:
dotnet new page --name Login --namespace QuizManager.Pages --output Pages
This command creates two files in the
PagesLogin.cshtmlLogin.cshtml.csOpen the
Login.cshtml.csPages// Pages/Login.cshtml.cs using Microsoft.AspNetCore.Authentication; using Auth0.AspNetCore.Authentication; using Microsoft.AspNetCore.Mvc.RazorPages; namespace QuizManager.Pages { public class LoginModel : PageModel { public async Task OnGet(string redirectUri) { var authenticationProperties = new LoginAuthenticationPropertiesBuilder() .WithRedirectUri(redirectUri) .Build(); await HttpContext.ChallengeAsync(Auth0Constants.AuthenticationScheme, authenticationProperties); } } }
This code creates a set of authentication properties required for the login and triggers the authentication process via Auth0.
Then, add the Logout page by typing the following command:
dotnet new page --name Logout --namespace QuizManager.Pages --output Pages
Similarly to the previous case, you will get two new files in the
PagesLogout.cshtmlLogout.cshtml.csReplace the content of the
Logout.cshtml.cs// Pages/Logout.cshtml.cs using Microsoft.AspNetCore.Authorization; using Microsoft.AspNetCore.Mvc; using Microsoft.AspNetCore.Mvc.RazorPages; using Microsoft.AspNetCore.Authentication; using Auth0.AspNetCore.Authentication; using Microsoft.AspNetCore.Authentication.Cookies; namespace QuizManager.Pages { public class LogoutModel : PageModel { [Authorize] public async Task OnGet() { var authenticationProperties = new LogoutAuthenticationPropertiesBuilder() .WithRedirectUri("/") .Build(); await HttpContext.SignOutAsync(Auth0Constants.AuthenticationScheme, authenticationProperties); await HttpContext.SignOutAsync(CookieAuthenticationDefaults.AuthenticationScheme); } } }
This code closes the user's session on your Blazor application and on Auth0.
Securing the client side
Now, you have to secure the client side of your Blazor application so that the users see different content when they are logged in or not.
Open the
App.razor// App.razor <CascadingAuthenticationState> <Router AppAssembly="@typeof(App).Assembly"> <Found Context="routeData"> <AuthorizeRouteView RouteData="@routeData" DefaultLayout="@typeof(MainLayout)"> <Authorizing> <p>Determining session state, please wait...</p> </Authorizing> <NotAuthorized> <h1>Sorry</h1> <p>You're not authorized to reach this page. You need to log in.</p> </NotAuthorized> </AuthorizeRouteView> <FocusOnNavigate RouteData="@routeData" Selector="h1" /> </Found> <NotFound> <PageTitle>Not found</PageTitle> <LayoutView Layout="@typeof(MainLayout)"> <p role="alert">Sorry, there's nothing at this address.</p> </LayoutView> </NotFound> </Router> </CascadingAuthenticationState>
Here you are using the
AuthorizeRouteViewMainLayoutNotAuthorizedAuthorizingCascadingAuthenticationState“The AuthorizeRouteView component allows you to control access to the UI parts of your Blazor application.”
Tweet This
At this point, make sure you're in the
QuizManagerdotnet run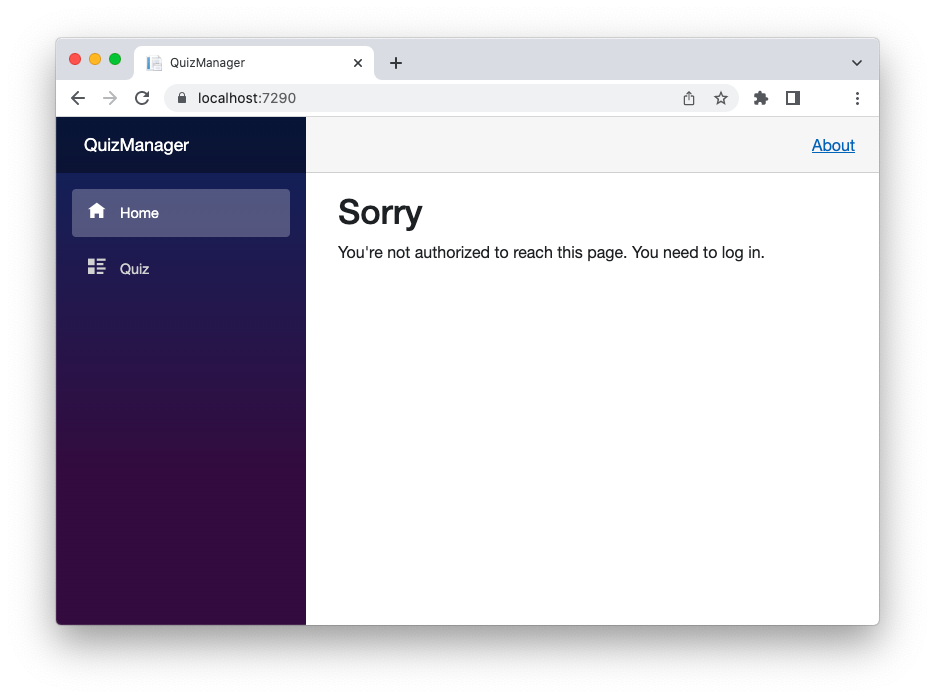
So, you need a way to let users authenticate. Create a razor component for this purpose by adding an
AccessControl.razorShared// Shared/AccessControl.razor <AuthorizeView> <Authorized> <a href="logout">Log out</a> </Authorized> <NotAuthorized> <a href="login?redirectUri=/">Log in</a> </NotAuthorized> </AuthorizeView>
This component uses the
AuthorizedNotAuthorizedThe final step is to put this component in the top bar of your Blazor application. So, replace the content of the
MainLayout.razor// Shared/MainLayout.razor @inherits LayoutComponentBase <PageTitle>QuizManager</PageTitle> <div class="page"> <div class="sidebar"> <NavMenu /> </div> <main> <div class="top-row px-4"> <AccessControl /> //👈 new markup <a href="https://docs.microsoft.com/aspnet/" target="_blank">About</a> </div> <article class="content px-4"> @Body </article> </main> </div>
As you can see, the only difference is the addition of the
AccessControlNow, your Blazor application is accessible just to authorized users. When users click the Log in link, they will be redirected to the Auth0 Universal Login page for authentication. After authentication completes, they will be back to the home page of your application and will be able to take their quiz.
Leverage Auth0's authentication and authorization services in your .NET applications.
DOWNLOAD THE FREE EBOOK
Accessing the User Profile
Once you add authentication to your Blazor Server application, you may need to access some information about the authenticated user, such as their name and picture. By default, the Auth0 ASP.NET Core Authentication SDK takes care of getting this information for you during the authentication process.
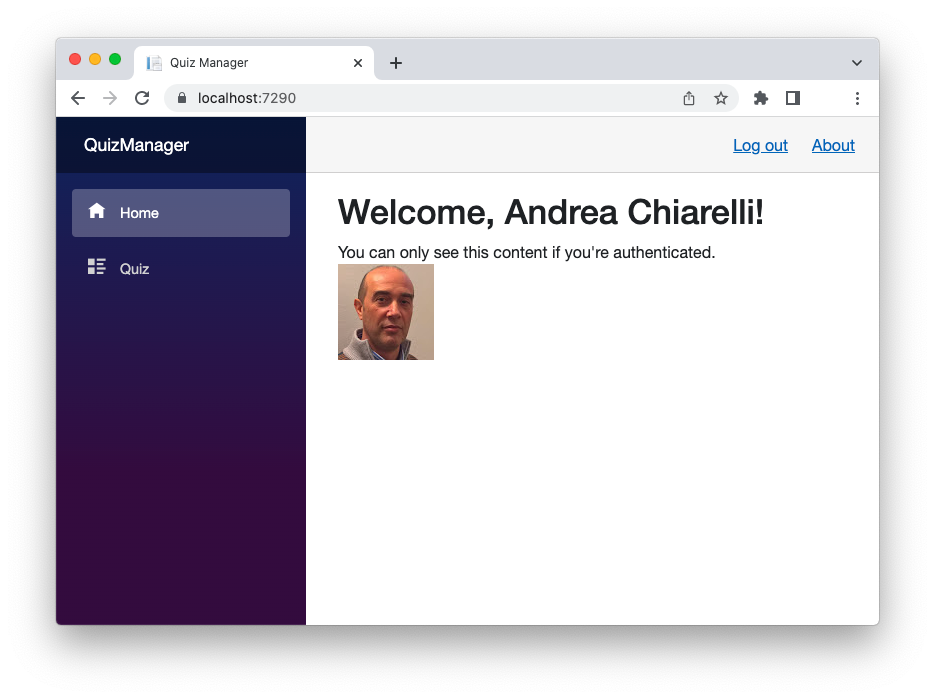
To show the user's name and picture on a page, change the content of the
Index.razor// Pages/Index.razor @page "/" @attribute [Authorize] <PageTitle>Quiz Manager</PageTitle> <h1>Welcome, @Username!</h1> You can only see this content if you're authenticated. <br /> <img src="@Picture"> @code { private string Username = "Anonymous User"; private string Picture = ""; [CascadingParameter] private Task<AuthenticationState>? authenticationState { get; set; } protected override async Task OnInitializedAsync() { if (authenticationState is not null) { var state = await authenticationState; Username = state?.User?.Identity?.Name?? string.Empty; Picture = state?.User.Claims .Where(c => c.Type.Equals("picture")) .Select(c => c.Value) .FirstOrDefault() ?? string.Empty; } await base.OnInitializedAsync(); } }
In this new version of the component, you define the
authenticationStateCascadingParameterauthenticationStateawait authenticationStateUsernamePictureAt this point, you can run your application, log in, and get a home page similar to the following:
A new Auth0-powered .NET app in less than a minute? Try out our templates
Install the Nugget package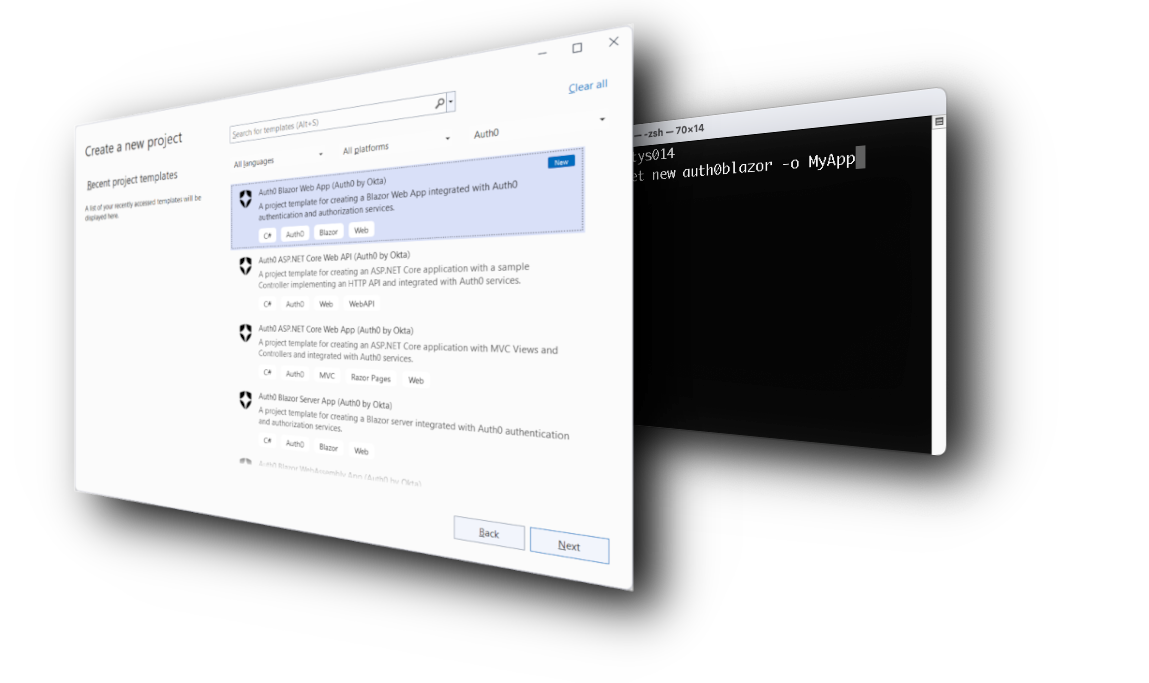
Recap
This article introduced the basics of Blazor, the programming framework that allows you to build Web client applications by using C# and the .NET platform. You learned about the two hosting models, Blazor Server and Blazor WebAssembly, and built a quiz manager application using the Blazor Server hosting model.
Finally, you secured the Blazor Server application by integrating it with Auth0.
The full source code of the application built throughout the article can be downloaded from this GitHub repository.
You can continue learning how to build and secure a Blazor WebAssembly application by reading this article.
About the author

Andrea Chiarelli
Principal Developer Advocate
I have over 20 years of experience as a software engineer and technical author. Throughout my career, I've used several programming languages and technologies for the projects I was involved in, ranging from C# to JavaScript, ASP.NET to Node.js, Angular to React, SOAP to REST APIs, etc.
In the last few years, I've been focusing on simplifying the developer experience with Identity and related topics, especially in the .NET ecosystem.