TL;DR: In this series, you will learn how to build a modern web application using React and Nest.js. In the end, you will also learn how to secure the application with Auth0. Rather than building a React application with JavaScript, we will deviate a bit and use TypeScript instead. Structuring the application this way comes with a lot of benefits such as type checking, enforcing, and associating every variable within the application with a datatype, cool, right? In this first part of the series, we will focus on building the backend API with Nest.js. The second part is about building the user interface and handling all frontend logic using React. You can find the second part here. The complete source code developed throughout this series can be found in this GitHub repository if you will prefer to head straight into the code.
Prerequisites
Basic knowledge and previous experience with building web applications with React will help you to get the best out of this series. Although not mandatory, you should know a few things about TypeScript. And to make it easy for everyone to follow along, I will endeavor to break down any complex implementation. Furthermore, you will also need to ensure that you have Node.js and Yarn package manager installed in your development machine. If you are yet to get them installed, kindly follow the instructions here to learn how to install Node.js properly and here for Yarn package manager.
Also, you need to have MongoDB installed on your machine. Follow the instructions here to download and install it for your choice of the operating system. To successfully install MongoDB, you can either install it by using Homebrew on Mac or by downloading it from the MongoDB website.
This tutorial uses a macOS machine for development. If you’re using another operating system, you may need to use
sudonpmIntroduction
Nest.js is a progressive Node.js framework with a modular architecture for building efficient, reliable, and scalable server-side applications. It is fully built with TypeScript, yet it still preserves compatibility with JavaScript and takes advantage of the latest JavaScript features. It brings design patterns and mature solutions to the Node.js development world. If you are conversant with the structure of Angular applications, you are going to feel more comfortable working with Nest.js. If you are new to Nest.js, check out this article on Nest.js Brings TypeScript to Node.js and Express to get yourself familiarized with some of the key concepts of Nest.js.
React is an open-source JavaScript frontend framework for building an intuitive and interactive user interface. It is widely adopted and a top choice among developers because of its great performance and simplicity in the rapid development of Single-Page Applications. Learn how React works and equip yourself with its key concepts in this React tutorial; Building and Securing Your First App.
MongoDB is a schema-less NoSQL database that can receive and store data in JSON-like documents. It takes away the idea of thinking and visualizing a database table in rows and columns. It allows you to be more productive by building JavaScript applications in a JSON format, making it not strange to any JavaScript developer. It supports arrays and nested objects values and allows for flexible and dynamic schemas. It is often used with Mongoose, an Object Data Modeling (ODM) library, that helps to manage relationships between data and provides schema validations.
“MongoDB allows you to be more productive by building JavaScript applications in a JSON format”
Tweet This
TypeScript, as described on its official website, is a superset of JavaScript that compiles down to plain JavaScript. It was designed and developed to help improve the productivity of developers when building large and complex programs by adding extra features that ensure the successful development of awesome applications with fewer bugs. You can easily focus on implementing new features without getting too worried over breaking an existing application in production, as TypeScript can allow you to easily spot errors in the code at a very early stage.
As pointed out earlier, in this tutorial, we will combine these awesome contemporary web tools and build an application with it. At the end of the article, you would have gathered enough knowledge for you to explore the benefits of building applications by combining React and TypeScript in either a new project or to enhance your existing projects.
Why Build React Applications with TypeScript
As you may be aware, React is a component-based frontend framework and make use of props and state objects here and there. Building React applications with TypeScript allows you to have strongly-typed components that have well defined and identifiable props and state objects. This will ensure that the usages of your components are type-checked by the compiler, and you can spot errors on time.
This will, in a nutshell, make you more productive as a developer and make your code easier to read and understand.
“React is a component-based frontend framework.”
Tweet This
What You Will Build
You are going to build a blog application with which users can:
- Create and save a new post.
- View the newly saved post and all other created posts on the homepage.
- Carry out processes such as editing and deleting posts.
Also, to persist data into the database, you will make use of MongoDB. Here is a preview of what to expect at the end of this tutorial:
This application will allow users to create a blog post only if they have been authenticated and authorized. Otherwise, they will only be able to view the created posts by authenticated users. Authentication and authorization of users will be handled by Auth0.
You will start gradually and take things one step at a time, starting by building the complete backend API and allow any user to have access and make successful API calls to create, retrieve, and edit data in the database. Then you will proceed to secure the API by managing user authentication via Auth0. To test all the implementation in this part of the series, you will use Postman.
Building Backend APIs with Nest.js
As mentioned, the backend API will be built using Nest.js. Here, you will start by installing and configuring Nest.js and then proceed to flesh out the structure necessary for the API.
Installing and configuring Nest.js
You can easily install a new Nest.js project using the command-line interface built specifically for scaffolding Nest applications called Nest CLI.
You will start by using the command-line interface built specifically for scaffolding a new Nest.js application to create yours. Alternatively, you can clone the starter project for Nest.js here on GitHub. Even though both approaches will produce the same outcome, for the sake of this tutorial and as it recommended for a first time user by the Nest.js team, you will use the Nest CLI to create your project.
Install the CLI by running the following command:
npm install -g @nestjs/cli
Once the process is complete, confirm if Nest CLI has been installed by running the following command:
nest --version
You will see an output similar to the following indicating the version installed on your machine:
6.6.4
💡 Please note that this version might be different from yours.
Craft a new project for this tutorial by using the
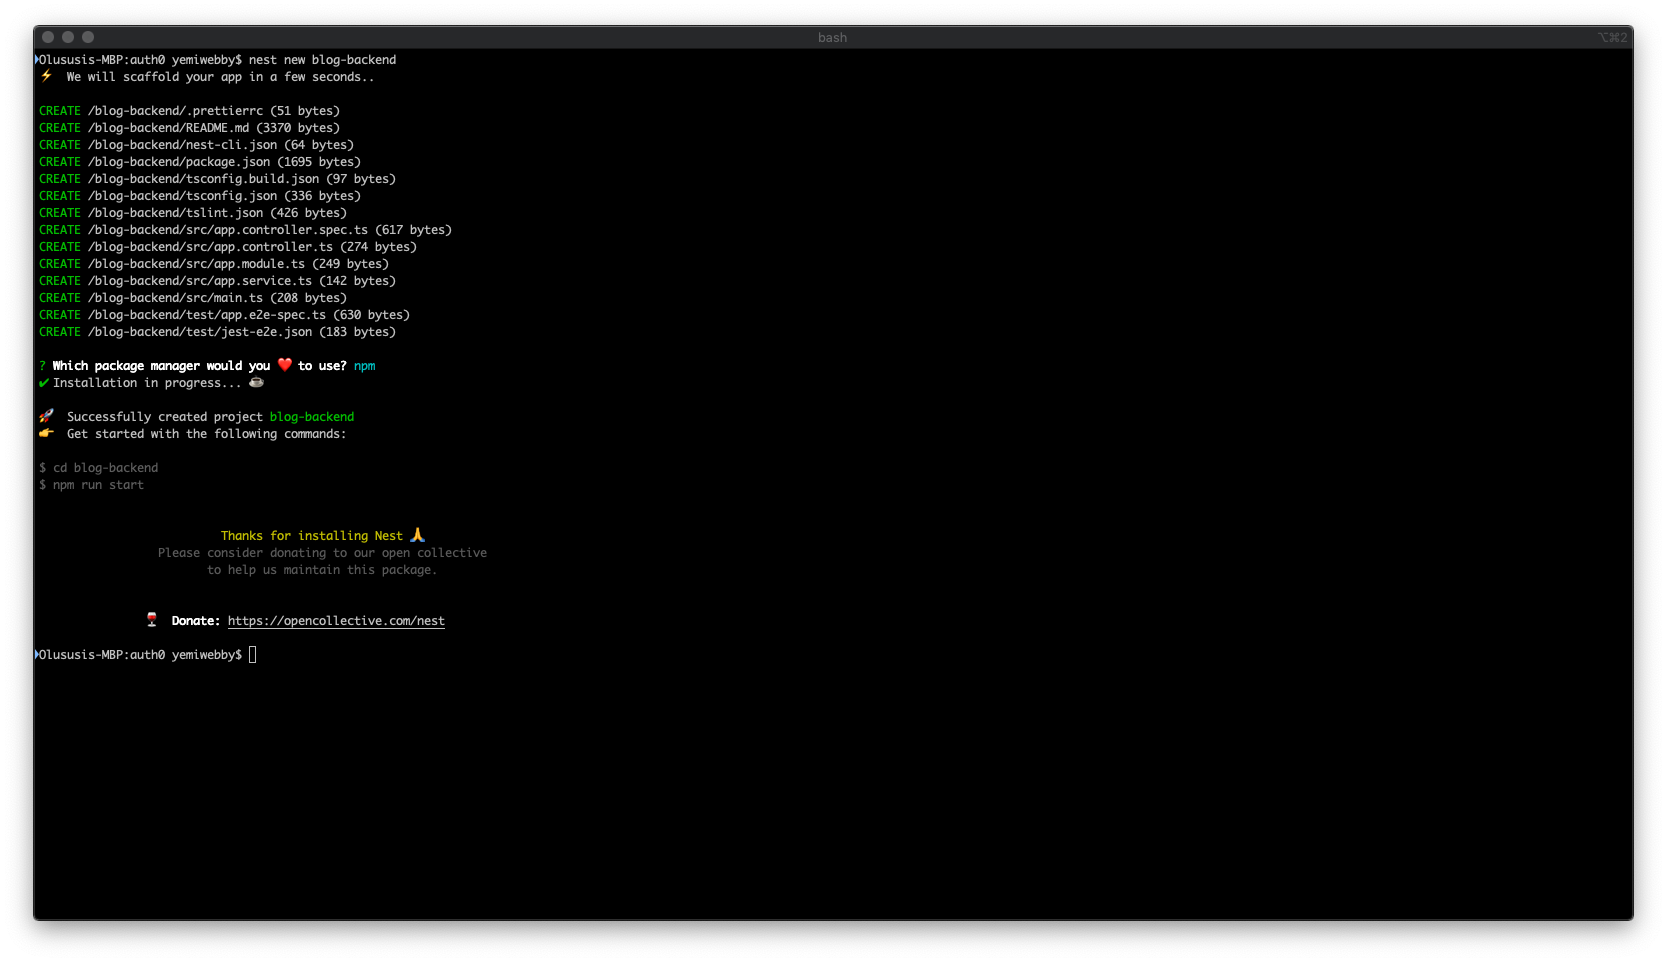
nestnest new blog-backend
Immediately after running the preceding command,
nestnpmENTERThis will create a new Nest.js project in a
blog-backend// change directory cd blog-backend // install dependency npm install --save @nestjs/mongoose mongoose
Because Nest.js supports integrating with MongoDB database by using Mongoose, what you have done here is to install
mongoose@nestjs/mongooseOnce the installation process is complete, you can then easily import the
MongooseModuleNext, before you start the application, open the project using your code editor, and edit the default port as shown below:
// /blog-backend/src/main.ts

import { NestFactory } from '@nestjs/core';
import { AppModule } from './app.module';
async function bootstrap() {
  const app = await NestFactory.create(AppModule);
  await app.listen(5000);// edit this
}
bootstrap();
What you have done here is to change the default port of Nest.js to
50003000With that done, start the application using the following command:
npm run start:dev
This will run the application on port
5000In this section, you have successfully installed the Nest CLI and leveraged it to generate the project for this tutorial. You then proceeded to run the application on the default port
5000Configuring a database connection
In this section, you will start by setting up the configuration necessary for database connection, which includes configuring and integrating MongoDB into your application. As instructed in the prerequisites section of this tutorial, you should have MongoDB installed by now. If this is your first time installing it, you should have it running automatically at the moment and might not be necessary to start it. To check if MongoDB is currently running, open a different terminal window to keep the backend application running and run the following command :
ps aux | grep -v grep | grep mongod
If an output similar to the one below is displayed in your terminal, then MongoDB is running:
root  4190   0.0  0.1  4349676   7476 s001  S+    9:58AM   0:00.04 sudo mongod
root  4191   0.0  0.5  5560120  43160 s001  S+    9:58AM   0:00.86 mongod
Otherwise, execute the following command to start MongoDB:
sudo mongod
Note: MongoDB usually stores data in
within the root directory of your computer’s operating system, but If your operating system is macOS Catalina or ran into an error while running the command above, the root folder is not writable. To handle this, you will have to create a different directory in another location and reference that path when running the command, as shown here:/data/dbsudo mongod --dbpath=/Users/<user>/data/db
This will start the MongoDB service and run the database in the background while waiting for connections from your application.
Next, open this file
./src/app.module.ts// blog-backend/src/app.module.ts import { Module } from '@nestjs/common'; import { AppController } from './app.controller'; import { AppService } from './app.service'; import { MongooseModule } from '@nestjs/mongoose'; // add this @Module({ imports: [ MongooseModule.forRoot('mongodb://localhost/nest-blog-project', { useNewUrlParser: true }), ], controllers: [AppController], providers: [AppService], }) export class AppModule {}
Here, you imported the
MongooseModuleAppModuleforRoot()Setting up a database schema and interface
Here, you will define the structure and datatype of the data in your application by creating a TypeScript interface, which will be used for type-checking and to define the types of data that should be passed into the application. Also, you will create a database schema, as Mongoose tends to derive everything from a Schema defined within a particular application.
To begin, go back to the terminal where the application is currently running and stop the process with
CTRL + C./src/blogschemasblogThis new directory will house all the database schema that will be required by your application. Now, create a schema file and called it
blog.schema.tsschemas// blog-backend/src/blog/schemas/blog.schema.ts import * as mongoose from 'mongoose'; export const BlogSchema = new mongoose.Schema({ title: String, description: String, body: String, author: String, date_posted: String, });
This definition specifies that all fields will store and only accept string values. With this in place, the datatype of data that will be stored in the database will be properly controlled.
Next, you will create the interface majorly for type-checking. To begin, create a new directory named
interfaces/blog-backend/src/blogpost.interface.ts// /blog-backend/src/blog/interfaces/post.interface.ts import { Document } from 'mongoose'; export interface Post extends Document { readonly title: string; readonly description: string; readonly body: string; readonly author: string; readonly date_posted: string; }
Here you have successfully defined the types of data for a
PostCreating a Data Transfer Object (DTO)
A data transfer object will help define how data will be sent over the network and control how data will be posted from the application to the database. To achieve this, create a directory
dto./src/blogcreate-post.dto.ts// /blog-backend/src/blog/dto/create-post.dto.ts export class CreatePostDTO { readonly title: string; readonly description: string; readonly body: string; readonly author: string; readonly date_posted: string; }
From the preceding code snippet, you have marked each of the individual properties in the
CreatePostDTOstringread-onlyCreating the blog module
Module in Nest.js is a class annotated with a
@Module()nestblog-backendnest generate module blog
The command above will generate a new module named
blog.module.tsBlogModule// /blog-backend/src/blog/blog.module.ts import { Module } from '@nestjs/common'; @Module({}) export class BlogModule {}
You will update this
BlogModuleCreating Nest.js services and controllers
Here you will generate a service, also known as a provider, and afterward, you will create a controller to handle all HTTP requests from the application. Services in Nest.js are meant only to handle any complex business logic for a specific purpose and return the appropriate response to the controller.
Create service
Run the following command while you are still within the project directory to generate a new service file:
nest generate service blog
The thing to note here is that the
nestblog.service.spec.tsblog.service.tsblog.module.tsOpen the newly created
blog.service.ts// /blog-backend/src/blog/blog.service.ts import { Injectable } from '@nestjs/common'; import { Model } from 'mongoose'; import { InjectModel } from '@nestjs/mongoose'; import { Post } from './interfaces/post.interface'; import { CreatePostDTO } from './dto/create-post.dto'; @Injectable() export class BlogService { constructor(@InjectModel('Post') private readonly postModel: Model<Post>) { } async addPost(createPostDTO: CreatePostDTO): Promise<Post> { const newPost = await this.postModel(createPostDTO); return newPost.save(); } async getPost(postID): Promise<Post> { const post = await this.postModel .findById(postID) .exec(); return post; } async getPosts(): Promise<Post[]> { const posts = await this.postModel.find().exec(); return posts; } }
In this file, you first imported the required module from
@nestjs/commonmongoose@nestjs/mongoosePostCreatePostDTOconstructor@InjectModel('Post')PostBlogServiceNext, you created
addPost()getPost()getPosts()Lastly, within this file, to enable editing and deleting any created post, you need to add the following immediately after the
getPosts()// /blog-backend/src/blog/blog.service.ts ... @Injectable() export class BlogService { ... async editPost(postID, createPostDTO: CreatePostDTO): Promise<Post> { const editedPost = await this.postModel .findByIdAndUpdate(postID, createPostDTO, { new: true }); return editedPost; } async deletePost(postID): Promise<any> { const deletedPost = await this.postModel .findByIdAndRemove(postID); return deletedPost; } }
All the methods created above will help facilitate proper interaction with the MongoDB database from the backend API. You can now proceed to create the required routes that will handle HTTP calls from a front-end client.
Create a new controller
Controllers in Nest.js are meant to receive incoming HTTP requests from an application frontend and return an appropriate response. This will ensure that the controller is not bloated as most of the business logic has been abstracted to a service.
You have created the service earlier, so here, you will leverage the
nestblog-backendnest generate controller blog
The preceding command created two new files within the
src/blogblog.controller.spec.tsblog.controller.ts@Controllerblog.controller.ts// /blog-backend/src/blog/blog.controller.ts import { Controller, Get, Res, HttpStatus, Param, NotFoundException, Post, Body, Put, Query, Delete } from '@nestjs/common'; import { BlogService } from './blog.service'; import { CreatePostDTO } from './dto/create-post.dto'; import { ValidateObjectId } from './shared/pipes/validate-object-id.pipes'; @Controller('blog') export class BlogController { constructor(private blogService: BlogService) { } // Submit a post @Post('/post') async addPost(@Res() res, @Body() createPostDTO: CreatePostDTO) { const newPost = await this.blogService.addPost(createPostDTO); return res.status(HttpStatus.OK).json({ message: 'Post has been submitted successfully!', post: newPost, }); } // Fetch a particular post using ID @Get('post/:postID') async getPost(@Res() res, @Param('postID', new ValidateObjectId()) postID) { const post = await this.blogService.getPost(postID); if (!post) { throw new NotFoundException('Post does not exist!'); } return res.status(HttpStatus.OK).json(post); } // Fetch all posts @Get('posts') async getPosts(@Res() res) { const posts = await this.blogService.getPosts(); return res.status(HttpStatus.OK).json(posts); } }
From the code snippet above, you imported all the necessary modules to handle HTTP requests from
@nestjs/commonBlogServiceCreatePostDTOValidateObjectIdValidateObjectIdTo have access to all the functions declared within the
BlogService
: This method will carry out the functionality of receiving an HTTP GET request from the client to fetch all posts from the database and then return the appropriate response. It is decorated with agetPosts()
.@Get('posts')
: This takes agetPost()
as a parameter and fetches a single post from the database. In addition to thepostID
parameter passed to this method, you realized the addition of an extra method namedpostID
. This method implements theValidateObjectId()
interface from Nest.js. Its purpose is to validate and ensure that thePipeTransform
parameter can be found in the database. You will define this method in the next section.postID
: This method will handle a POST HTTP request to add a new post to the database.addPost()
For editing and deleting a particular post, add two more methods to the
blog.controller.tseditPost()deletePost()addPost()// /blog-backend/src/blog/blog.controller.ts ... @Controller('blog') export class BlogController { ... // Edit a particular post using ID @Put('/edit') async editPost( @Res() res, @Query('postID', new ValidateObjectId()) postID, @Body() createPostDTO: CreatePostDTO, ) { const editedPost = await this.blogService.editPost(postID, createPostDTO); if (!editedPost) { throw new NotFoundException('Post does not exist!'); } return res.status(HttpStatus.OK).json({ message: 'Post has been successfully updated', post: editedPost, }); } // Delete a post using ID @Delete('/delete') async deletePost(@Res() res, @Query('postID', new ValidateObjectId()) postID) { const deletedPost = await this.blogService.deletePost(postID); if (!deletedPost) { throw new NotFoundException('Post does not exist!'); } return res.status(HttpStatus.OK).json({ message: 'Post has been deleted!', post: deletedPost, }); } }
Here you have added:
: This method accepts a query parameter ofeditPost()
and will carry out the functionality of updating a single post. It also made use of thepostID
method to provide proper validation for the post that you need to edit.ValidateObjectId
: This method will accept a query parameter ofdeletePost()
and will delete a particular post from the database.postID
Similarly to the
BlogControllerFor example, the
BlogControllerbloggetPosts()postsblog/postshttp:localhost:3000/blog/postsgetPosts()Validation for Mongoose with Pipes
Navigate to the
blogsharedpipesvalidate-object-id.pipes.tspostID// /blog-backend/src/blog/shared/pipes/validate-object-id.pipes.ts import { PipeTransform, Injectable, ArgumentMetadata, BadRequestException } from '@nestjs/common'; import * as mongoose from 'mongoose'; @Injectable() export class ValidateObjectId implements PipeTransform<string> { async transform(value: string, metadata: ArgumentMetadata) { const isValid = mongoose.Types.ObjectId.isValid(value); if (!isValid) { throw new BadRequestException('Invalid ID!'); } return value; } }
The
ValidateObjectId()PipeTransform@nestjs/commontransform()postIDpostIDAfter creating both the service and controller, you need to set up the
PostBlogSchemaApplicationModuleBlogModule./src/blog/blog.module.ts// /blog-backend/src/blog/blog.module.ts import { Module } from '@nestjs/common'; import { BlogService } from './blog.service'; import { BlogController } from './blog.controller'; import { MongooseModule } from '@nestjs/mongoose'; // add this import { BlogSchema } from './schemas/blog.schema'; // and this @Module({ imports: [ MongooseModule.forFeature([{ name: 'Post', schema: BlogSchema }]), ], // add providers: [BlogService], controllers: [BlogController] }) export class BlogModule {}
This module uses the
MongooseModule.forFeature()PostModelBlogService@injectModel()Test without authentication
Go back to the terminal and test the application by running the following command from the terminal while you are still within the project’s directory:
npm run start:dev
The preceding command will run the application in watch mode to track any new changes while the application is still running.
Note: Ensure that the MongoDB instance is still running from the other terminal as mentioned earlier. Otherwise, open another terminal and run
to start the MongoDB process in the background. You can use Postman to test the API. Postman is a testing tool to confirm and check the behavior of your web service before deploying to production.sudo mongod
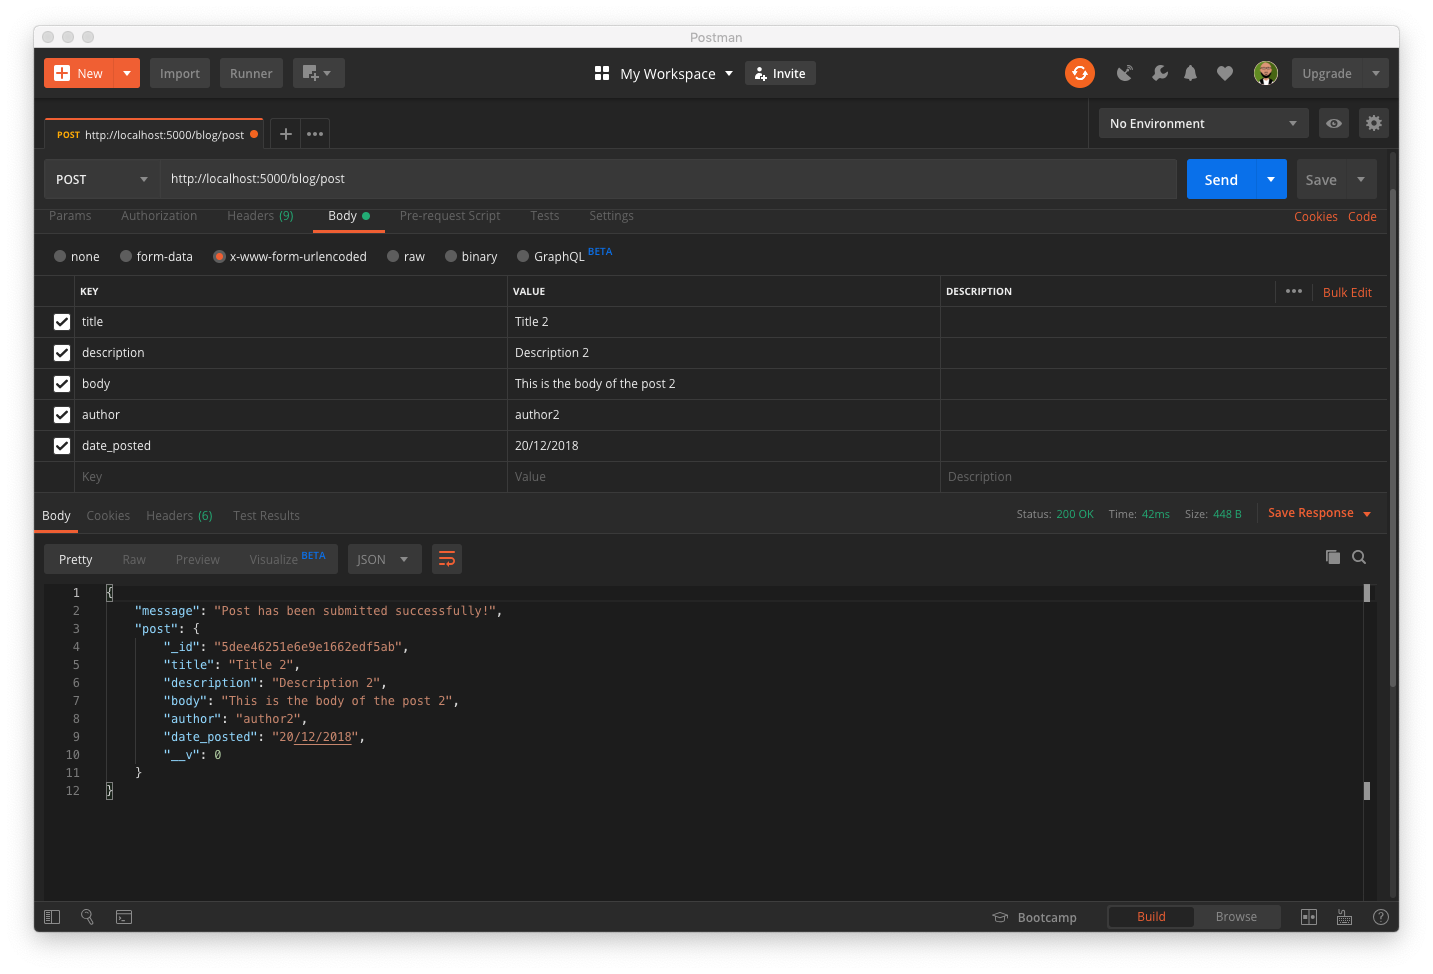
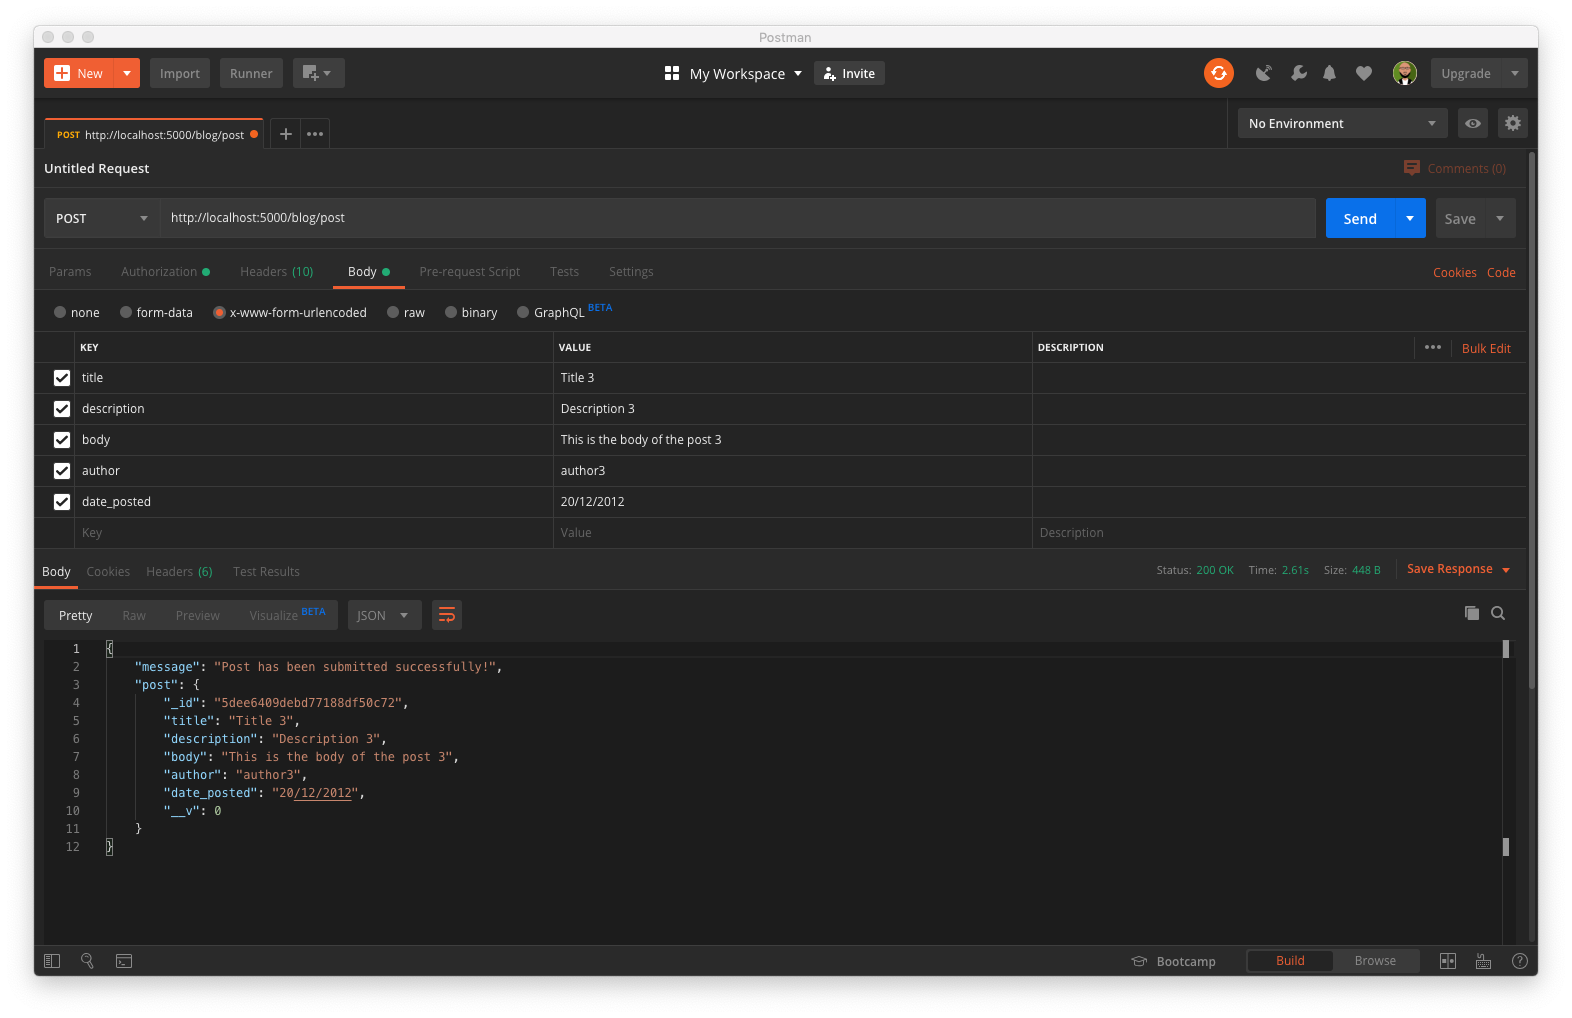
Create a post using the application
As shown here, a POST HTTP call was made to http://localhost:5000/blog/post endpoint with the details of a blog post. After a successful process, the created post was returned as a response with a message indicating that it was created successfully.
View post
From the screenshots above, it is obvious that all the implemented logic for your backend API is working properly, but this raises another concern. Any random user can easily make an API call to retrieve or create a new post without authentication and succeed. This is not acceptable as the applications need to be smart enough to manage the identity of users.
To make the API protected, first, you will need an Auth0 account, create a new account if you don’t have one already.
Try out the most powerful authentication platform for free.
Get started →Securing Nest.js with Auth0 and managing the identity of users
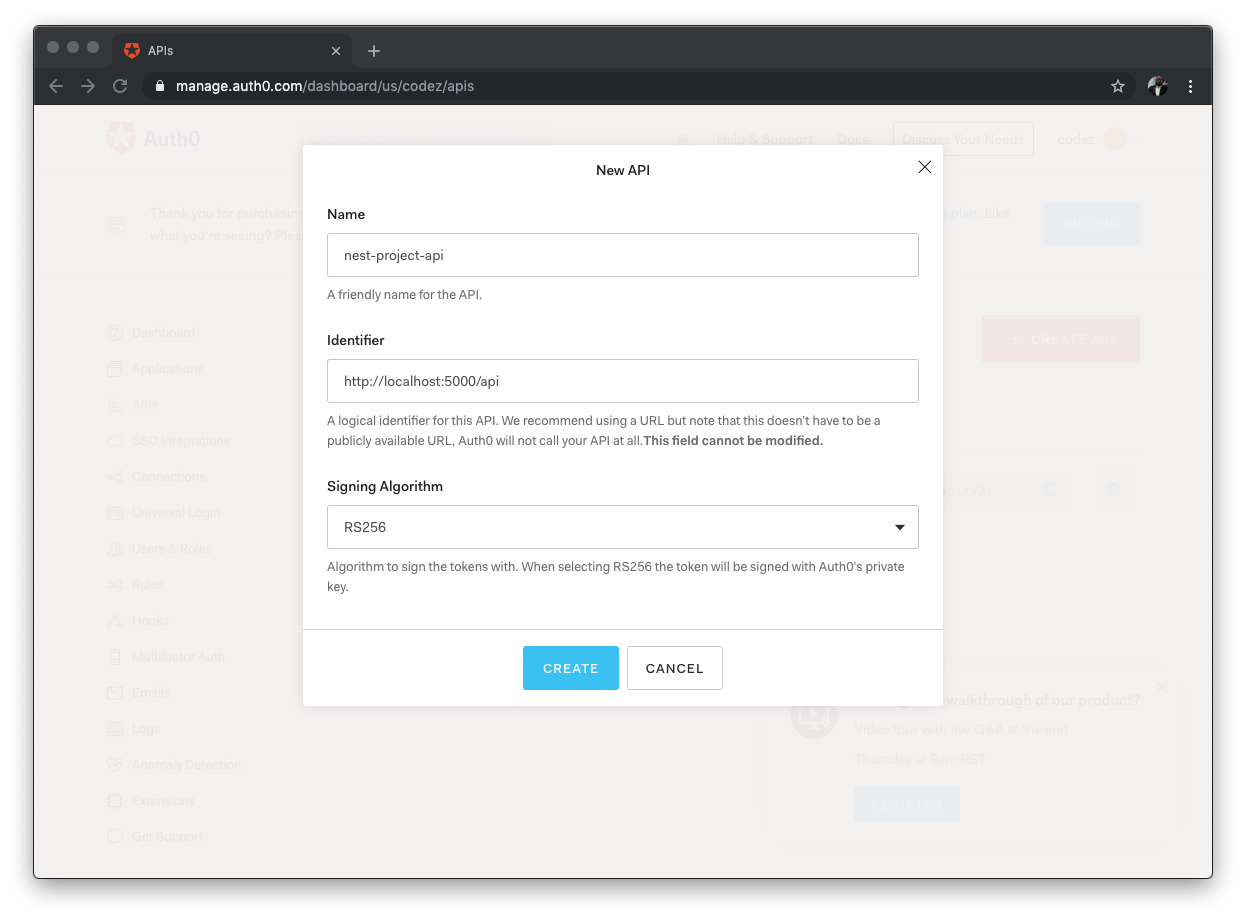
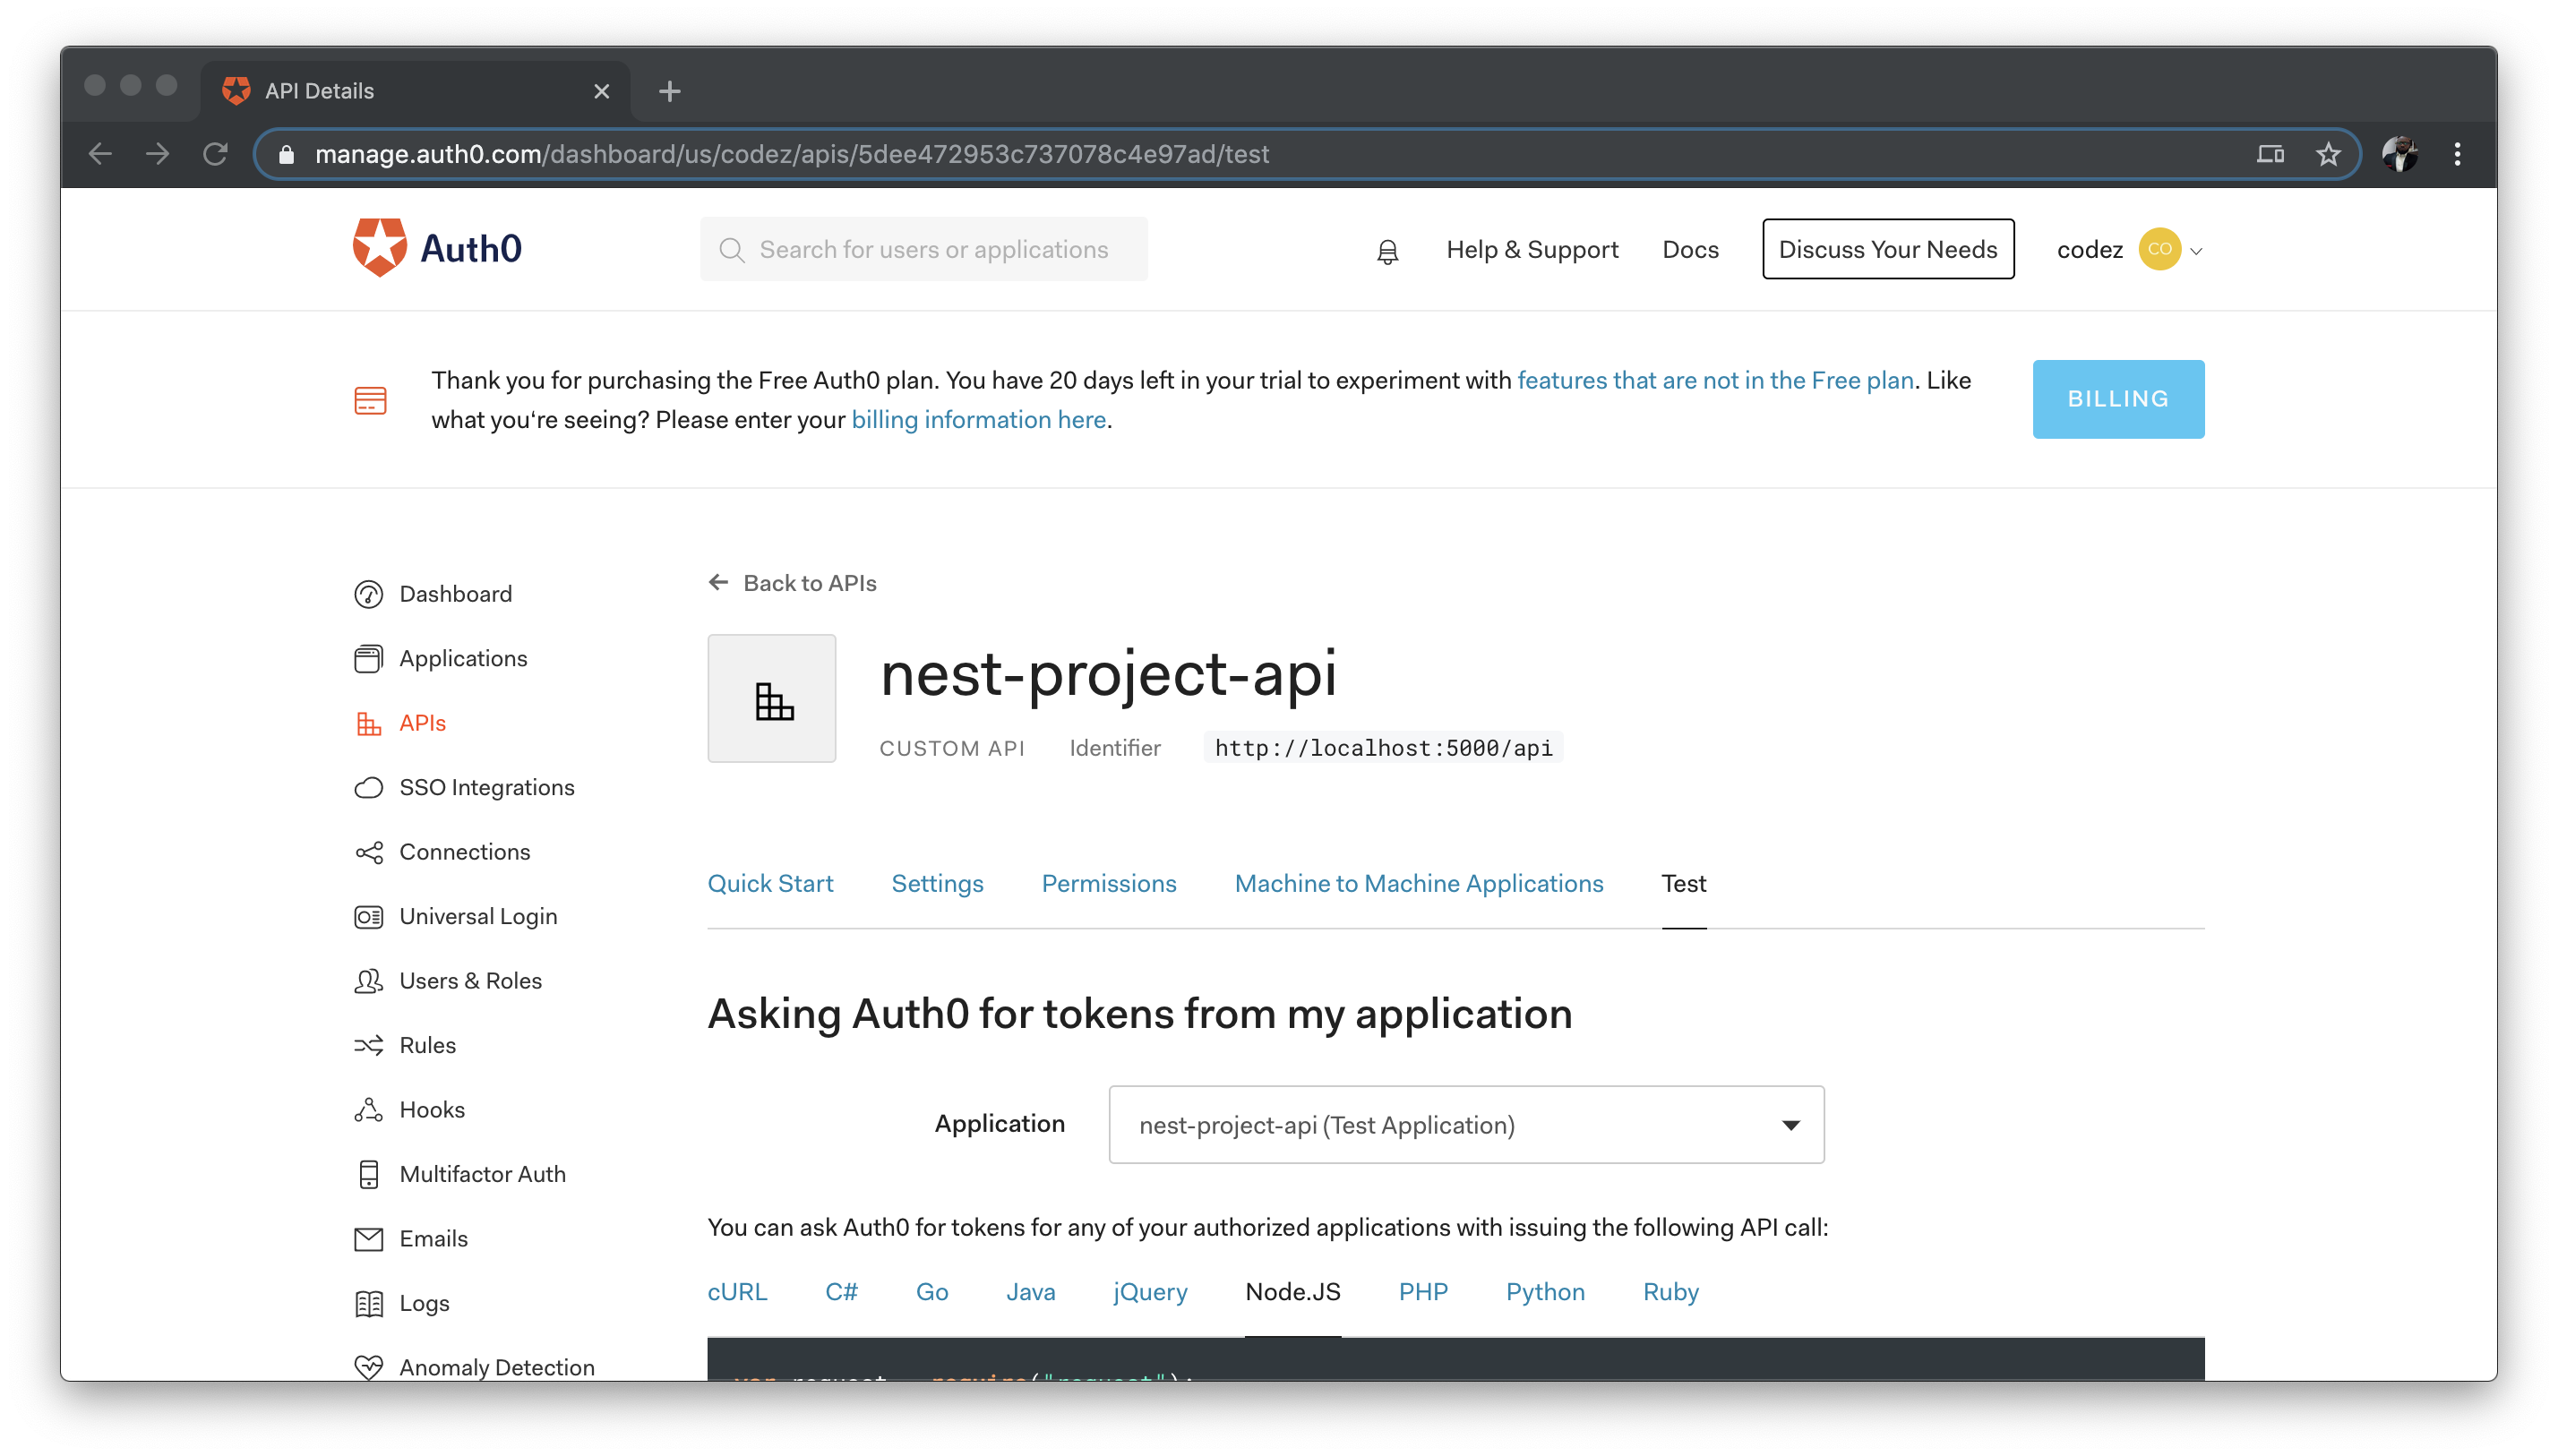
After creating an account, log in to it and head over to the API section of your Auth0 management dashboard and select APIs from the side menu. This will show you your list of APIs if you have created any for your account, but for this tutorial, go ahead and click on the CREATE API button and set up a new one. Next, provide a friendly name as you deem fit for your API. Set the identifier as
http://localhost:5000/apiRS256Immediately when you created this API, Auth0 also automatically created a test application for you to use. This is a machine-to-machine application that you will only use here for testing purposes for this part of the tutorial. You will create a new single-page application that will represent the front-end React app in the next part of the tutorial.
Next, click on "Applications" from the side menu to view the list of applications for your account and select the test application that was generated. You will then click on the "Settings" tab.
Now locate the Allowed Callback URLs fields and add
http://localhost:3000DomainClient IDClient SecretDefining a Nest.js authentication middleware
To protect your routes and ensure that every user gets authenticated before accessing some of the resources provided by your API, you will make use of Auth0.
How this will work is that once a user is authenticated by Auth0, an access token will be generated for such user to make API calls subsequently. To verify the generated JWT token issued by Auth0, you will make use of Express middleware provided by
express-jwtStop the application if running and install the following libraries:
npm install express-jwt jwks-rsa dotenv
Included in the libraries above is a
dotenv.envTo easily access and reference credentials such as the
Domain.envAUTH0_DOMAIN=YOUR_AUTH0_DOMAIN AUTH0_AUDIENCE=http://localhost:5000/api
Replace the
YOUR_AUTH0_DOMAINTo configure the authentication middleware that will ensure that every call to your protected endpoint is identified by an access token, create a folder named
commonsrcauthentication.middleware.ts// blog-backend/src/common/authentication.middleware.ts import { Injectable, NestMiddleware } from '@nestjs/common'; import * as jwt from 'express-jwt'; import { expressJwtSecret } from 'jwks-rsa'; import { Request, Response } from 'express'; import * as dotenv from 'dotenv'; dotenv.config(); @Injectable() export class AuthenticationMiddleware implements NestMiddleware { use(req: Request, res: Response, next: Function) { jwt({ secret: expressJwtSecret({ cache: true, rateLimit: true, jwksRequestsPerMinute: 5, jwksUri: `https://${process.env.AUTH0_DOMAIN}/.well-known/jwks.json`, }), issuer: `https://${process.env.AUTH0_DOMAIN}/`, algorithms: ['RS256'], })(req, res, (err) => { if (err) { const status = err.status || 500; const message = err.message || 'Sorry we were unable to process your request.'; return res.status(status).send({ message, }); } next(); }); } }
This code will check if the Access Token included in a request is valid. If the token is not valid, the user will get a message indicating that the authorization token is not valid.
After this, navigate back to the
blog.module.tsimport { Module, NestModule, MiddlewareConsumer, RequestMethod } from '@nestjs/common'; import { BlogService } from './blog.service'; import { BlogController } from './blog.controller'; import { MongooseModule } from '@nestjs/mongoose'; import { BlogSchema } from './schemas/blog.schema'; import { AuthenticationMiddleware } from 'src/common/authentication.middleware'; @Module({ imports: [ MongooseModule.forFeature([{ name: 'Post', schema: BlogSchema }]), ], // add this providers: [BlogService], controllers: [BlogController] }) export class BlogModule implements NestModule { configure(consumer: MiddlewareConsumer): MiddlewareConsumer | void { consumer.apply(AuthenticationMiddleware).forRoutes( { method: RequestMethod.POST, path: '/blog/post' }, { method: RequestMethod.PUT, path: '/blog/edit' }, { method: RequestMethod.DELETE, path: '/blog/delete' } ) } }
With this implementation, any subsequent requests without an Access Token to the following routes will not be allowed by the application:
GET /blog/postPUT /blog/editDELETE /blog/delete
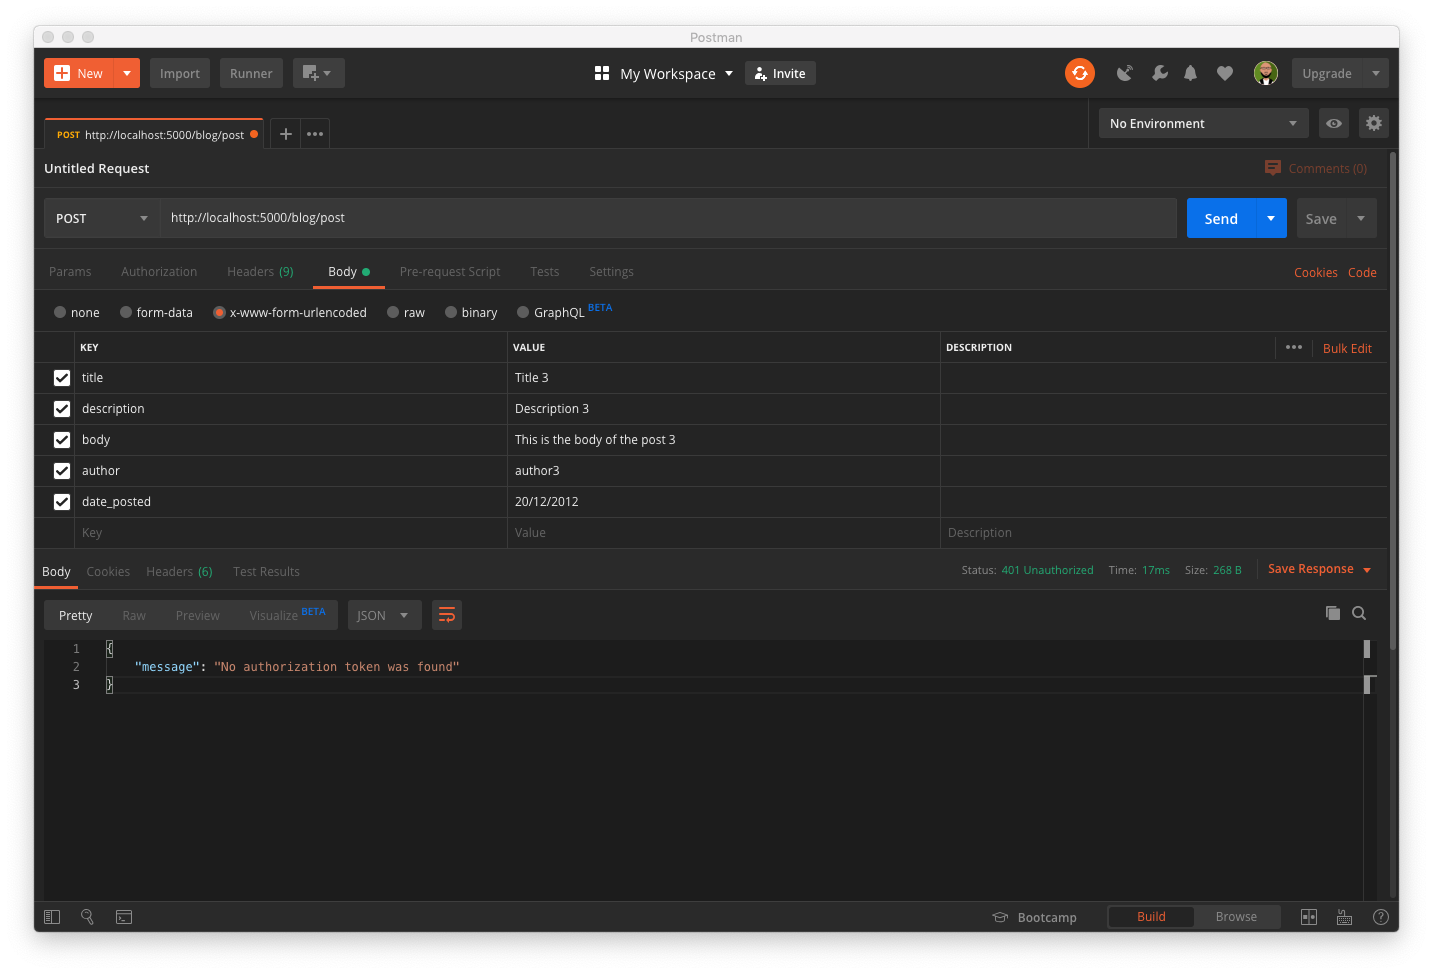
To test this out, start the application and the MongoDB instance again using
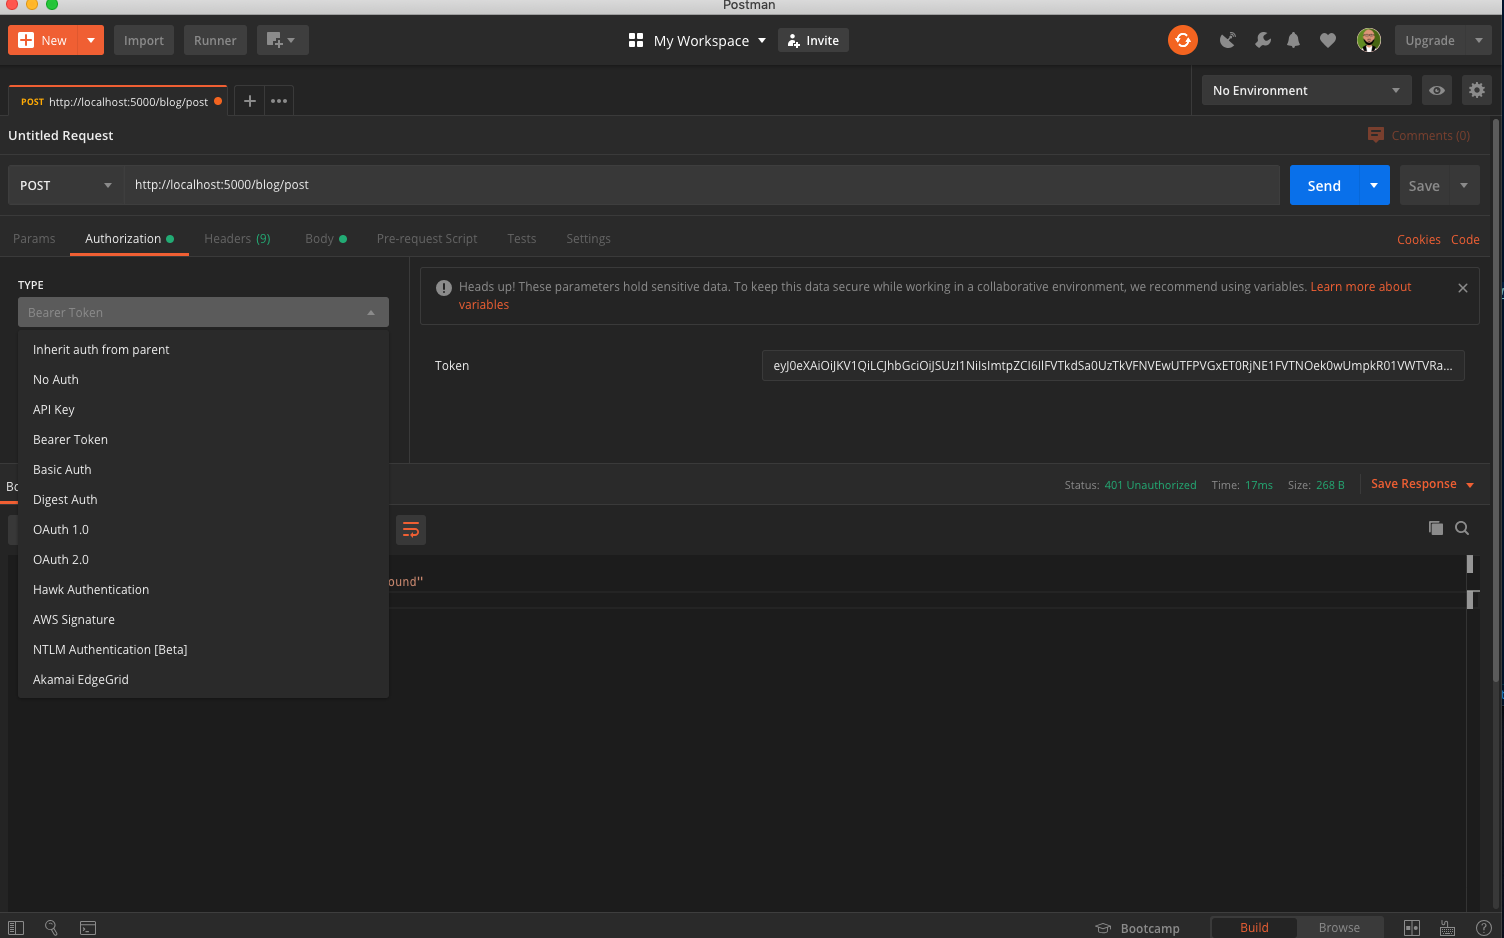
npm run start:devsudo mongodPOSThttp://localhost:5000/blog/postIn the next part of this series, you will have the opportunity to generate an access token on the fly once authenticated by Auth0. But as a proof of concept, for now, you can obtain a test access token for your API from the Auth0 account management dashboard. Access the API section in your Auth0 dashboard and click on the API that was created earlier.
Now click on the
TestNext, open up Postman and from the Authorization tab, select
Bearer TokenTest all endpoints using Postman
Now, you can try to access all the protected endpoints:
Conclusion
In this tutorial, you were able to successfully build an API using Nest.js and then persist data into your database using MongoDB. You went further to protect some of the endpoints with the application by ensuring and verifying the JWT (JSON Web Token) issued by Auth0.
This is the first part of this series, and from the second part, you will set up a user interface and create frontend logic using React and TypeScript.
About Auth0
Auth0 by Okta takes a modern approach to customer identity and enables organizations to provide secure access to any application, for any user. Auth0 is a highly customizable platform that is as simple as development teams want, and as flexible as they need. Safeguarding billions of login transactions each month, Auth0 delivers convenience, privacy, and security so customers can focus on innovation. For more information, visit https://auth0.com.
About the author

Olususi Oluyemi
Software Engineer / Technical Content Creator
