
Having control over who can access your API is a necessary requirement to make your application secure. This article will show you how to restrict access to your ASP.NET Core Web API to authorized users only.
Setting up the Web API Application
Let's start by setting up the ASP.NET Core Web API application to be protected. You can download a glossary Web API from this GitHub repository by running the following command in a terminal window:
git clone --branch starter --single-branch https://github.com/auth0-blog/glossary-web-api-aspnet.git
This ASP.NET application provides you with a CRUD Web API to manage a glossary of terms. You can learn the details of its implementation by reading this article.
Once you download the application, move to the
glossary-web-api-aspnetdotnet runhttps://localhost:5001/swagger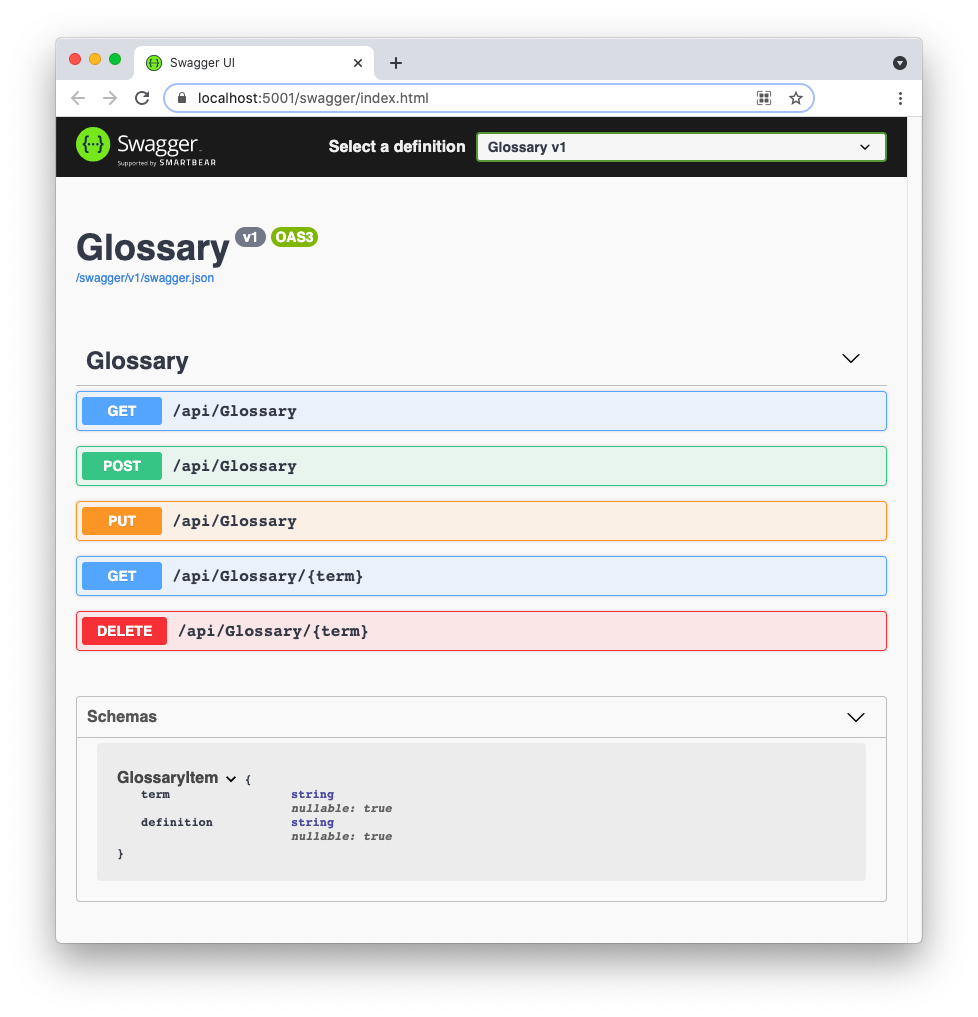
The Web API application allows you to get a list of term definitions or a single term definition. It also lets you create a new definition and modify or delete an existing one.
The current implementation of this glossary Web API allows anyone to perform all the available operations on the glossary. Most probably, you want to allow everyone to get a single glossary item or the full glossary. Still, only authorized users should be enabled to create, update, and delete glossary items.
Let's go and see how to protect these three actions by integrating your ASP.NET Core Web API with Auth0 services.
Registering the Web API with Auth0
To start securing your API with Auth0, you need an Auth0 account. If you haven't got one, you can sign up for a free one. Now, you can register your Web API through the Auth0 Dashboard. Move to the API section of the Dashboard and follow these steps:
- Click on Create API
- Provide a friendly name for your API (for example, Glossary API) and a unique identifier in the URL format (for example, https://glossary.com)
- Leave the signing algorithm as RS256 and click the Create button
These steps make Auth0 aware of your Web API and will allow you to control access.
Note: While you are in the Auth0 Dashboard, take note of your Auth0 domain. You will need it soon. This is a string in the form
whereYOUR-TENANT-NAME.auth0.comis the name you provided when you created your account with Auth0. For more information, check the documentation.YOUR-TENANT-NAME
Using the Auth0 CLI
As an alternative to the Dashboard, you can use the Auth0 CLI to register your API with Auth0.
In this case, install the CLI on your machine and configure it to access your Auth0 tenant. Then, run the following command in a terminal window:
auth0 apis create --name "Glossary API" --identifier https://glossary.com --scopes ""
This command creates an entry for your API with the name Glossary API and the unique identifier
https://glossary.comRunning this command has exactly the same effect as registering your API through the Auth0 Dashboard.
After the registration, you will get an output like the following:
=== <YOUR_AUTH0_DOMAIN> API created

ID          60ac3b89f0cd4a003d42e850
NAME        Glossary API
IDENTIFIER  https://glossary.com
SCOPES
Take note of the values for the
<YOUR_AUTH0_DOMAIN>Enabling Authorization Support
The next step is to adapt the ASP.NET Core Web API application's code to use Auth0 authorization services.
Configuring the Web API
Back in your ASP.NET application, open the
appsettings.json{ "Logging": { "LogLevel": { "Default": "Information", "Microsoft": "Warning", "Microsoft.Hosting.Lifetime": "Information" } }, "AllowedHosts": "*", "Auth0": { "Domain": "YOUR_AUTH0_DOMAIN", "Audience": "YOUR_UNIQUE_IDENTIFIER" } }
Replace the
YOUR_AUTH0_DOMAINYOUR_UNIQUE_IDENTIFIERhttps://glossary.comIntegrating with Auth0
In order to interact with the Auth0 authorization services, your application needs to be able to handle tokens in the JWT (JSON Web Token) format. You can accomplish this by installing the
Microsoft.AspNetCore.Authentication.JwtBearerdotnet add package Microsoft.AspNetCore.Authentication.JwtBearer
When the installation is complete, open the
Startup.csJwtBearerusing//Startup.cs ...existing code... using Microsoft.OpenApi.Models; using Microsoft.AspNetCore.Authentication.JwtBearer; //👈 new code namespace Glossary { //...existing code... }
In the same file, replace the
ConfigureServices()Startup//Startup.cs // ...existing code... public void ConfigureServices(IServiceCollection services) { //👇 new code services.AddAuthentication(options => { options.DefaultAuthenticateScheme = JwtBearerDefaults.AuthenticationScheme; options.DefaultChallengeScheme = JwtBearerDefaults.AuthenticationScheme; }).AddJwtBearer(options => { options.Authority = $"https://{Configuration["Auth0:Domain"]}/"; options.TokenValidationParameters = new Microsoft.IdentityModel.Tokens.TokenValidationParameters { ValidAudience = Configuration["Auth0:Audience"], ValidIssuer = $"{Configuration["Auth0:Domain"]}", ValidateLifetime = true, }; }); //👆 new code services.AddControllers(); services.AddSwaggerGen(c => { c.SwaggerDoc("v1", new OpenApiInfo { Title = "Glossary", Version = "v1" }); }); } // ...existing code...
You added the authentication service by specifying the JWT bearer scheme. You also configured the JWT handler by using the domain and audience values from the
appsettings.json- it has the expected audience,
- it was issued by the expected domain,
- it is not expired.
Finally, replace the
Configure()Startup//Startup.cs // ...existing code... public void Configure(IApplicationBuilder app, IWebHostEnvironment env) { if (env.IsDevelopment()) { app.UseDeveloperExceptionPage(); } app.UseHttpsRedirection(); app.UseRouting(); app.UseAuthentication(); //👈 new code app.UseAuthorization(); app.UseEndpoints(endpoints => { endpoints.MapControllers(); }); } // ...existing code...
Compared to the previous version, you just added the
app.UseAuthentication()Why do you need authentication?
You may wonder why you need to register the authentication middleware in your ASP.NET Web API. After all, you should only manage authorization. The authentication middleware is needed because it is responsible for creating the security context under which the code is running.
Also, the registration order is important: you need to register the authentication middleware before the authorization middleware.
For more details, check out the ASP.NET Web API authentication and authorization documentation.
A new Auth0-powered .NET app in less than a minute? Try out our templates
Install the Nugget package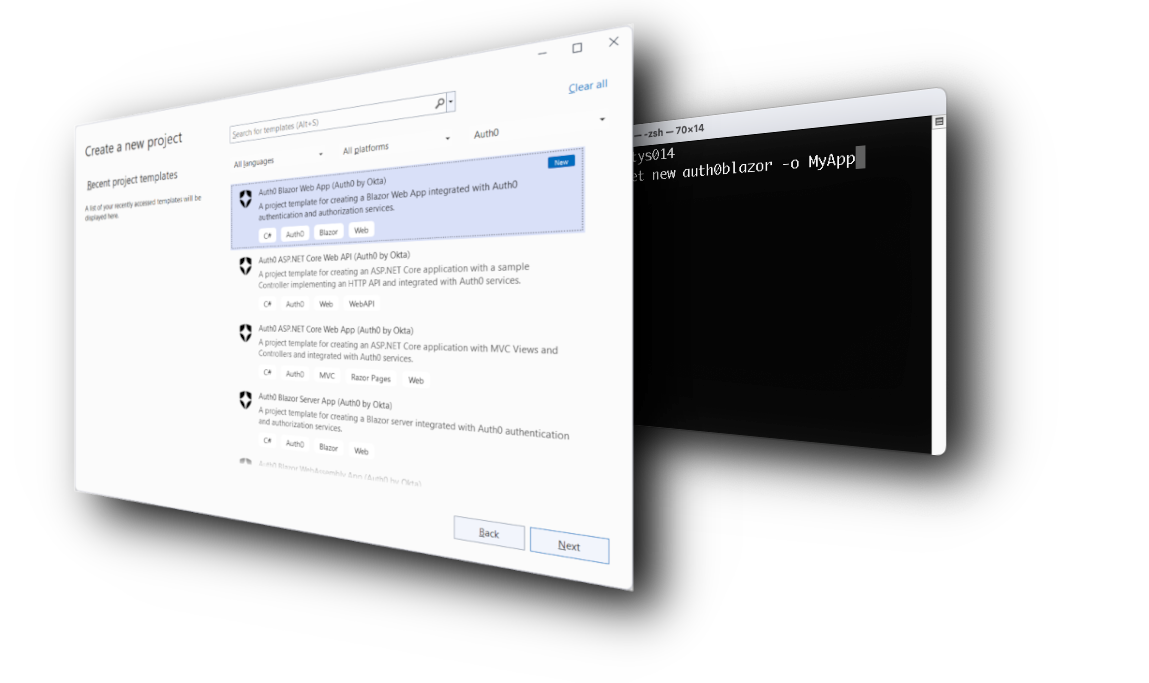
Securing the API Endpoints
Almost everything is ready to secure your application. You just need to protect the actions that allow clients to create, update, and delete glossary items. So, open the
GlossaryController.csControllersMicrosoft.AspNetCore.Authorizationusing//Controllers/GlossaryController.cs using System; using System.Collections.Generic; using Microsoft.AspNetCore.Mvc; using System.IO; using Microsoft.AspNetCore.Authorization; //👈 new code namespace Glossary.Controllers { // ...existing code... }
Now, add the
AuthorizePost()Put()Delete()Delete()//Controllers/GlossaryController.cs // ...existing code... [HttpDelete] [Route("{term}")] [Authorize] //👈 new code public ActionResult Delete(string term) { var glossaryItem = Glossary.Find(item => item.Term.Equals(term, StringComparison.InvariantCultureIgnoreCase)); if (glossaryItem == null) { return NotFound(); } else { Glossary.Remove(glossaryItem); return NoContent(); } } // ...existing code...
As you can see, the only difference is the
AuthorizeNote: You may be wondering if the order of the attributes applied to a method or to a controller class matters. Their order is internally defined, and it depends on the stage of the HTTP pipeline they are bound to and on their scope (global, class, or method scope). So, from a syntactical point of view, it doesn't matter if you put, for example, the
attribute before or after theAuthorizeone. For more information on this point, check the official documentation.Route
Leverage Auth0's authentication and authorization services in your .NET applications.
DOWNLOAD THE FREE EBOOK
Testing the Secure Web API
In order to ensure that all works as expected, run the application, point your browser to https://localhost:5001/swagger, and test the GET action on the
api/GlossaryTesting unauthorized accesses
Now, try to add a new item to the glossary by using the POST action on the
api/Glossary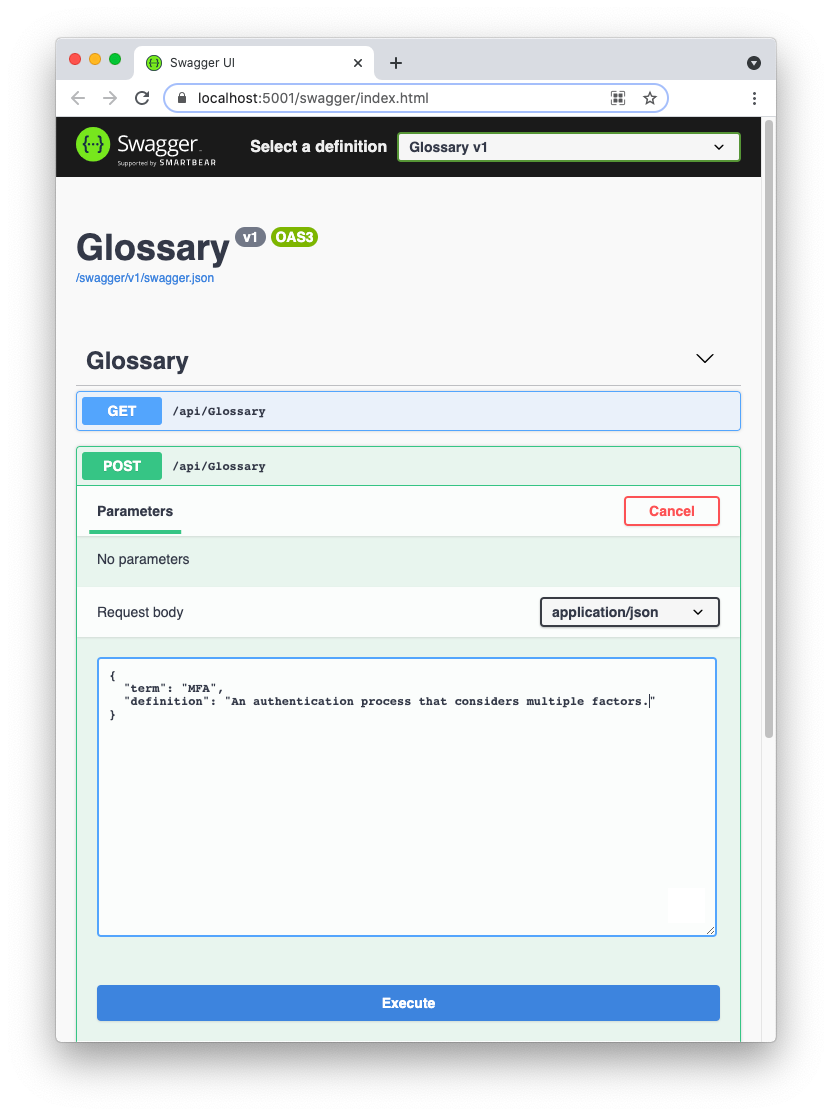
This time you should get a
401 Unauthorized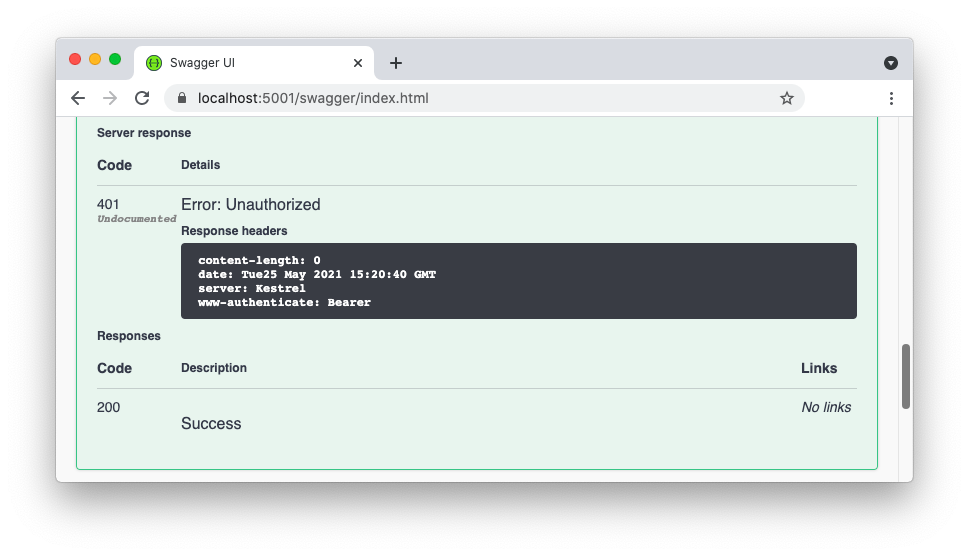
This means that your endpoint is protected: only authorized users can add a new definition to the list. So, in order to add a new item to the glossary, you need to get an access token from Auth0 and make a request to the API endpoint using the Bearer Authorization scheme.
Testing authorized accesses
However, before going ahead, you need a way to provide your access token to the interactive web API documentation. To achieve this goal, edit the
Startup.csConfigureServices()//Startup.cs // ...existing code... public void ConfigureServices(IServiceCollection services) { // ...existing code... services.AddControllers(); services.AddSwaggerGen(c => { c.SwaggerDoc("v1", new OpenApiInfo { Title = "MyProject", Version = "v1.0.0" }); //👇 new code var securitySchema = new OpenApiSecurityScheme { Description = "Using the Authorization header with the Bearer scheme.", Name = "Authorization", In = ParameterLocation.Header, Type = SecuritySchemeType.Http, Scheme = "bearer", Reference = new OpenApiReference { Type = ReferenceType.SecurityScheme, Id = "Bearer" } }; c.AddSecurityDefinition("Bearer", securitySchema); c.AddSecurityRequirement(new OpenApiSecurityRequirement { { securitySchema, new[] { "Bearer" } } }); //👆 new code }); } // ...existing code...
You added a few additional configuration options to your API's Swagger instance. In particular, you defined a security schema and added it to the generated documentation as a security requirement.
Now, restart your ASP.NET Core Web API and take a look at the web page shown at the address https://localhost:5001/swagger:

You see the new Authorize button and the lock icon on each action. You can configure Swagger to get a more accurate UI, but this topic is out of the scope of this article. Please check out the official documentation for more details.
At this point, let's get the access token from Auth0. The simplest way is to access the API section of your Auth0 Dashboard again, select the API that you created before and select the Test tab. In this section, you can get a temporary token to test your Web API by clicking the Copy Token icon as shown in the following picture:

Now, head back to your browser and click the Authorize button. A window dialog opens, as shown in the following picture:
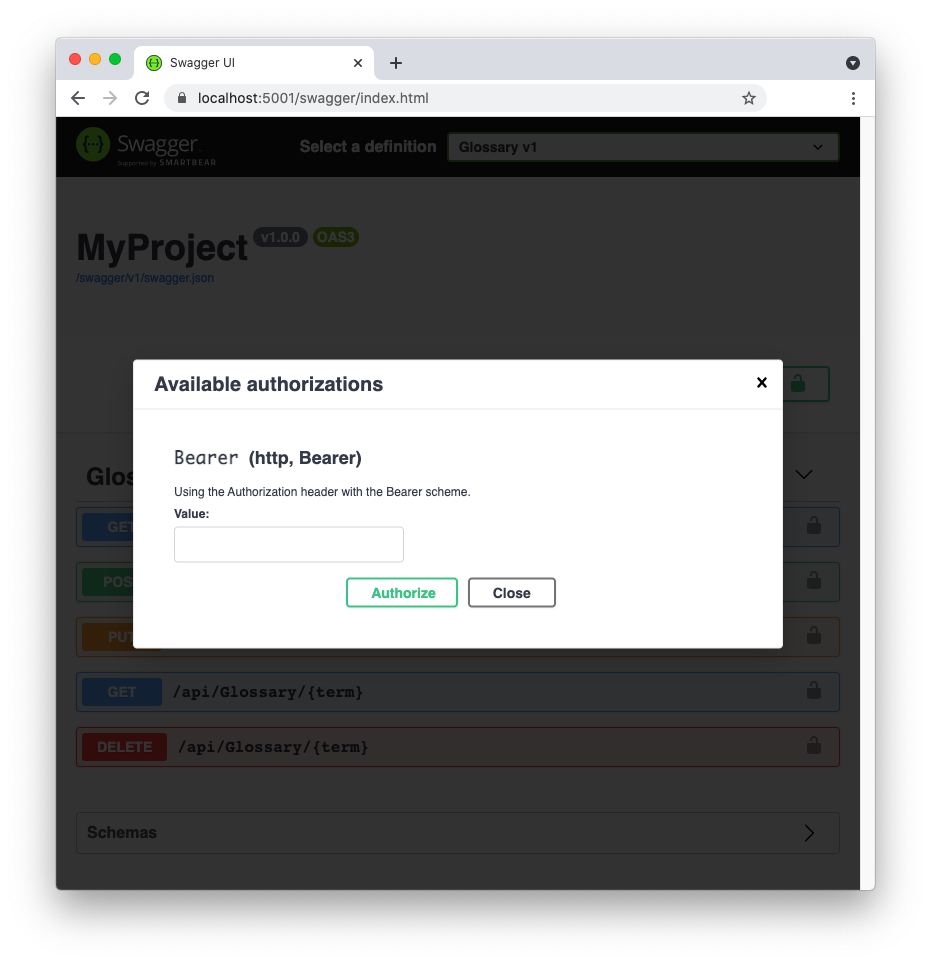
Paste the token you copied from the Auth0 Dashboard into the text box and click Authorize.
With this step, you have configured the interactive documentation to add the Authorization header to each HTTP request. That header's value will be the access token in the form of a bearer token.
If you try to add a new glossary term through the POST action, you should get a successful
201 Created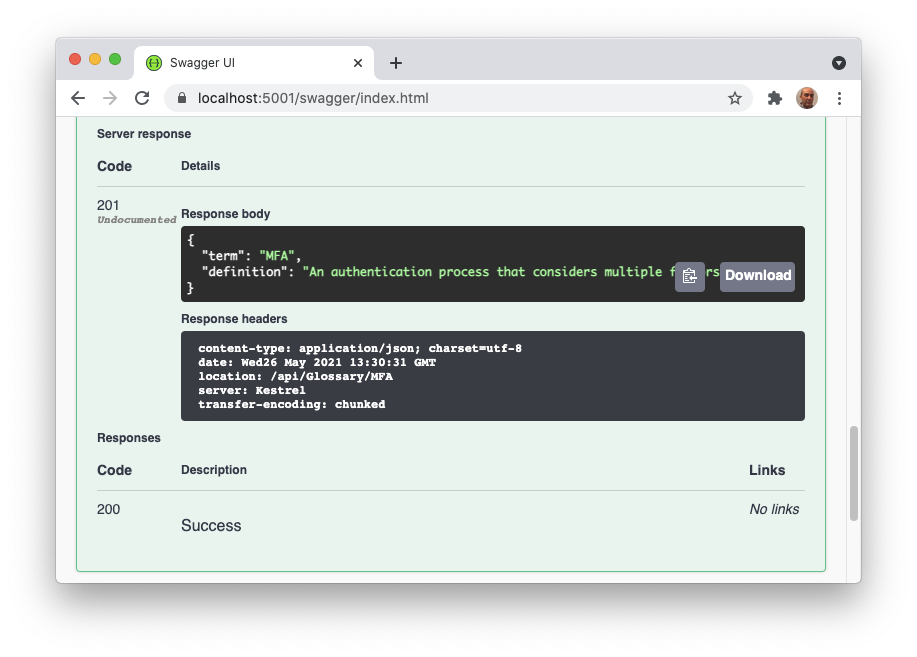
Now your Web API is ready to be securely consumed by clients.
Recap
This article showed you how to protect your ASP.NET Core Web API to prevent unauthorized users from accessing specific endpoints. You learned how to register your Web API application with Auth0, how to enable your ASP.NET application to support authorization, and how to use the autogenerated interactive documentation to test the endpoints.
You can download the full source code of the application from GitHub.
About the author

Andrea Chiarelli
Principal Developer Advocate
I have over 20 years of experience as a software engineer and technical author. Throughout my career, I've used several programming languages and technologies for the projects I was involved in, ranging from C# to JavaScript, ASP.NET to Node.js, Angular to React, SOAP to REST APIs, etc.
In the last few years, I've been focusing on simplifying the developer experience with Identity and related topics, especially in the .NET ecosystem.