

Flutter is Google's cross-platform UI toolkit created to help developers build expressive and beautiful mobile applications. In this article, you will learn how to build and secure a Flutter application with Auth0 using the open-source Auth0 Flutter SDK library. You can check out the code developed throughout the article in this GitHub repository.
Prerequisites
Before getting started with this article, you need a working knowledge of Flutter. If you need help getting started, you can follow the codelabs on the Flutter website.
You also need to have the following installations on your machine:
- Flutter SDK: We tested this tutorial with SDK version 1.17.
A Development Environment, one of:
These IDEs integrate well with Flutter and make your development effective through the provision of tools to edit and refactor your Flutter application code. You will need an installation of the Dart and Flutter plugins, regardless of the IDE you decide to use.
OAuth 2.0 Flow and Mobile Applications
OAuth 2.0 is an industry-standard protocol for authorization. It allows users to give third-party applications access to their resources. You can see a typical example of OAuth 2.0 in action when a user tries to sign up for a third-party app using Google. OAuth 2.0 allows users to give the third-party application access to resources, such as using their profile data on a social network platform, without needing to input their credentials on said application.
OpenID Connect (OIDC) is an authentication protocol on top of OAuth 2.0. It expands the successful delegation model of OAuth 2.0 in many ways, like the ability to sign in, a JWT structured ID token, and discovery.
OAuth 2.0 is not just for web applications. It provides different flows to address authentication requirements for various types of applications. For mobile applications, OAuth 2.0 provides the Authorization Code Grant flow with PKCE, which is the recommended flow that you'll use throughout this tutorial.
A significant benefit of using standards like OAuth 2.0 and OIDC is that you can decouple your application from a particular vendor. You may have different options of open-source software libraries that can help you integrate your application with these two protocols — you don't have to start from scratch.
For your Flutter application using Auth0, you can delegate that integration job to Auth0 Flutter SDK, the official Auth0 library for Flutter applications.
What You'll Build
Throughout this article, you'll build an application that allows users to log in or sign up using a social identity provider, such as Google, or a set of credentials, such as a username and password. You won't have to build any forms, though! The application will leverage a login page provided by Auth0, the Universal Login page. Your application will also have a profile screen where you can display detailed information about the logged-in user and a logout button.
Try out the most powerful authentication platform for free.
Get started →Take a peek of what you'll build:
 |  |
|---|---|
 |  |
If you encounter any issues, the complete source code of the sample application is available on this GitHub repository.
Scaffold a Flutter Project
To facilitate the process of creating a new Flutter project, you will use the Flutter CLI tool. To do this, open your terminal and navigate to your projects directory to run the following command:
flutter create --org com.auth0 flutterdemo
The
parameter sets the hierarchy of your Flutter app, which is significant when you are implementing user authentication using a callback URL. You'll find more details on this concept as you follow the article.com.auth0
The CLI tool generates a template project within a couple of seconds to get you started, which you can open in your preferred IDE.
Open the
lib/main.dart/// ----------------------------------- /// External Packages /// ----------------------------------- import 'package:flutter/material.dart'; /// ----------------------------------- /// Profile Widget /// ----------------------------------- /// ----------------------------------- /// Login Widget /// ----------------------------------- /// ----------------------------------- /// App /// ----------------------------------- void main() => runApp(MyApp()); class MyApp extends StatefulWidget { @override _MyAppState createState() => _MyAppState(); } /// ----------------------------------- /// App State /// ----------------------------------- class _MyAppState extends State<MyApp> { bool isBusy = false; late String errorMessage; @override Widget build(BuildContext context) { return MaterialApp( title: 'Auth0 Demo', home: Scaffold( appBar: AppBar( title: const Text('Auth0 Demo'), ), body: Center( child: const Text('Implement User Authentication'), ), ), ); } }
This template is the skeleton of your app. You'll add code to each section as you follow the article.
Install Dependencies
This Flutter project requires only one dependency, the Auth0 Flutter SDK library.
To install it, run the following command:
flutter pub add auth0_flutter
Configure the SDK
auth0-flutterA callback URL is a mechanism by which an authorization server communicates back to your application.
For web applications, the callback URL is a valid HTTP(s) URL. More or less, the same applies to native applications. The subtle difference is that in native applications, callbacks are pseudo-URLs that you compose using an application schema and URI that's configured per application.
Configure Android
The Flutter Auth0 SDK will set up an
intent-filter
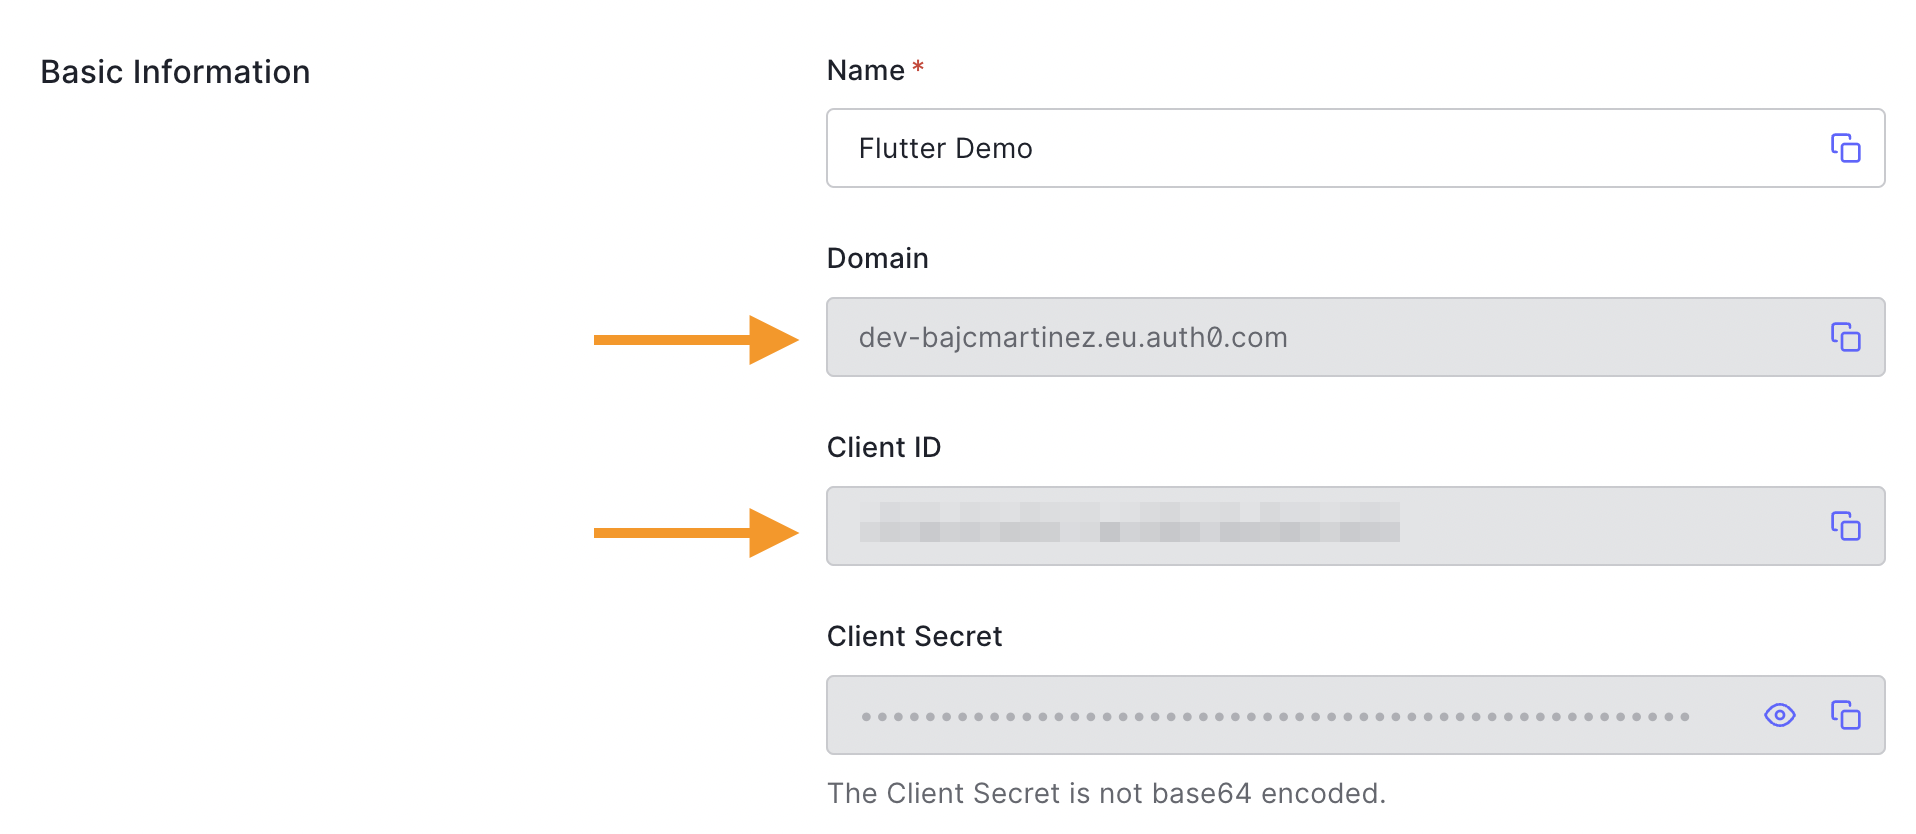
: The domain of your Auth0 tenant. You can find this in the Auth0 dashboard under your application's Settings tab in the Domain field.auth0Domain
: The scheme to use; it can be either a custom scheme (e.g.,auth0Scheme
) or HTTPS if you want to use Android App Links.flutterdemo
To configure the
intent-filterandroid/app/build.gradleandroid > defaultConfig// android/app/build.gradle android { // ... defaultConfig { // ... manifestPlaceholders += [auth0Domain: "<YOUR_AUTH0_DOMAIN>", auth0Scheme: "flutterdemo"] // 👈 New code } // ... }
For our example, we'll use
flutterdemo<YOUR_AUTH0_DOMAIN>Configure iOS
Similar to Android, for iOS, we need to specify the callback scheme by adding the following entry to the
<dict>ios/Runner/Info.plist<?xml version="1.0" encoding="UTF-8"?> <!DOCTYPE plist PUBLIC "-//Apple//DTD PLIST 1.0//EN" "http://www.apple.com/DTDs/PropertyList-1.0.dtd"> <plist version="1.0"> <dict> ... <!-- 👇 New code --> <key>CFBundleURLTypes</key> <array> <dict> <key>CFBundleTypeRole</key> <string>Editor</string> <key>CFBundleURLName</key> <string>auth0</string> <key>CFBundleURLSchemes</key> <array> <string>$(PRODUCT_BUNDLE_IDENTIFIER)</string> </array> </dict> </array> <!-- 👆 New code --> ... </dict> </plist>
The minimum target platform supported by the
isAuth0 Flutter SDK, so make sure you have that set in your iOS project.iOS 12.0
Run the Application
Launch either the iOS simulator or Android emulators, then run the application on all available devices like so:
I have feedback or ran into an issueflutter run -d all
Create the User Interface
Locate the
Profile Widgetlib/main.dart/// ----------------------------------- /// Profile Widget /// ----------------------------------- // 👇 New code class Profile extends StatelessWidget { final Future<void> Function() logoutAction; final UserProfile? user; const Profile(this.logoutAction, this.user, {final Key? key}) : super(key: key); @override Widget build(BuildContext context) { return Column( mainAxisAlignment: MainAxisAlignment.center, children: <Widget>[ Container( width: 150, height: 150, decoration: BoxDecoration( border: Border.all(color: Colors.blue, width: 4), shape: BoxShape.circle, image: DecorationImage( fit: BoxFit.fill, image: NetworkImage(user?.pictureUrl.toString() ?? ''), ), ), ), const SizedBox(height: 24), Text('Name: ${user?.name}'), const SizedBox(height: 48), ElevatedButton( onPressed: () async { await logoutAction(); }, child: const Text('Logout'), ), ], ); } } // 👆 New code
This widget defines a view that displays user profile information once the user has logged in. It also displays a logout button.
Locate the
Login Widget/// ----------------------------------- /// Login Widget /// ----------------------------------- // 👇 New code class Login extends StatelessWidget { final Future<void> Function() loginAction; final String loginError; const Login(this.loginAction, this.loginError, {final Key? key}) : super(key: key); @override Widget build(BuildContext context) { return Column( mainAxisAlignment: MainAxisAlignment.center, children: <Widget>[ ElevatedButton( onPressed: () async { await loginAction(); }, child: const Text('Login'), ), Text(loginError ?? ''), ], ); } } // 👆 New code
This widget defines a view that your app shows to users who have not been authenticated yet by Auth0. It displays a login button so that they can start the authentication process.
Set Up Auth0
Auth0 is an Identity-as-a-Service (IDaaS) platform that provides developers with features such as Social and Passwordless Login, among others, to ease online identity management.
To integrate Auth0 into your Flutter app, you need an Auth0 account. If you have an existing account, you can use it. If you don't, click here to create a FREE account.
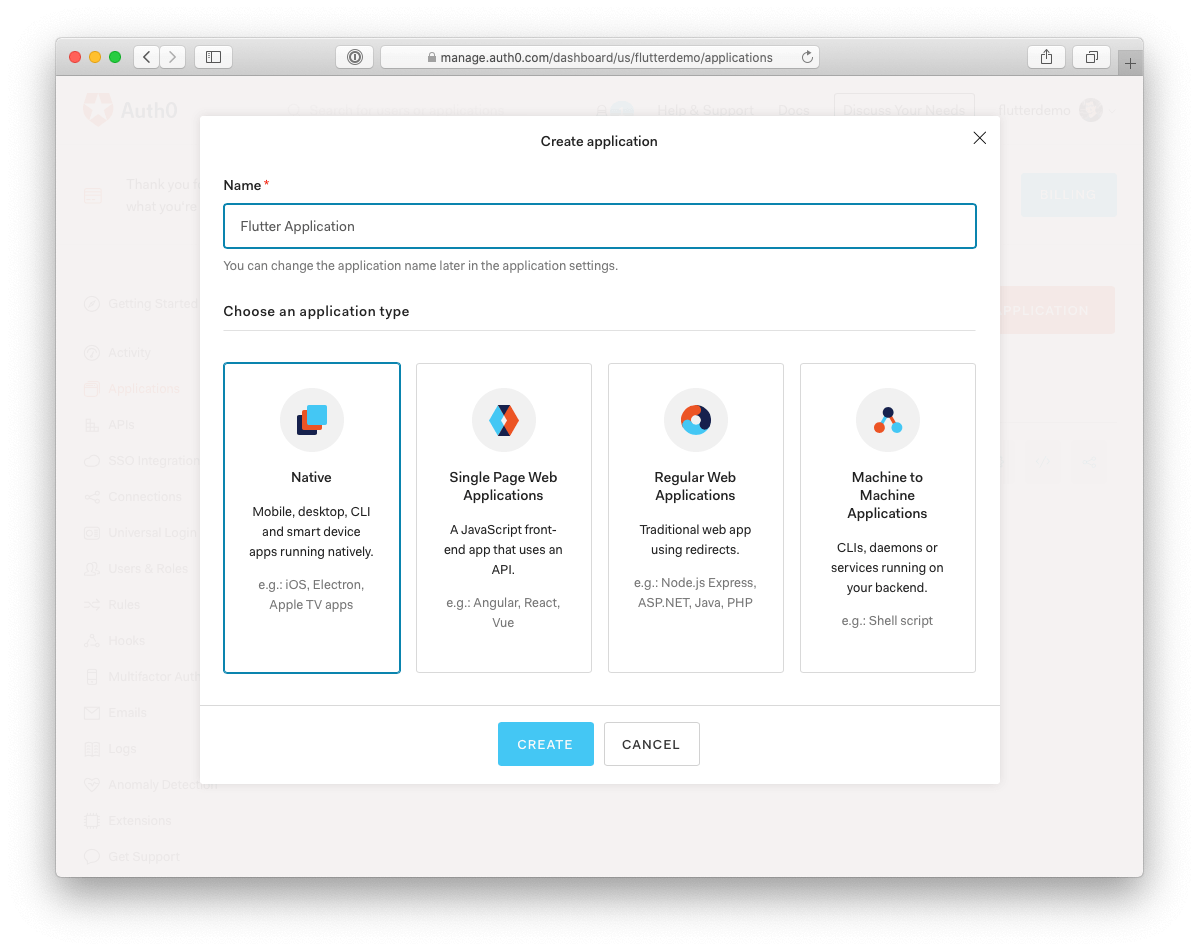
After creating an Auth0 account, follow the steps below to set up an application:
- Go to the Applications section of your dashboard.
- Click on the "Create Application" button.
- Enter a name for your application (e.g., "Flutter Application").
- Finally, select Native as the application type and click the Create button.
Your application should have at least one enabled Connection. Click on the "Connections" tab on your application page and switch on any database or social identity provider (e.g., Google).

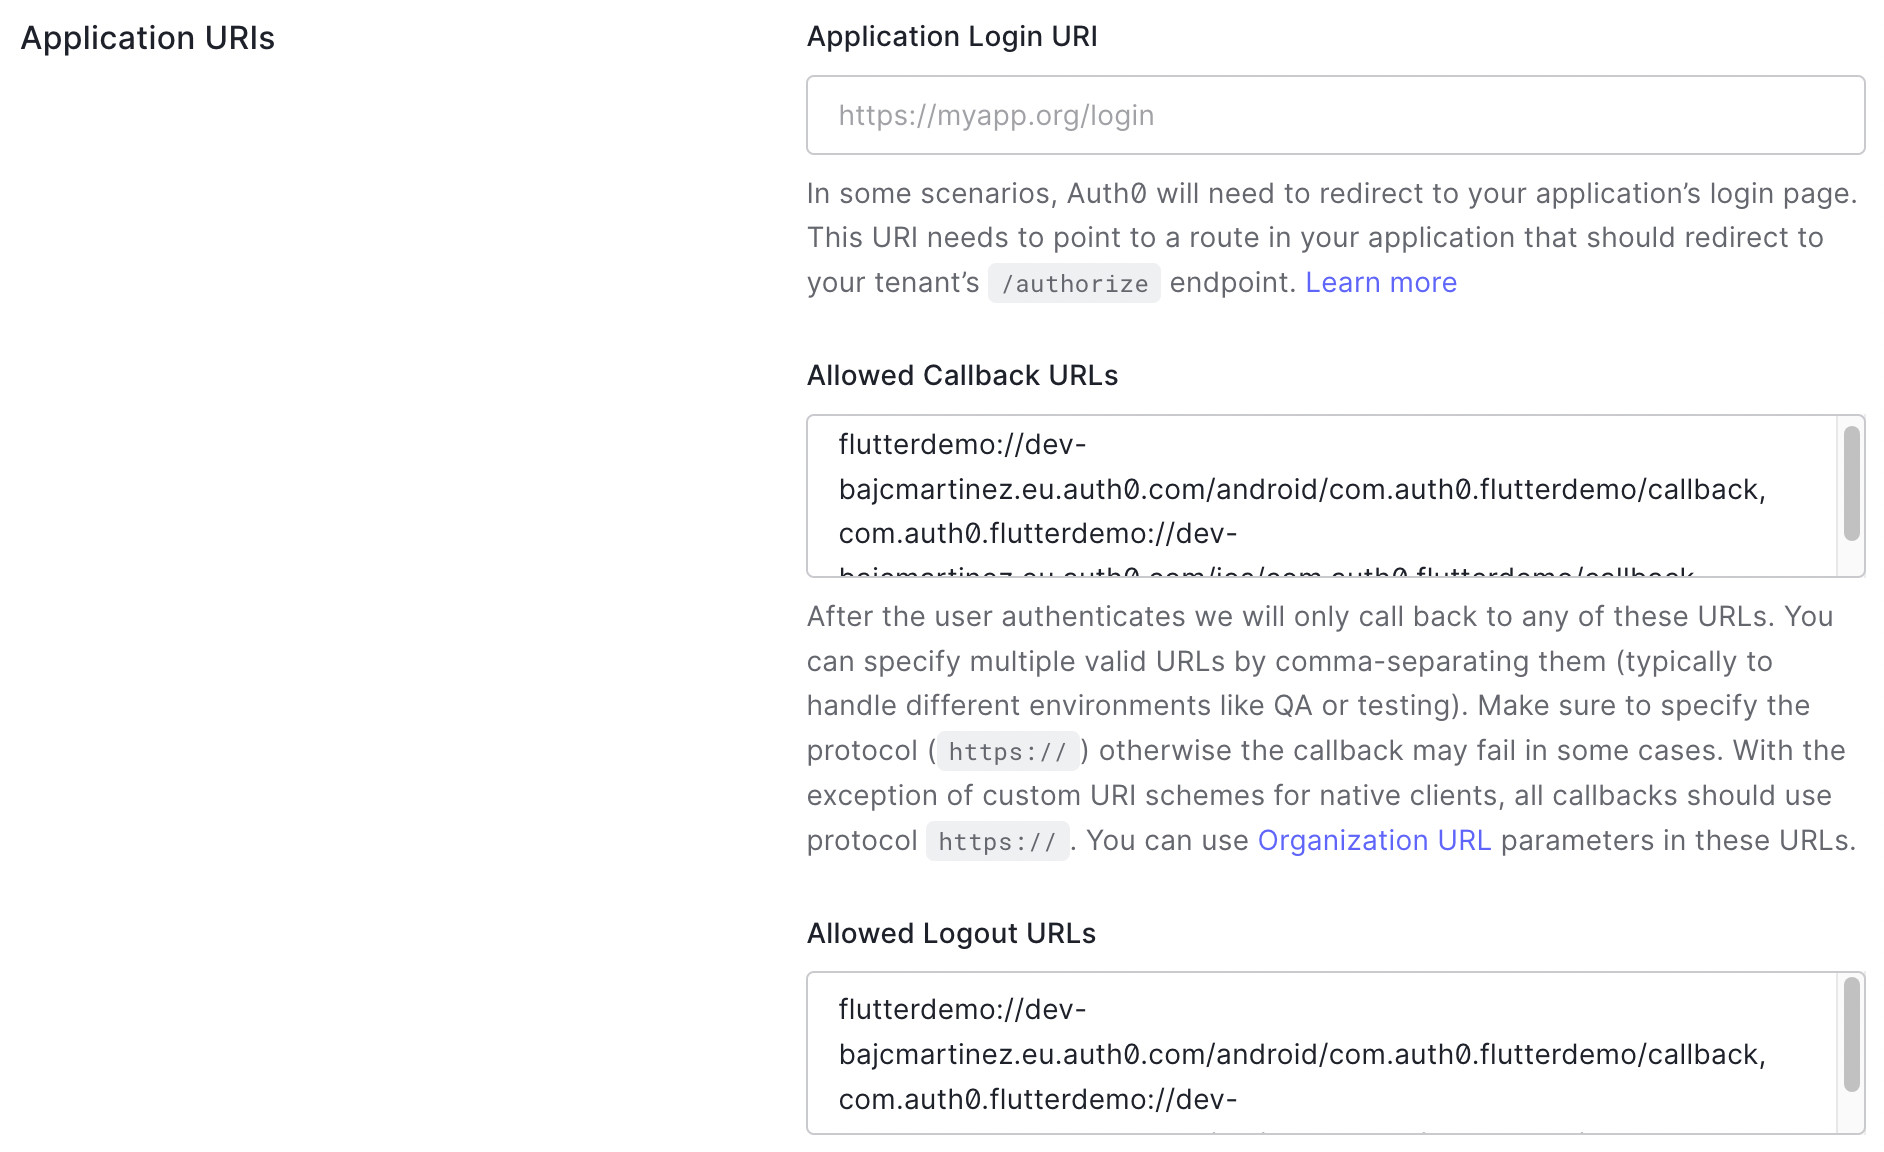
Finally, we need to set the allow callback and logout URLs. For our example application, we will be using the following values:
- Android:
SCHEME://YOUR_DOMAIN/android/YOUR_PACKAGE_NAME/callback - iOS:
YOUR_BUNDLE_ID://YOUR_DOMAIN/ios/YOUR_BUNDLE_ID/callback
In our case:
- The Android scheme is
, and the package name isflutterdemocom.auth0.flutterdemo - The iOS bundle ID is
.com.auth0.flutterdemo
To set them up, navigate to the "Settings" tab on your application page and set your Allowed Callback URLs and Allowed Logout URLs for Android and iOS in the Application URIs section. Since you need to add both values for iOS and Android, separate each with a
,Here is how it should look in your Application settings page:
Once you set the callback and logout URL value, scroll to the bottom of the page and click on the "Save Changes" button. You should receive a confirmation message stating that your changes have been saved.
Integrate Auth0 with Flutter
Now that you set up Auth0, you can write the code for the login and logout actions and connect all the widgets and functions to the main application widget so that at the end of this section, you'll have a running flutter application.
Add user login with loginAction
loginActionNext, we'll create a function
loginActionImplement a
loginAction()AppState/// ----------------------------------- /// External Packages /// ----------------------------------- import 'package:flutter/material.dart'; import 'package:auth0_flutter/auth0_flutter.dart'; // 👈 New code ... // 👇 New code Future<void> loginAction() async { setState(() { isBusy = true; errorMessage = ''; }); try { final Credentials credentials = await auth0.webAuthentication(scheme: appScheme).login(); setState(() { isBusy = false; _credentials = credentials; }); } on Exception catch (e, s) { debugPrint('login error: $e - stack: $s'); setState(() { isBusy = false; errorMessage = e.toString(); }); } } // 👆 New code
The
loginActionIn a future article, we'll show you how to configure Auth0 to call third-party APIs from Flutter applications.
In this section of code, we introduce a new variable,
appSchememain.dartIt is important that the value assigned to this variable reflects the same scheme we defined when we configured the Android platform.
At the beginning of the
main.dart/// ----------------------------------- /// External Packages /// ----------------------------------- import 'package:flutter/material.dart'; import 'package:auth0_flutter/auth0_flutter.dart'; const appScheme = 'flutterdemo'; // 👈 New code
Add user logout with logoutAction
logoutActionLogout is simply implemented as follows:
// 👇 New code
Future<void> logoutAction() async {
  await auth0.webAuthentication(scheme: appScheme).logout();

  setState(() {
    _credentials = null;
  });
}
// 👆 New code
The
logoutAction()_credentialsIt is important to note that the
method from the Auth0 SDK will remove the session from the authorization server (AS), so the next time to try to login, you'll be prompted to enter your credentials once more.logout()
Render the user interface conditionally in build
buildBefore we can start rendering our final UI, we need to declare a few more state properties and initialize them.
For that, extend your
_MyAppStateclass _MyAppState extends State<MyApp> { // 👇 New code Credentials? _credentials; late Auth0 auth0; // 👆 New code ... // 👇 New code void initState() { super.initState(); auth0 = Auth0('{domain}', '{clientId}'); errorMessage = ''; } // 👆 New code ... }
Once again, in the code snippet above, you'll have to replace the placeholders for the Auth0 domain and client ID, which can be obtained from the Auth0 dashboard.
Finally, we can update the build method to display either a processing indicator if things are loading or the Profile/Login widget accordingly.
I have feedback or ran into an issue@override Widget build(BuildContext context) { return MaterialApp( title: 'Auth0 Demo', home: Scaffold( appBar: AppBar( title: const Text('Auth0 Demo'), ), body: Center( child: isBusy ? const CircularProgressIndicator() : _credentials != null ? Profile(logoutAction, _credentials?.user) : Login(loginAction, errorMessage), ), // 👈 Updated code ), ); }
Test the Final Application
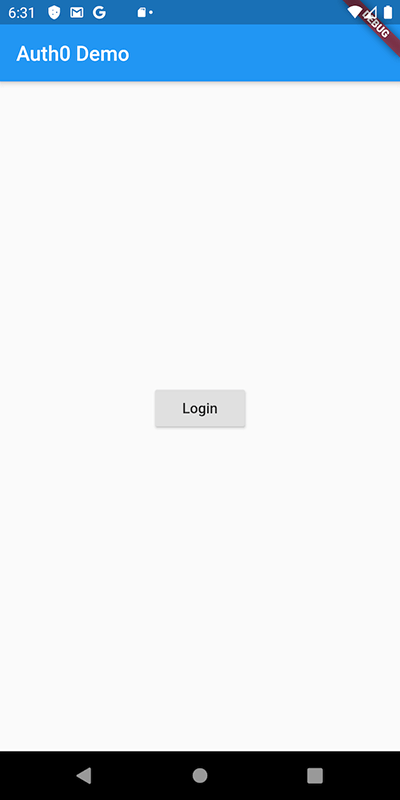
Well done on getting to the final stage. If you have successfully followed the steps so far, you should see a login screen similar to this one in your emulator:
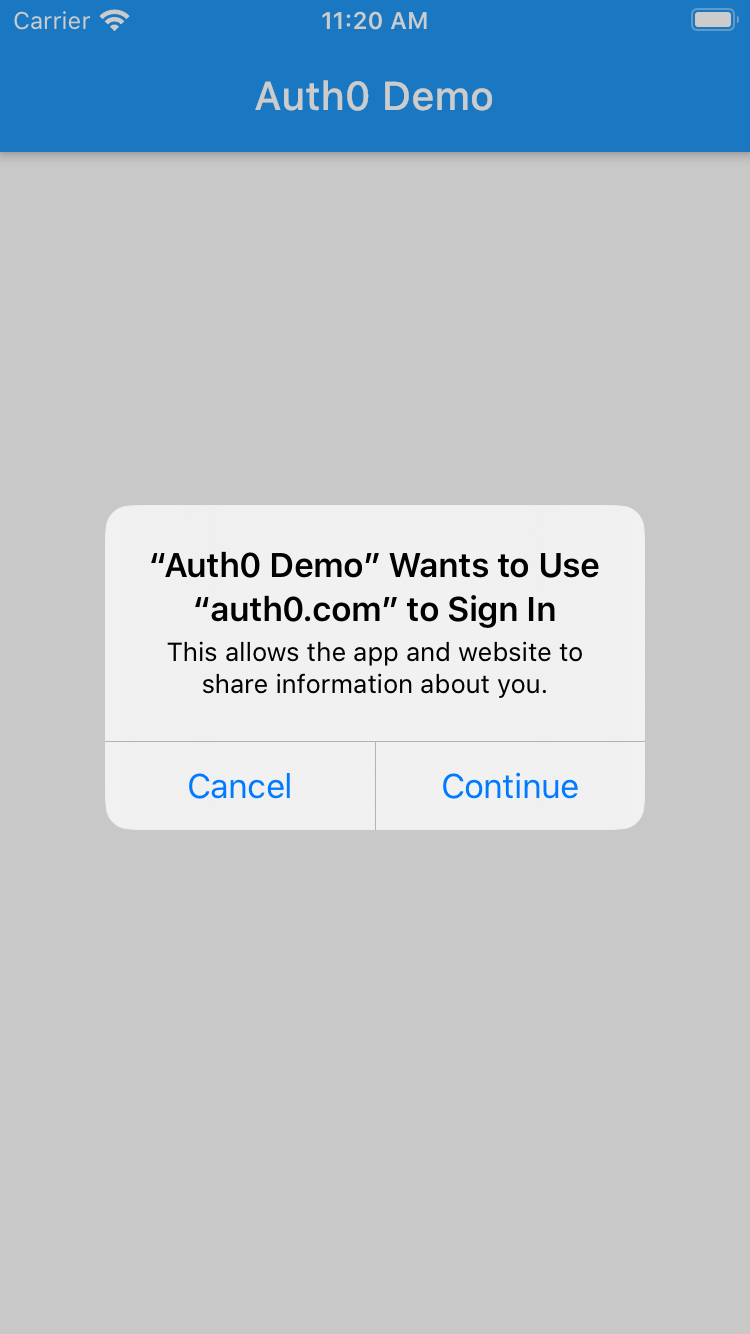
Go ahead and tap the "Login" button. Note that in iOS, a consent prompt comes up to notify you that the application intends to use the system browser SSO to process the login:

The iOS prompt is an expected part of the
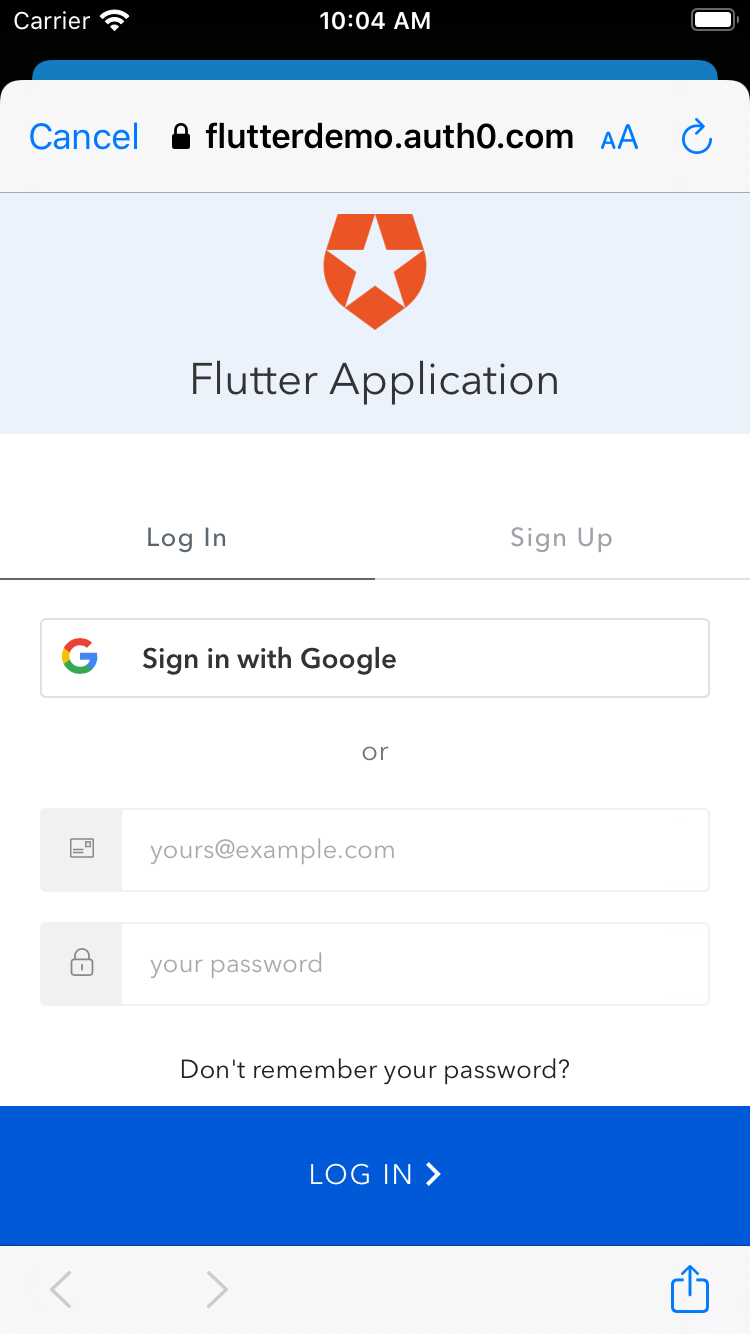
implementation.ASWebAuthenticationSessionThat should take you to the Auth0 Universal Login page in the system browser:
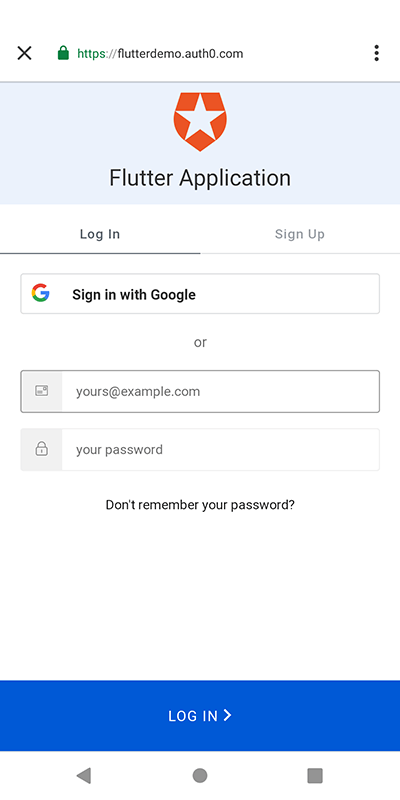
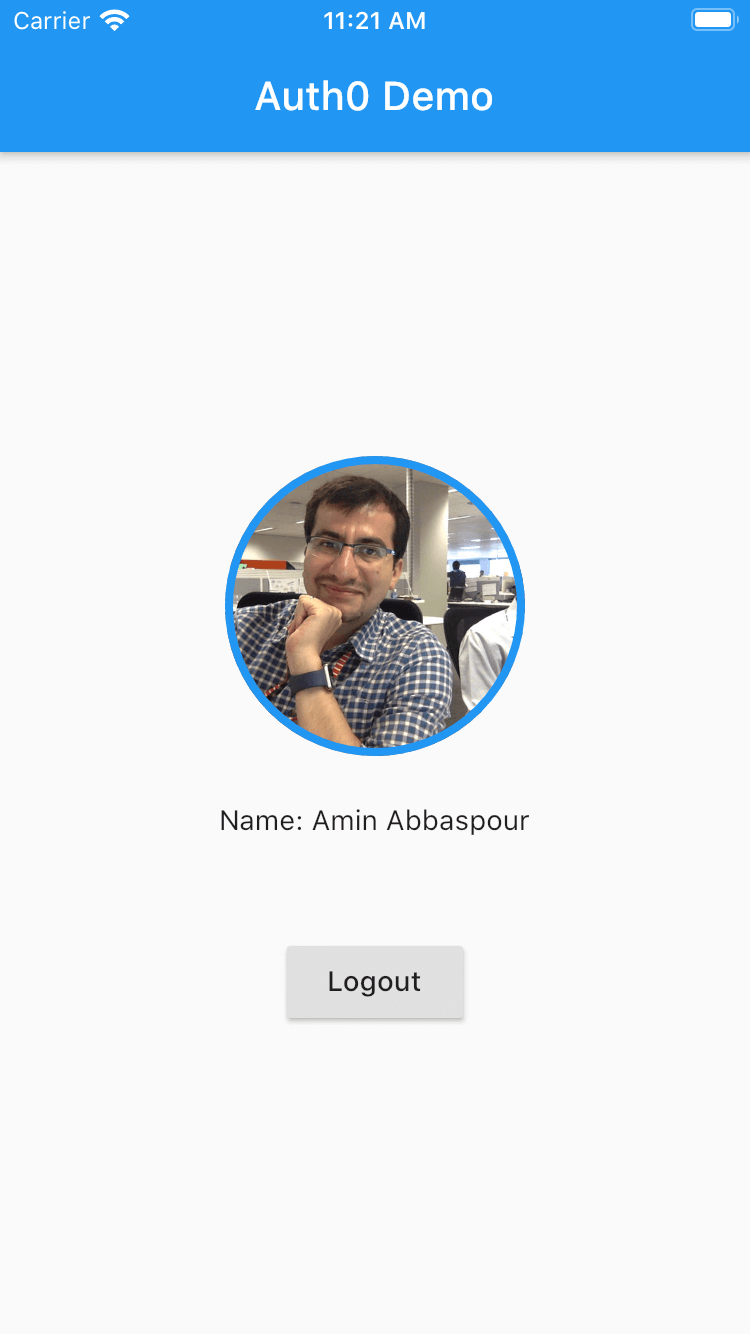
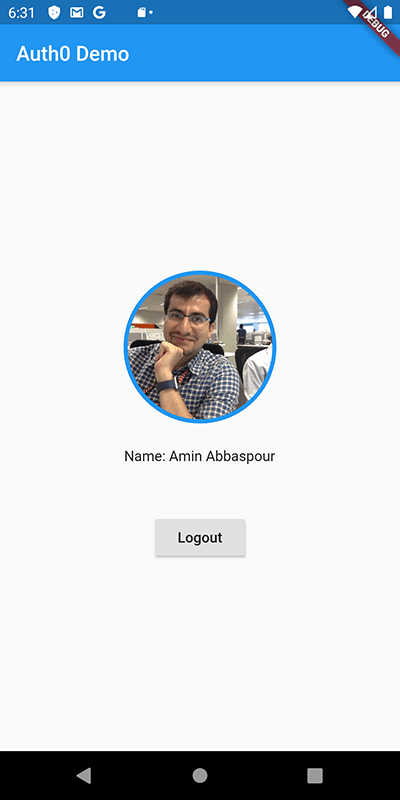
On this screen, either enter your credentials or click "Sign in with Google". Either way, once you successfully log in, the profile screen renders:
You can create new users in your tenant directly by using the "Users" section of the Auth0 Dashboard
Tapping the "Logout" button should take you back to the initial login screen.
Congratulations. You did it!
Conclusion and Recommendations
In this post, you learned how to secure a Flutter application with Auth0 using readily available OSS libraries. It didn't take you more than a couple of lines to connect and secure your application.
The article is intentionally simple to cover the basic flow. In a future article, we'll cover how to secure multi-page apps as well as define and call back-end APIs from your Flutter application.
I have feedback or ran into an issue