TL;DR: This is the third part of the series about developing a Web application based on ASP.NET Core 2.0 and React. In the first post, you built a secured Web API application that provides a list of books with ASP.NET Core 2.0. In the second post, you created a Single Page Application (SPA) client based on React to consume this API. In this post, you will integrate the client-server system with scopes and authorization management by using Auth0. You can find the final code of both the React client and the ASP.NET server in this GitHub repository.
“Learn how to integrate React and ASP.NET Core apps in this practical tutorial.”
Tweet This
API Scopes
In order to enhance your client-server application, you are going to implement a more granular access control to the server's resources. This will guarantee that only some specific users are allowed to make specific actions. In particular, you will add to your application an API to create new books and will restrict the access to this API only to some users.
This access granularity can be obtained by using scopes. Scopes are a feature provided by OAuth2 protocol allowing to limit the access granted to an access token.
Creating Scopes for Your APIs
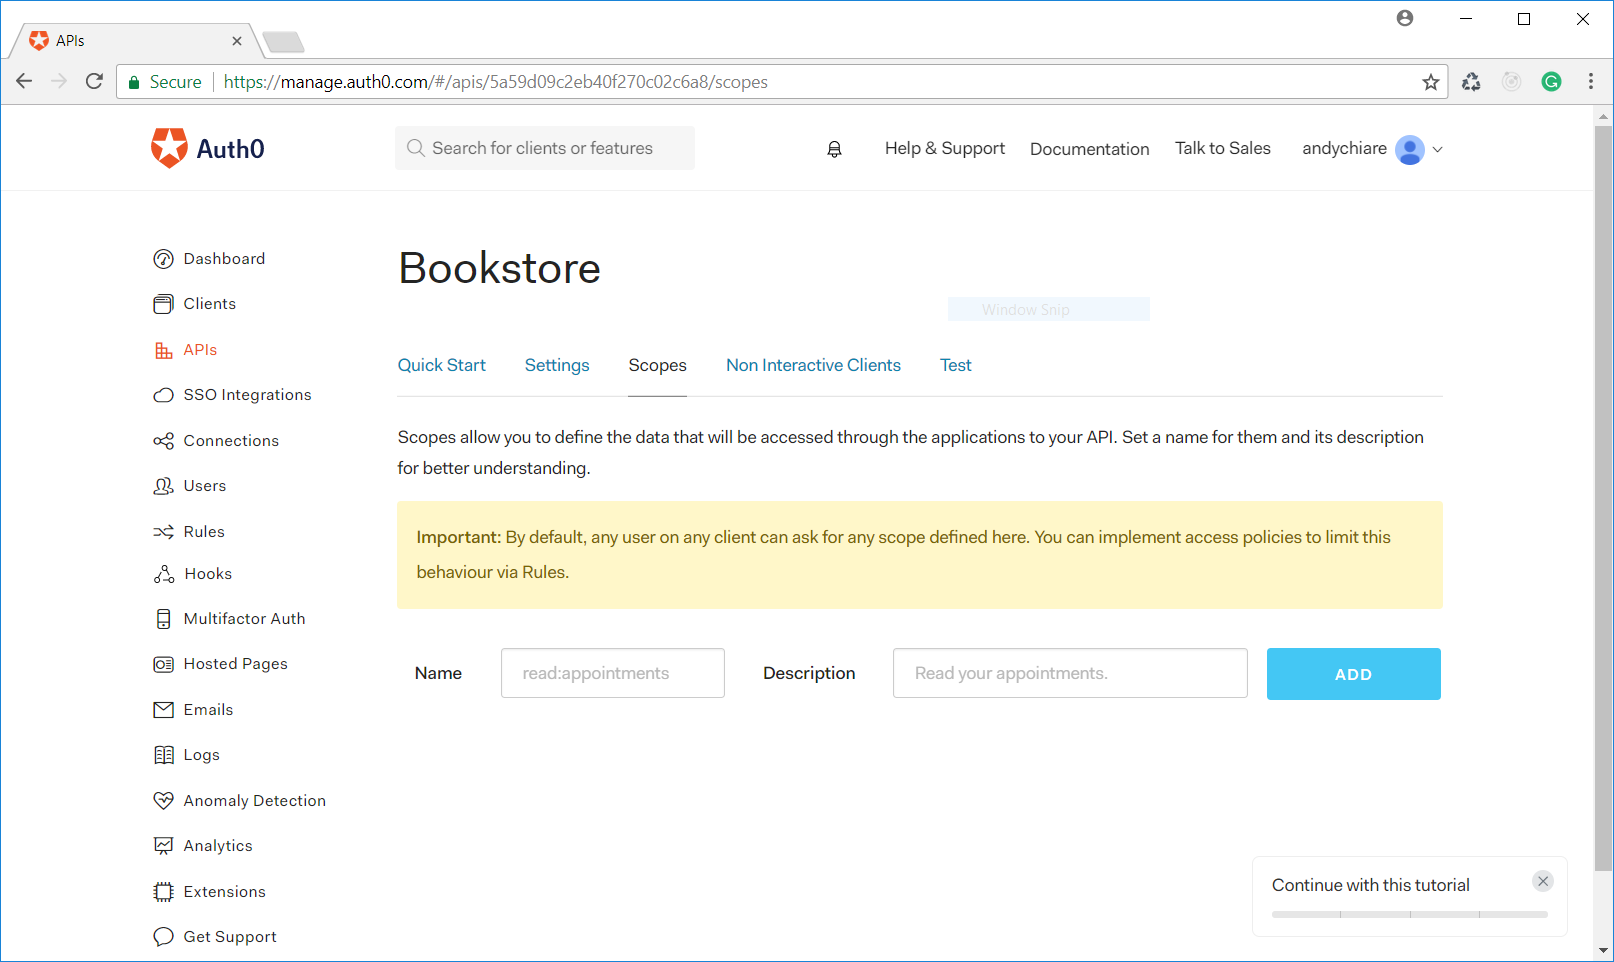
As a first step, you need to create scopes for your APIs. So, open the Auth0 dashboard, click the APIs section, and select the API created in the first post of the series. Then click the Scopes tab, as shown below:
Here you can define scopes for your APIs by specifying a name and a description. A scope name can be any string but, by convention, it usually takes the form of
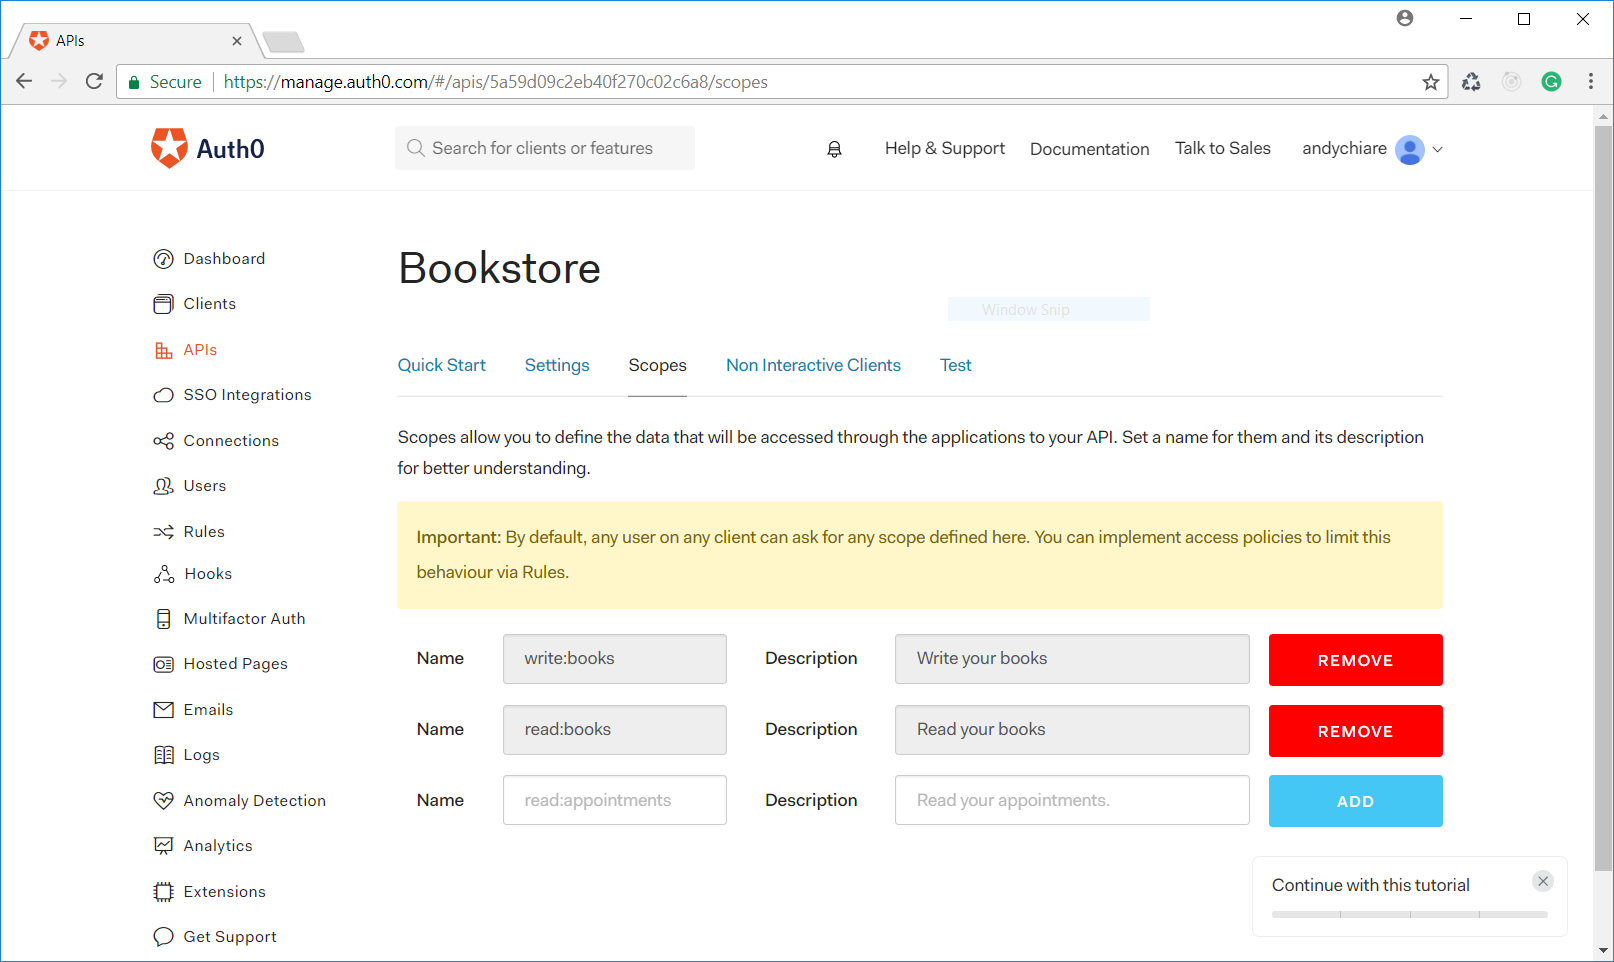
action:resourceactionresourceSo, define the
write:booksread:booksDefinition of scopes for APIs just declares which actions may be performed on server's resources. As a next step, you need to associate scopes to users in order to grant them the ability to access server's resources.
Installing Authorization Extension
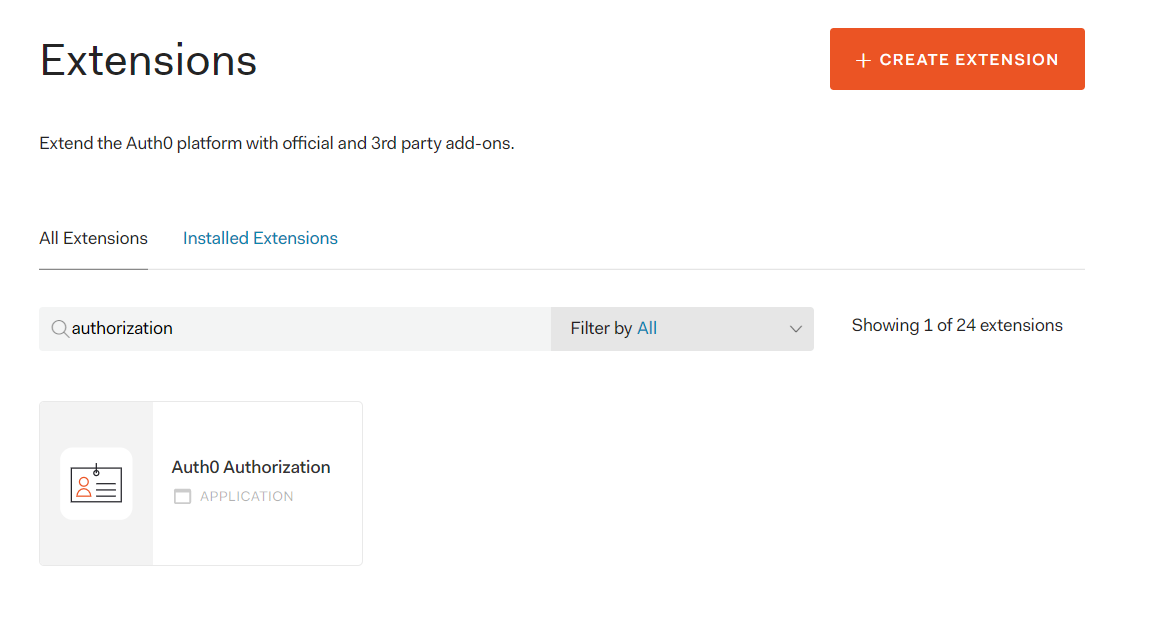
To associate scopes with users, you need to configure permissions and roles. This may be accomplished by using the Auth0 Authorization Extension in Auth0 dashboard. If you've never used this extension, you need to install it by accessing the Extensions section of the dashboard and by filtering the available extensions by authorization keyword, as shown in the following picture:
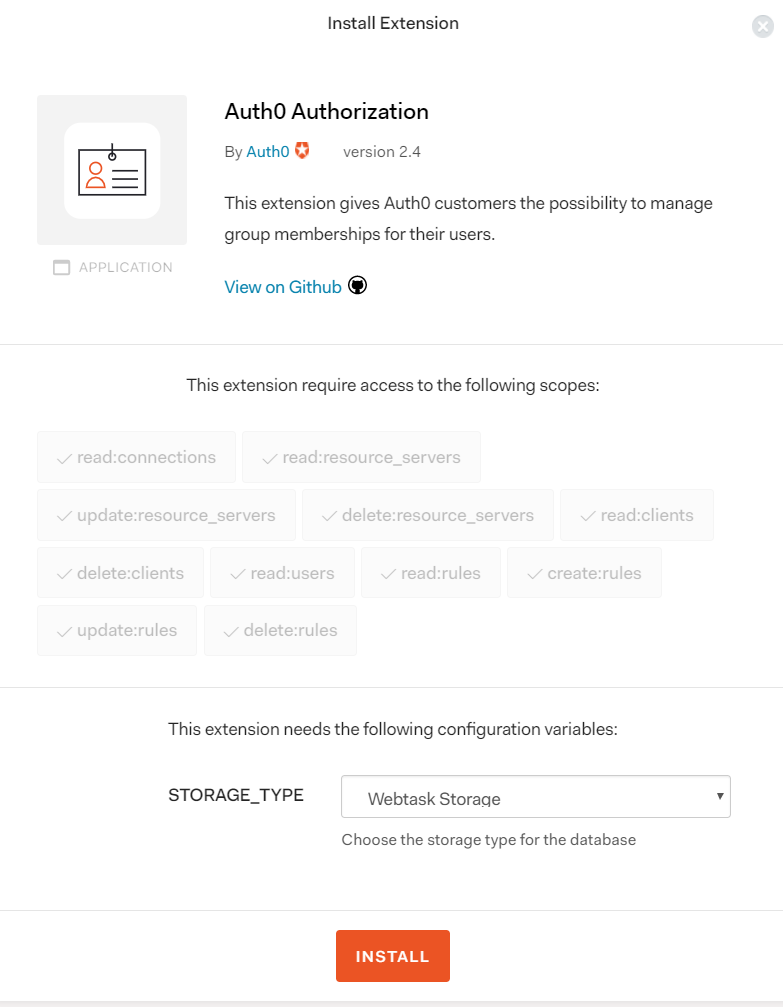
Then click the Auth0 Autorization box to start the installation process. You will be prompted to choose the storage where you would like to store your data. For this simple application, you will choose the default choice, Webtask Storage:
Once the extension is installed, you will see it listed in the Installed Extensions tab.
Configuring Permissions and Roles
Now that you have installed the Authorization Extension, you can use it to configure permissions and roles. To be clear, these are their definitions:
- Permissions are actions that users can do, such as reading a list of books or adding a new book to the list.
- Roles are collections of permissions. For example, you can define a role for administrators that have the permissions to read the list of books and to add a new book to the list.
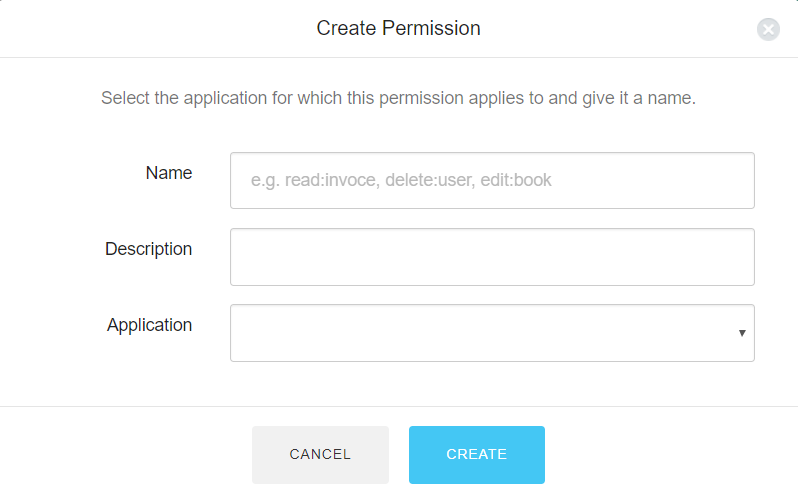
So, click the Authorization Extension shown in the Installed Extensions tab and a new window will be opened. Here, select the Permissions section and then click the Create Permission button in the upper right corner. You will be prompted to provide data defining the permission, as shown below:
Here you will provide the name of the permission, a description and the client application the permission should be bound to.
Note: Ensure that the name of a permission is exactly the same as the corresponding scope.
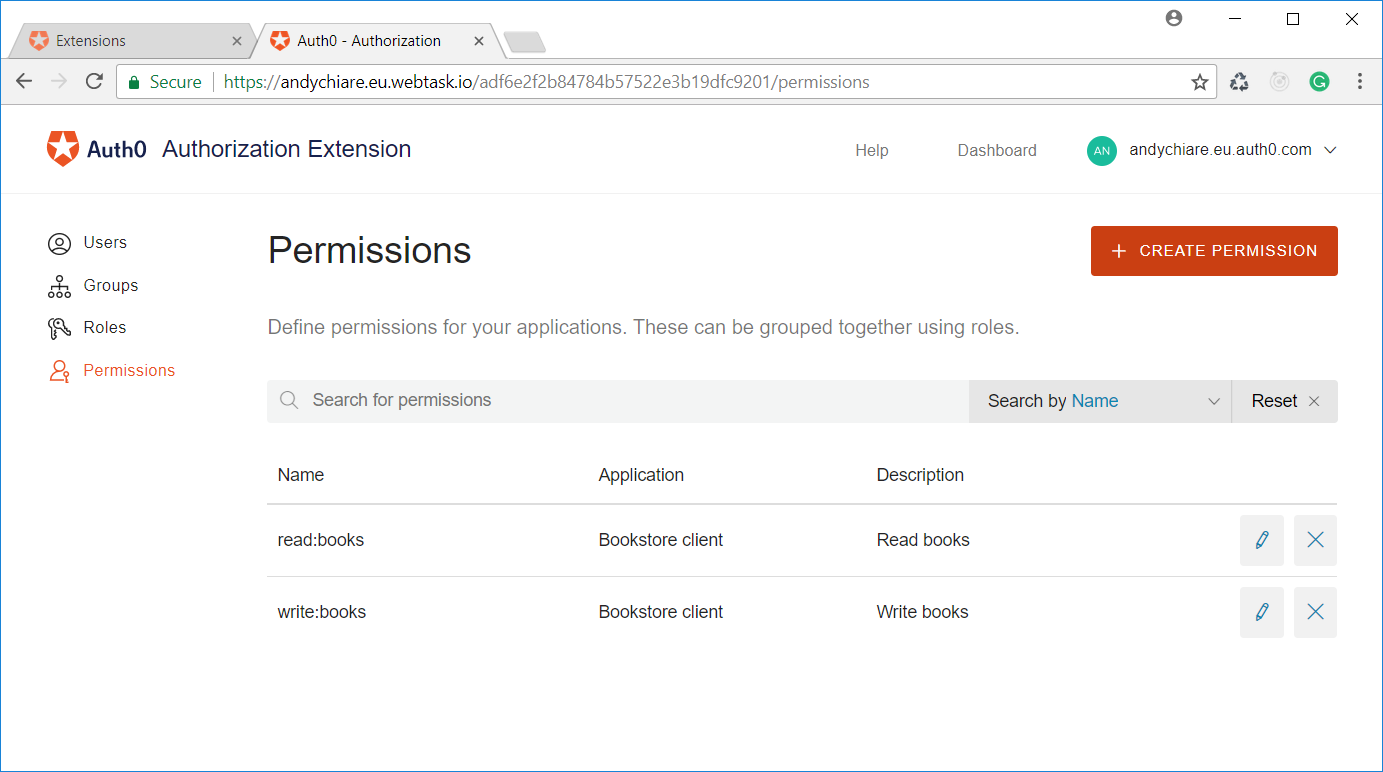
In your case, you will add one permission for
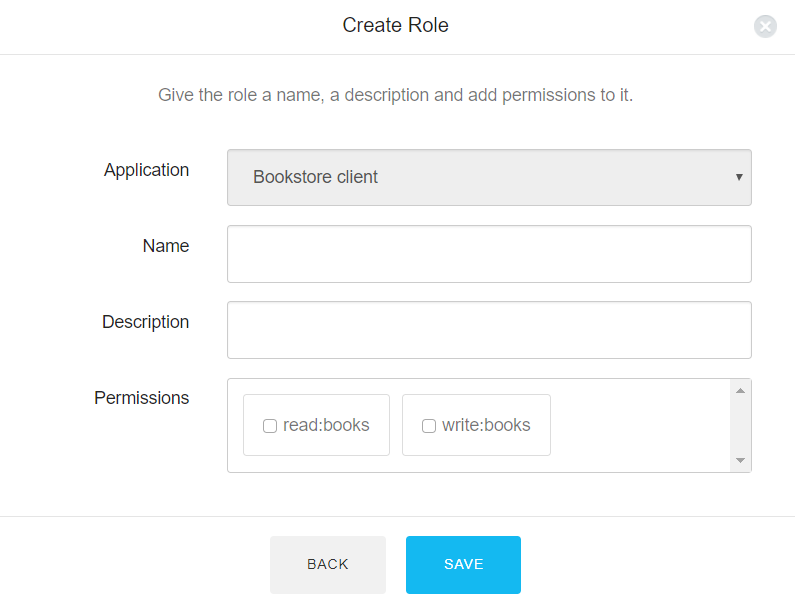
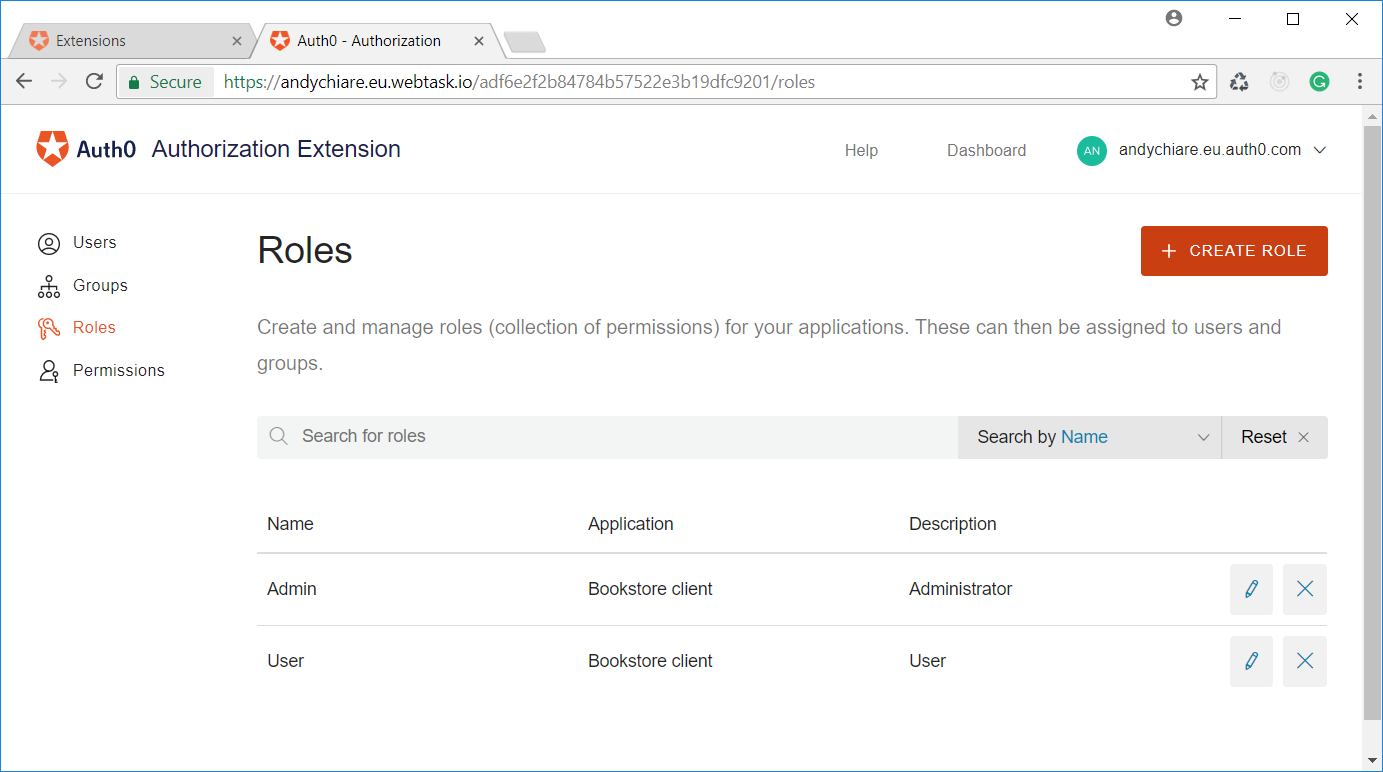
read:bookswrite:booksNow you need to define two roles for your application: Admin, having both permissions you've just created, and User, having just the
read:booksUse this form to create both roles. The final result should be as follows:
Adding Roles to Users
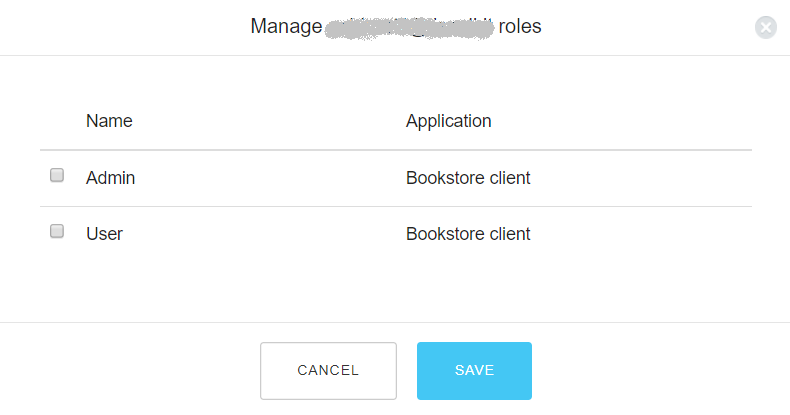
Next, you will need to associate roles to users. Actually, in Users section of the Authorization Extension you will find all the users already created in your Auth0 platform. Here you can assign roles to each user by selecting him, using the Roles tab and clicking the Add role to user button. Now you can check the roles you want to assign the user, as shown in the following picture:
Publishing Permission and Rule
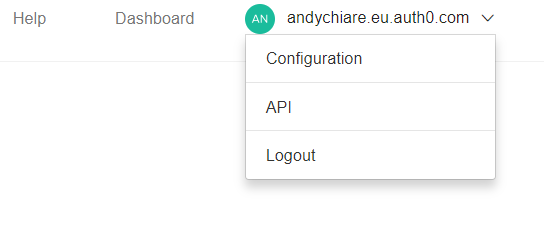
As a final step of Authorization Extension configuration, you need to click your domain drop-down menu in the upper right corner and select the Configuration item:
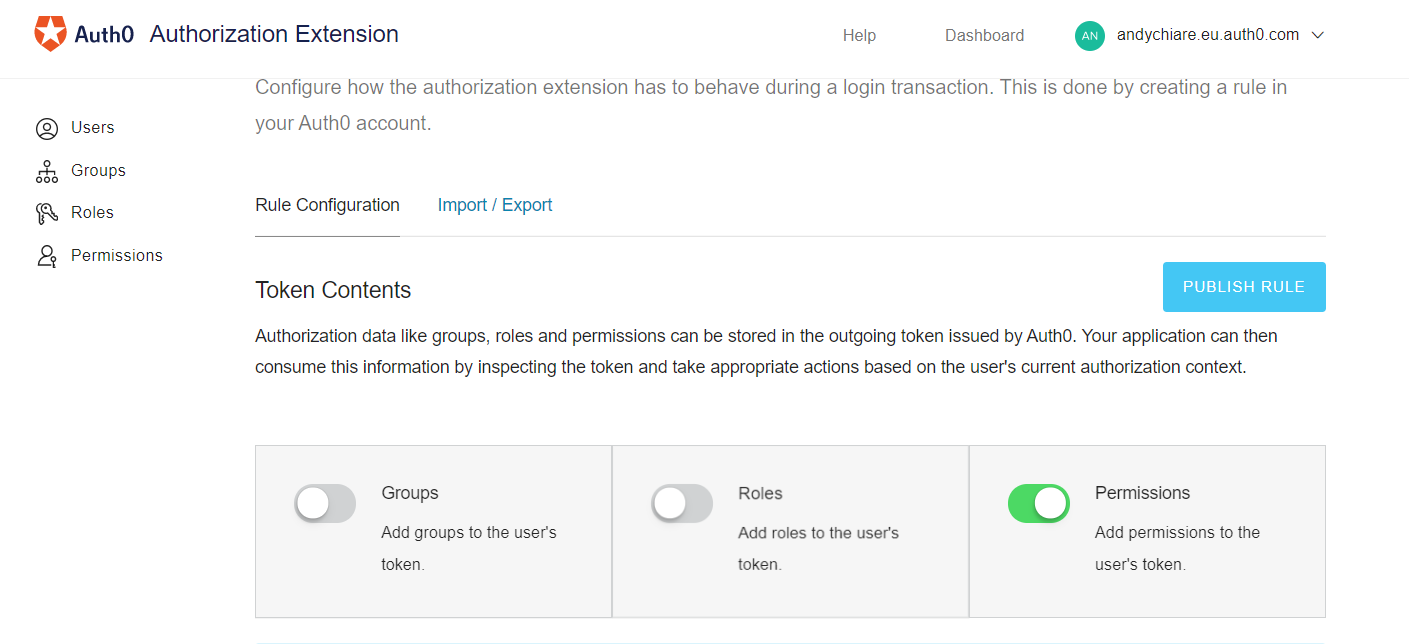
In the page that appears, make sure that Permissions are enabled and click Publish Rule button:
This operation creates a rule for your tenant that will be executed after each user login. In Auth0 platform, a rule is a JavaScript function that is executed when the user is authenticated. The newly created rule will add user's permissions to the user's profile. You can check the rule's code by using the Dashboard.
Validating Token Scopes
The last step in this configuration process is to create a new rule which ensures that scopes contained in an access token is valid accordingly to the user's permission. It means that when a user is authenticated, you need to add only the user's permissions to his access token. To add this rule, go to Rules section in the Auth0 dashboard, click the Create rule button and select the Empty rule template. Now, give a name to the rule and put the following code into the code window:
function (user, context, callback) {
  if (context.clientName !== 'Bookstore client') {
    return callback(null, user, context);
  }

  const permissions = user.permissions || [];
  const requestedScopes = context.request.body.scope || context.request.query.scope;
  const filteredScopes = requestedScopes.split(' ').filter((x) => (x.indexOf(':') < 0));
  Array.prototype.push.apply(filteredScopes, permissions);
  context.accessToken.scope = filteredScopes.join(' ');

  callback(null, user, context);
}
The first line of the JavaScript function's body checks if the current client is the Bookstore client created in the second article of this series. If not, the rule is not executed. Otherwise, only the user's permissions are assigned to the access token's
scopeNote: Keep in mind that the rules are executed in the order they are displayed in the Rules section.
Adding Scope Management to ASP.NET Core 2.0 APIs
After this configuration process on the Auth0 platform side, you need to change the code of the ASP.NET Core 2 Web API application built in part 1 of this series. As a first step, you need to implement a way to add an access control to the Web API and to check if a request has the rights to access the Web API. You can apply the Policy-based Authorization provided by ASP.NET Core.
Following this approach, you need to define an Authorization requirement and an Authorization handler. The former is a collection of data containing the current user's rights. The latter evaluates the Authorization requirement to determine if access is allowed.
Now, you have to define the Authorization requirement. So, add a
HasScopeRequirement.cspublic class HasScopeRequirement : IAuthorizationRequirement { public string Issuer { get; } public string Scope { get; } public HasScopeRequirement(string scope, string issuer) { Scope = scope ?? throw new ArgumentNullException(nameof(scope)); Issuer = issuer ?? throw new ArgumentNullException(nameof(issuer)); } }
The
HasScopeRequirementIAuthorizationRequirementscopeissuerScopeIssuerThe Authorization handler will be implemented in a
HasScopeHandler.cspublic class HasScopeHandler : AuthorizationHandler<HasScopeRequirement> { protected override Task HandleRequirementAsync(AuthorizationHandlerContext context, HasScopeRequirement requirement) { if (!context.User.HasClaim(c => c.Type == "scope" && c.Issuer == requirement.Issuer)) return Task.CompletedTask; var scopes = context.User .FindFirst(c => c.Type == "scope" && c.Issuer == requirement.Issuer) .Value.Split(' '); if (scopes.Any(s => s == requirement.Scope)) context.Succeed(requirement); return Task.CompletedTask; } }
The class
HasScopeHandlerAuthorizationHandlerHandleRequirementAsync()contextrequirementIf the current user principal hasn't a
scopeIssuerNow, you need to change the
ConfigurationServices()Startuppublic void ConfigureServices(IServiceCollection services) { services.AddAuthentication(options => { options.DefaultAuthenticateScheme = JwtBearerDefaults.AuthenticationScheme; options.DefaultChallengeScheme = JwtBearerDefaults.AuthenticationScheme; }).AddJwtBearer(options => { options.Authority = Configuration["Auth0:Authority"]; options.Audience = Configuration["Auth0:Audience"]; }); services.AddAuthorization(options => { options.AddPolicy("read:books", policy => policy.Requirements.Add(new HasScopeRequirement("read:books", Configuration["Auth0:Authority"]))); }); services.AddSingleton<IAuthorizationHandler, HasScopeHandler>(); services.AddMvc(); }
The differences from the previous version of the method concern the addition of the new policy through
services.AddAuthorization()HasScopeHandlerAddSingleton()The final step to setup scope management at the API side is to pass the
read:booksAuthorize[Route("api/[controller]")] public class BooksController : Controller { [HttpGet, Authorize("read:books")] public IEnumerable<Book> Get() { var resultBookList = new Book[] { ... }; return resultBookList; } }
Testing the Authorization Policy for Read Permission
Now you can test Web API access control by simply running the Single Page Application created in part 2 of this series. If you access the application by using a user with User or Admin role, you will be able to get the list of books provided by the Web API. Otherwise, you will not be able to get the list and will get a page like the following:
If you look at the Developer tools console or some other similar tool in your browser, you will find something like this:
As expected, the Web API refused to provide you the requested data since you have not the required permissions.
You could make the user experience a bit more fluent by managing the
403ComponentDidMountHomecomponentDidMount() { const accessToken = this.props.auth.getAccessToken(); fetch("/api/books", {headers: new Headers({ "Accept": "application/json", "Authorization": `Bearer ${accessToken}` })}) .then(response => { if (response.ok) { return response.json() } if (response.status === 403) { alert("You are not authorized!") } }) .then(books => this.setState({bookList: books || []})) .catch(error => console.log(error)) }
In this case, if the status code returned by the server is
403Managing Write Permissions in ASP.NET Core 2.0 APIs
So far, you have only managed the
read:bookswrite:booksAs a first step, you will add the authorization policy in
StartupAddAuthorization()services.AddAuthorization(options => { options.AddPolicy("read:books", policy => policy.Requirements.Add( new HasScopeRequirement("read:books", Configuration["Auth0:Authority"]) )); options.AddPolicy("write:books", policy => policy.Requirements.Add( new HasScopeRequirement("write:books", Configuration["Auth0:Authority"]) )); });
Then, you will change the
BooksControllerFirst of all, you need to transform the current array of books into a static list, as shown below:
[Route("api/[controller]")]
public class BooksController : Controller
{
    private static List<Book> bookList = new List<Book>() {
    new Book { Author = "Ray Bradbury", Title = "Fahrenheit 451", AgeRestriction = false },
    new Book { Author = "Gabriel García Márquez", Title = "One Hundred years of Solitude" AgeRestriction = false },
        new Book { Author = "George Orwell", Title = "1984", AgeRestriction = false },
        new Book { Author = "Anais Nin", Title = "Delta of Venus", AgeRestriction = true }
    };

    [HttpGet, Authorize("read:books")]
  public IEnumerable<Book> Get()
  {
    return bookList;
    }

    //... etc
}
This is necessary because you need to keep the same list among the various requests and get any changes to it. Of course, in a real world scenario this data should be stored in a database.
Now you can add a new API to add a book to the current book list:
[Route("api/[controller]")]
public class BooksController : Controller
{
  //... bookList definition

  [HttpPost, Authorize("write:books")]
  public void Post([FromBody] Book book)
  {
    bookList.Add(book);
  }

  //... etc
}
As you can see, the new API simply adds to the list of books the book representation received from the body of the HTTP POST request. The important thing is that the API has been marked with the
Authorizewrite:booksAllowing to Add Books from the React Client
On the React client side, you will implement the addition of books.
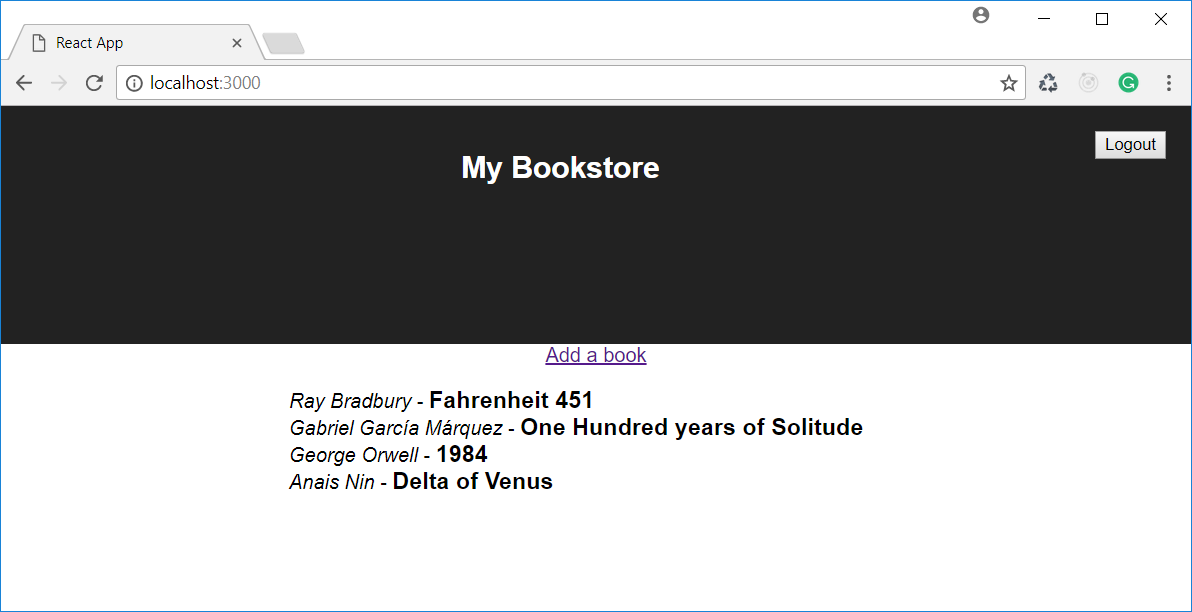
First, you add in the home page a link that will open a page allowing to submit a new book. This can be done by starting with a small change in the JSX code of the
Homeclass Home extends React.Component { //... constructor and other statements render() { //... other statements return ( <div> <Link to="/bookForm">Add a book</Link> <ul> {bookList} </ul> </div> ); } }
This simple addition makes the home page looking as follows:
Then you need to define the route used in the
LinkApp//... other imports import BookForm from './BookForm'; class App extends Component { //... other statements render() { const logoutButton = this.createLogoutButton(); return ( <div className="App"> <header className="App-header"> {logoutButton} <h1 className="App-title">My Bookstore</h1> </header> <Switch> <Route exact path="/" render={() => this.renderHome()}/> <Route path="/startSession" render={({history}) => this.startSession(history)}/> <Route path="/bookForm" render={({history}) => <BookForm history={history} auth={this.authService}/>}/> </Switch> </div> ); } }
The
/bookFormBookFormAuthServiceThen, you will implement the
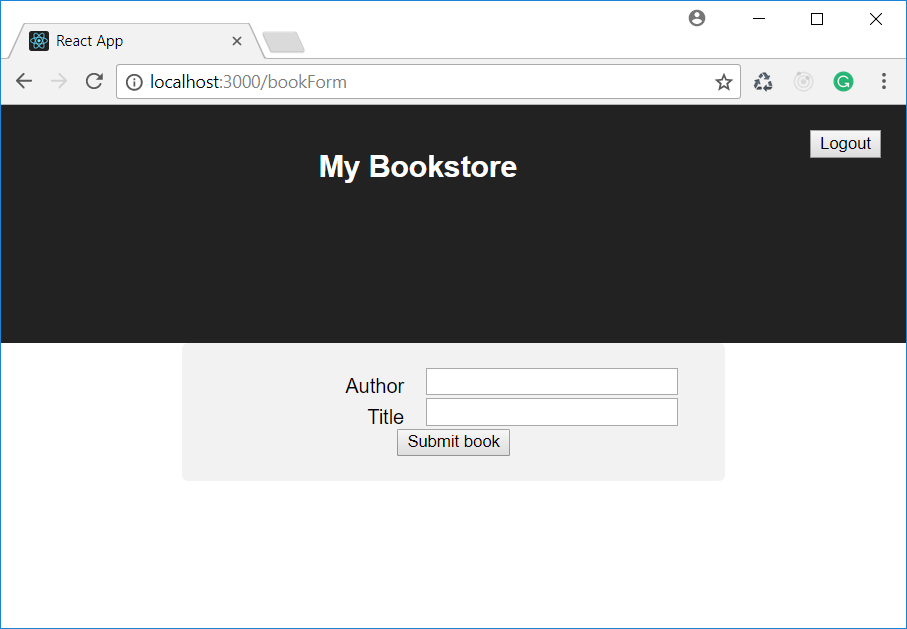
BookFormBookForm.jsimport React from 'react'; import './BookForm.css' class BookForm extends React.Component { constructor() { super(); this.state = { author: "", title: "" }; } handleAuthorChange(e) { this.setState({author: e.target.value}); } handleTitleChange(e) { this.setState({title: e.target.value}); } render() { return ( <div className="formContainer"> <form onSubmit={(e) => this.handleFormSubmit(e)}> <div className="row"> <label className="col-50" htmlFor="author">Author</label> <input type="text" name="author" value={this.state.author} onChange={(e)=> this.handleAuthorChange(e)}/> </div> <div className="row"> <label className="col-50" htmlFor="title">Title</label> <input type="text" name="title" value={this.state.title} onChange={(e)=> this.handleTitleChange(e)}/> </div> <div className="row"> <input type="submit" value="Submit book"/> </div> </form> </div> ); } handleFormSubmit(e) { //TO BE IMPLEMENTED } } export default BookForm;
The markup generated by the
render()The styles of the form are defined in the
BookForm.css.formContainer { border-radius: 5px; background-color: #f2f2f2; padding: 20px; margin-left: 20%; margin-right: 20%; } .row:after { content: ""; display: table; clear: both; } .col-50 { float: left; width: 40%; margin-top: 6px; text-align: right; } input[type=text] { width: 50%; }
Looking at the component's code, you can find that the constructor initializes the state of the component. It is defined as an object with an empty string for the author and the title of a book. You can also find two methods,
handleAuthorChange()handleTitleChange()handleFormSubmit()onSubmithandleFormSubmit(e) { e.preventDefault(); const accessToken = this.props.auth.getAccessToken(); fetch("/api/books", { method: "POST", body: JSON.stringify(this.state), headers: new Headers({ "Content-Type": "application/json", "Authorization": `Bearer ${accessToken}` }) }).then((response) => { if (response.ok) { this.props.history.push("/"); } else { alert(response.statusText); } }); }
As you can see, the first line of the method prevents the default behaviour of form submission. This is needed to avoid the standard page reloading performed by the browser. Then you get the access token by using the
getAccessToken()AuthServicefetch()HomeDisabling Book Addition for Not Authorized Users
The implementation you made so far works fine. If you access the application by using an admin user, you will be able to add a new book by clicking the Add a book link, filling the form and submitting it to the server. On the other hand, if you access the application by using a simple user (i.e. a non-admin user) you will be able to click on the Add a button link and fill the book form, but when you will try to submit the form's data to the server you will receive a
403Even if this behaviour is functionally correct, letting the user to access the book form when he is not authorized to send data to the server is very annoying. You should make sure that only admin users access the book form. In other words, only admin users should see the Add a button link.
You can obtain this result by making a few changes to the React application.
The first thing you need to do is getting the scopes returned by the authorization server and store them into the session data. That's mean to add the following line to the
setSession()AuthServicesetSession(authResult) { //... other statements localStorage.setItem('scopes', JSON.stringify(authResult.scope || "")); }
As you can see, you can find the user's scope in the
authResultscopeNow you can add the
hasScopes()AuthServiceexport default class AuthService { //... other statements hasScopes(scopes) { const grantedScopes = JSON.parse(localStorage.getItem('scopes')).split(' '); return scopes.every(scope => grantedScopes.includes(scope)); } }
This method takes an array of strings representing scopes and returns a boolean value saying if the passed scopes are included in the scopes granted to the user (
truefalseYou will use the
hasScopes()render()Homeclass Home extends React.Component { //... other statements render() { const bookList = this.state.bookList.map((book) => ( <li><i>{book.author}</i> - <h3>{book.title}</h3></li> )); const addBookButton = this.props.auth.hasScopes(["write:books"]) ? <Link to="/bookForm">Add a book</Link> : null; return ( <div> {addBookButton} <ul> {bookList} </ul> </div> ); } }
As you can see, the
addBookButton<Link>write:booksnull“Managing OAuth 2.0 Scopes on ASP.NET Core 2.0 is easy.”
Tweet This
Summary
In this part of the series, you made a few settings on the Auth0 dashboard in order to define and manage scopes and roles for users. Then you changed the Web API application implemented in the first part and the React-based client built in the second part of the series in order to support user's permission previously defined.
You can find the final code and download it from the GitHub repository.
About the author

Andrea Chiarelli
Principal Developer Advocate
I have over 20 years of experience as a software engineer and technical author. Throughout my career, I've used several programming languages and technologies for the projects I was involved in, ranging from C# to JavaScript, ASP.NET to Node.js, Angular to React, SOAP to REST APIs, etc.
In the last few years, I've been focusing on simplifying the developer experience with Identity and related topics, especially in the .NET ecosystem.

