When you build B2B SaaS, you need multitenancy for better resource allocation while keeping security. Auth0 Organizations provides you with a set of features that allow you to build your B2B application with a high level of flexibility. Let's explore how you can use these features to build your B2B SaaS on the .NET platform using Blazor.
This article uses Blazor as the reference framework to build the sample project, but you can use the same approach with any other server-side ASP.NET Core framework, such as ASP.NET Core MVC and Razor Pages.
Why Use Organizations?
When you use Auth0 to secure your application, you set up an Auth0 tenant to isolate the resources and the users dedicated to it. That's pretty fine when your userbase does not need any further structuring. Assume you need to further isolate groups of users, i.e., you want to create groups of users that can access your application with different authentication options, different sets of roles, or different branding. This is a typical scenario for B2B SaaS, where you provide access to your application to your business customers. Your business customers have their own users, which need to be isolated for security and customization reasons while still using the same application.
This is where Auth0 Organizations can help you!
At a high level, see Auth0 Organizations a way to structure groups of users within an Auth0 tenant, as illustrated by the following diagram:
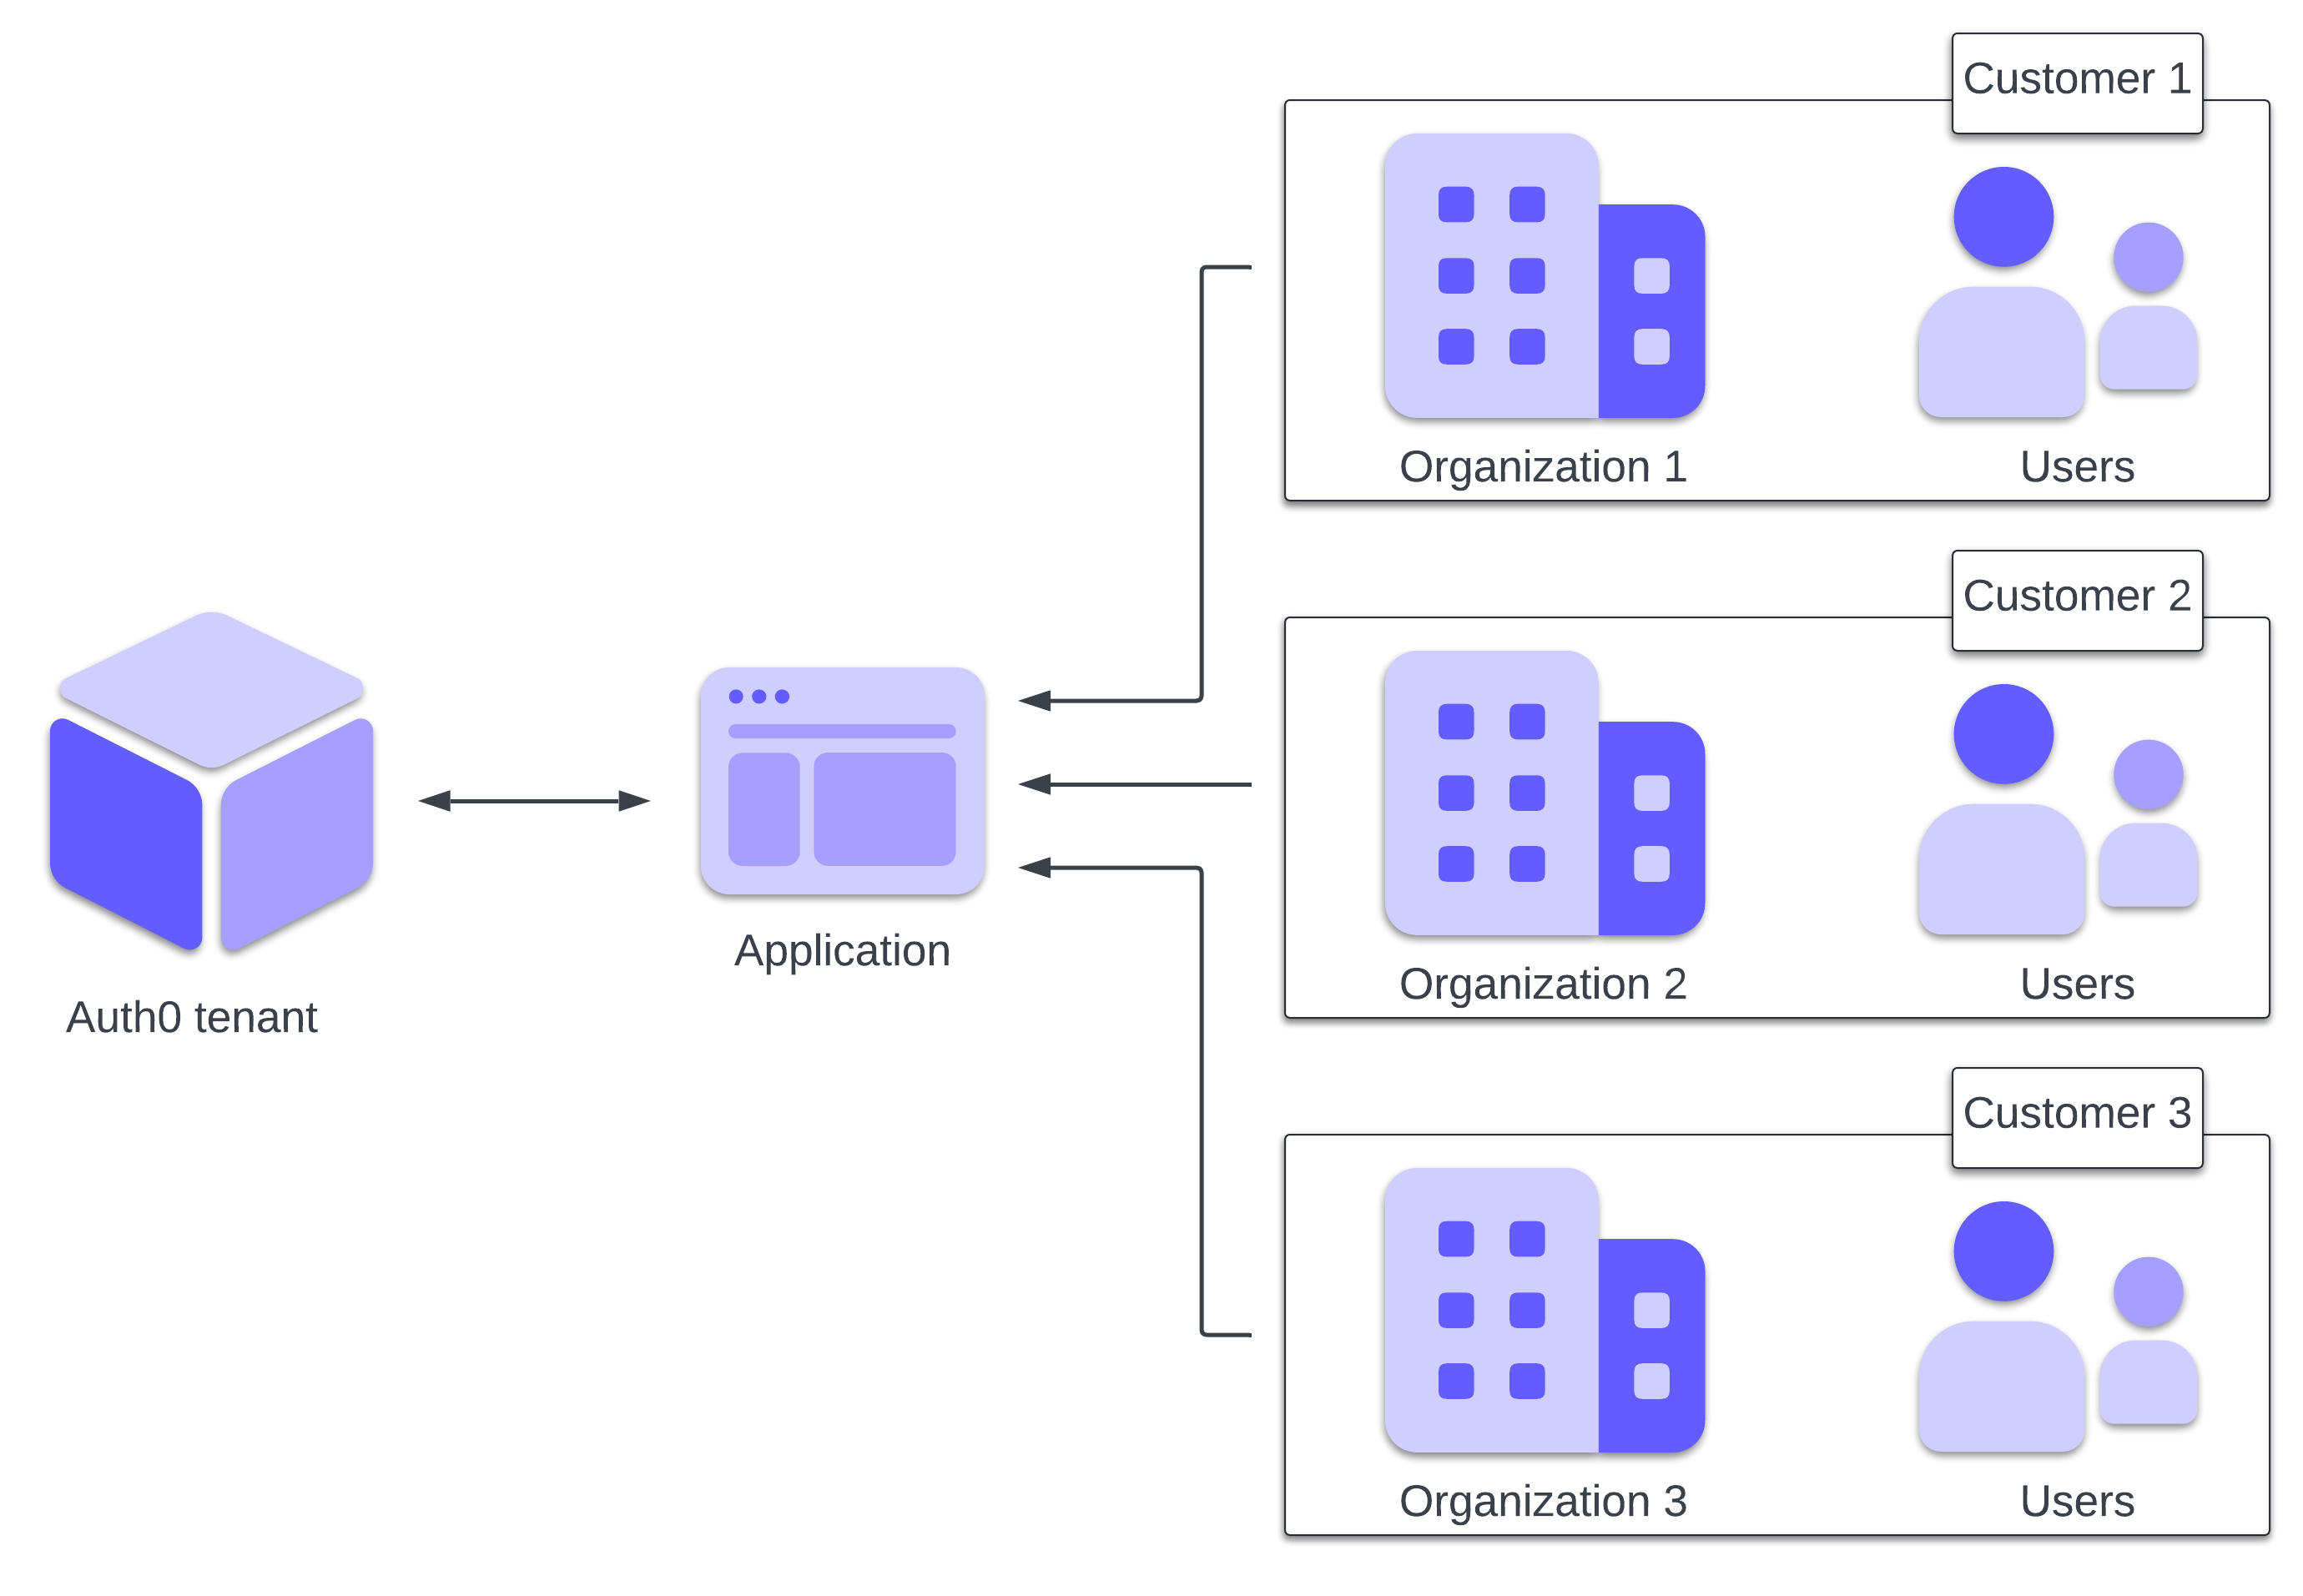
In a B2B scenario, your application is associated with one Auth0 tenant and supports multiple Organizations, one for each of your customers. These Organizations allow you to isolate users and customize your application for each customer.
Let's see how this works in practice.
The Sample Project
Throughout this article, you will use a basic Blazor application with Auth0 authentication. You will add support for Auth0 Organizations and will learn how to add users and manage their authentication in the Organization context.
For the purpose of this article, we will focus on a B2B scenario with the following constraints:
- You set up the Auth0 Organization for your customers.
- Users can't autonomously sign up.
- Only members of an Organization can access your application.
- You create the Organization's members on behalf of your customers.
You can build the starter application in two ways:
- Using the Auth0 Templates for .NET.
- Building it from scratch.
Use the Auth0 Templates for .NET
You can build the starter application by leveraging the Auth0 Templates for .NET , specifically, the Blazor Web Application template. Make sure you follow the instructions to install the NuGet package and use the Blazor Web App template through the .NET CLI, Visual Studio, or JetBrains Rider.
If you use the .NET CLI and have the Auth0 CLI installed on your machine and logged in to your Auth0 tenant, you can leverage the automatic registration feature by simply running the following command:
dotnet new auth0blazor -o MyBlazorSaaS
This command will create a ready-to-run Blazor application with Auth0 authentication embedded in the
MyBlazorSaaSOtherwise, if you don't have the Auth0 CLI installed or you use the template with Visual Studio or Rider, you need to register your app with Auth0 and configure the
appsettings.jsonBuild the app from scratch
If you want to build your starter application from scratch, read this article to learn how to add Auth0 authentication to a basic Blazor Web App.
Whatever approach you used to build and configure your starter app, run it to make sure that everything works as expected.
Leverage Auth0's authentication and authorization services in your .NET applications.
DOWNLOAD THE FREE EBOOK
Set Up a New Organization
Now, assume you sold your awesome SaaS application to the company Acme Inc. You will need to create an Auth0 Organization for them so that they can use your application without interfering with the users of your other customers.
Create a new Organization
Go to your Auth0 dashboard and select the Organizations item in the left-hand menu, then click the Create Organization button. You will be asked to enter the new Organization's name and display name, as shown in the following image:
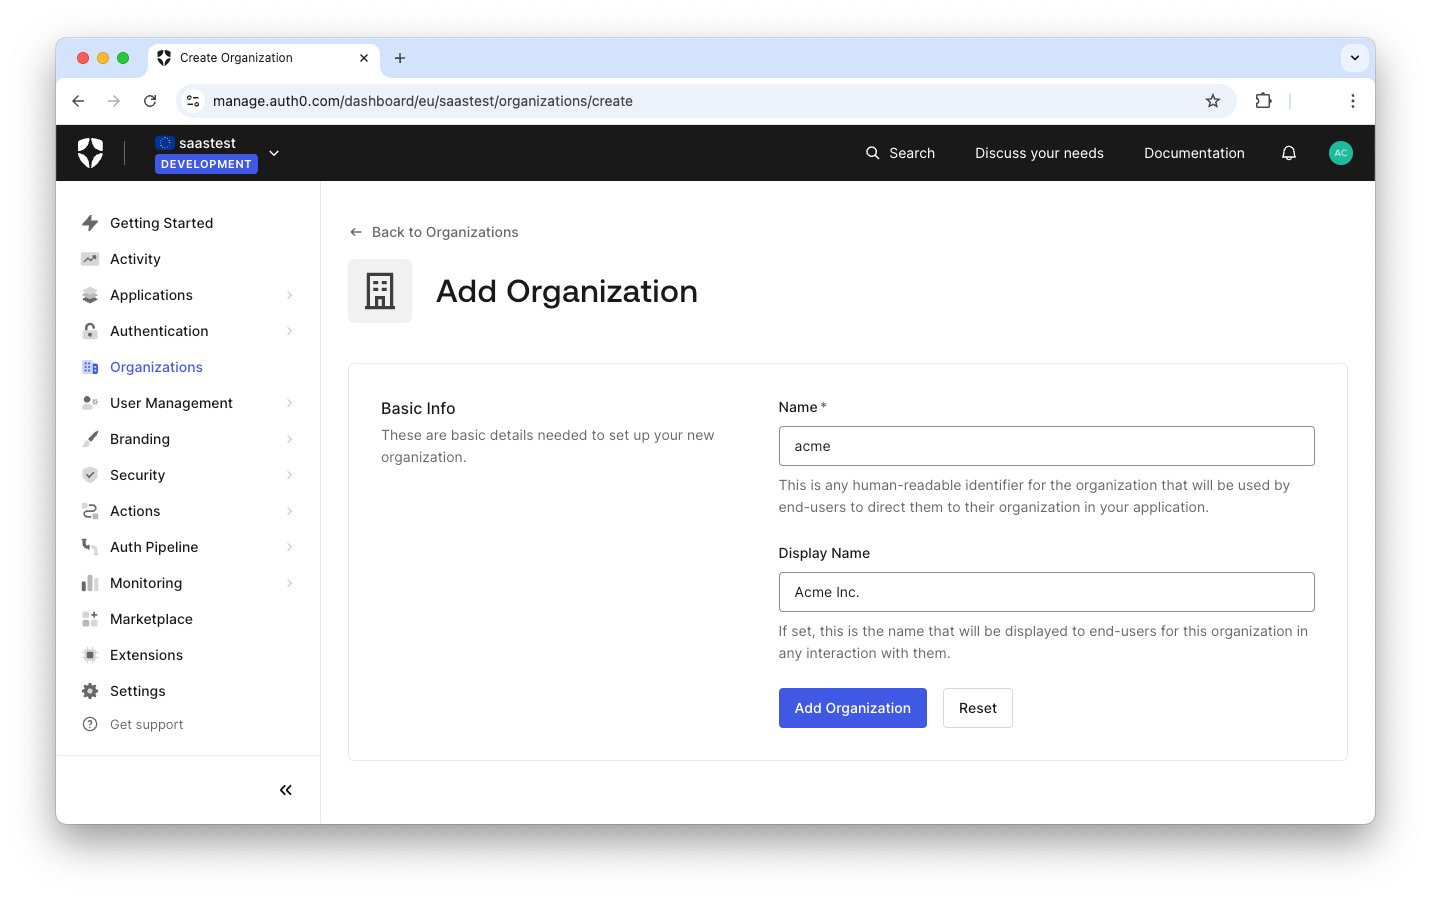
In the picture above, you can see "acme" as the name and "Acme Inc." as the display name of the Organization you are creating. Click the Add Organization button and you will navigate to the configuration page for your new customer's Organization:
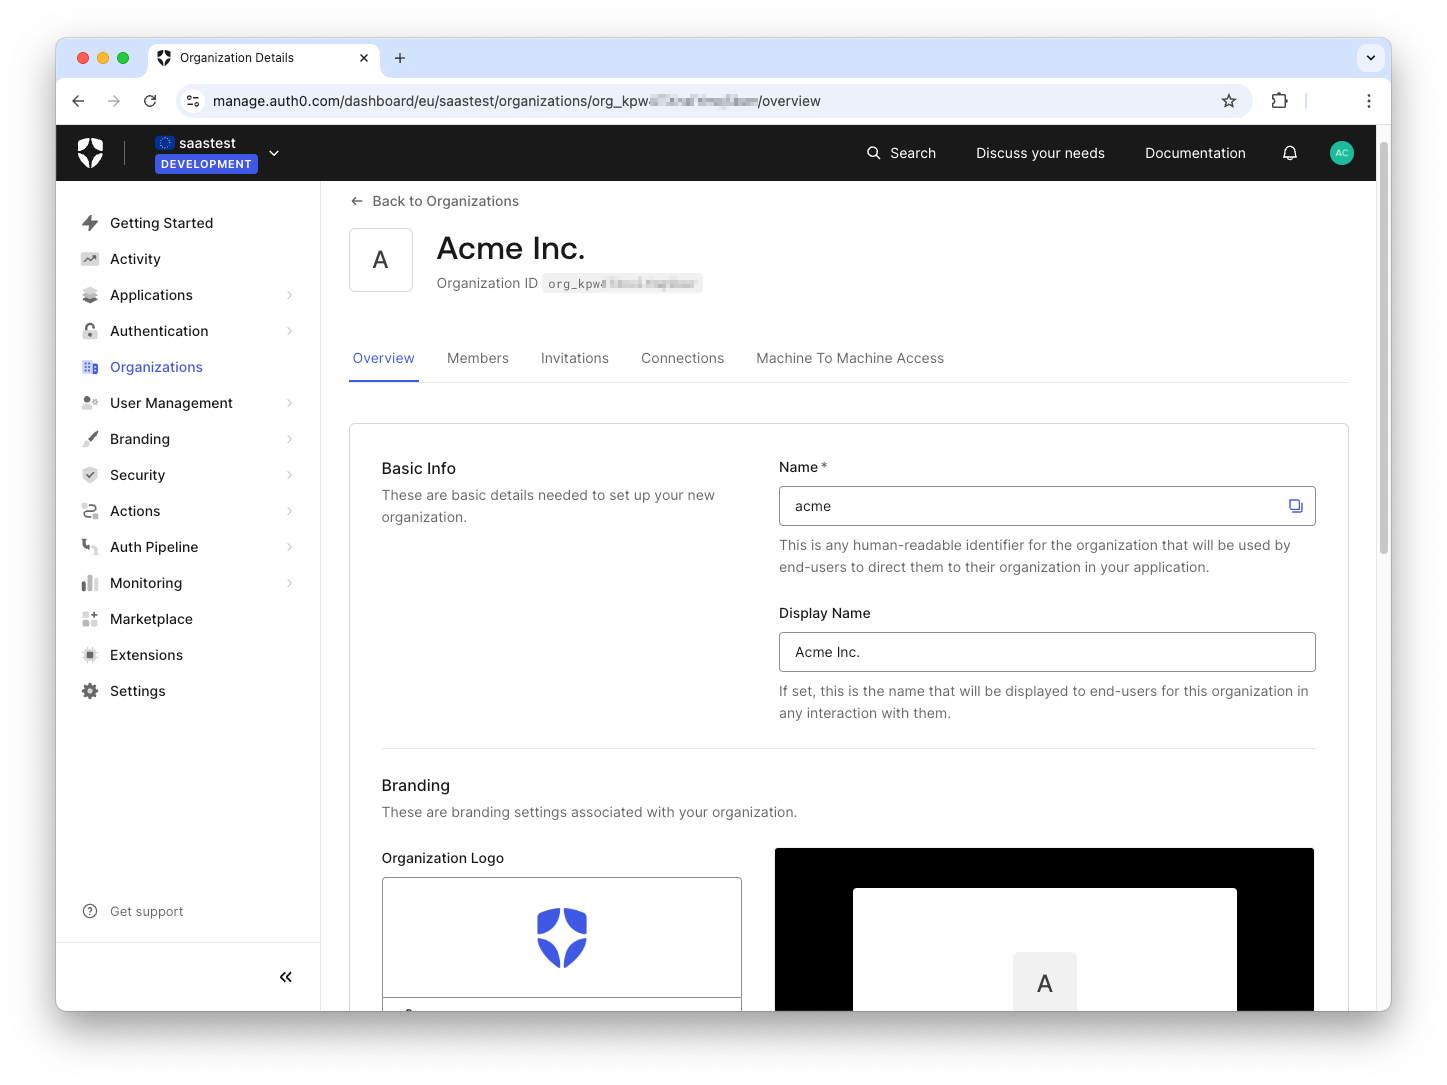
Congratulations! You have created a basic Organization for your customer.
The Organization's configuration page allows you to manage and customize your customer's Organization. You will use it in the following, but we will not explore all the available features. Read the documentation to learn how to configure your Organization.
If you go back to the Organizations page, you can see the new Organization listed there:
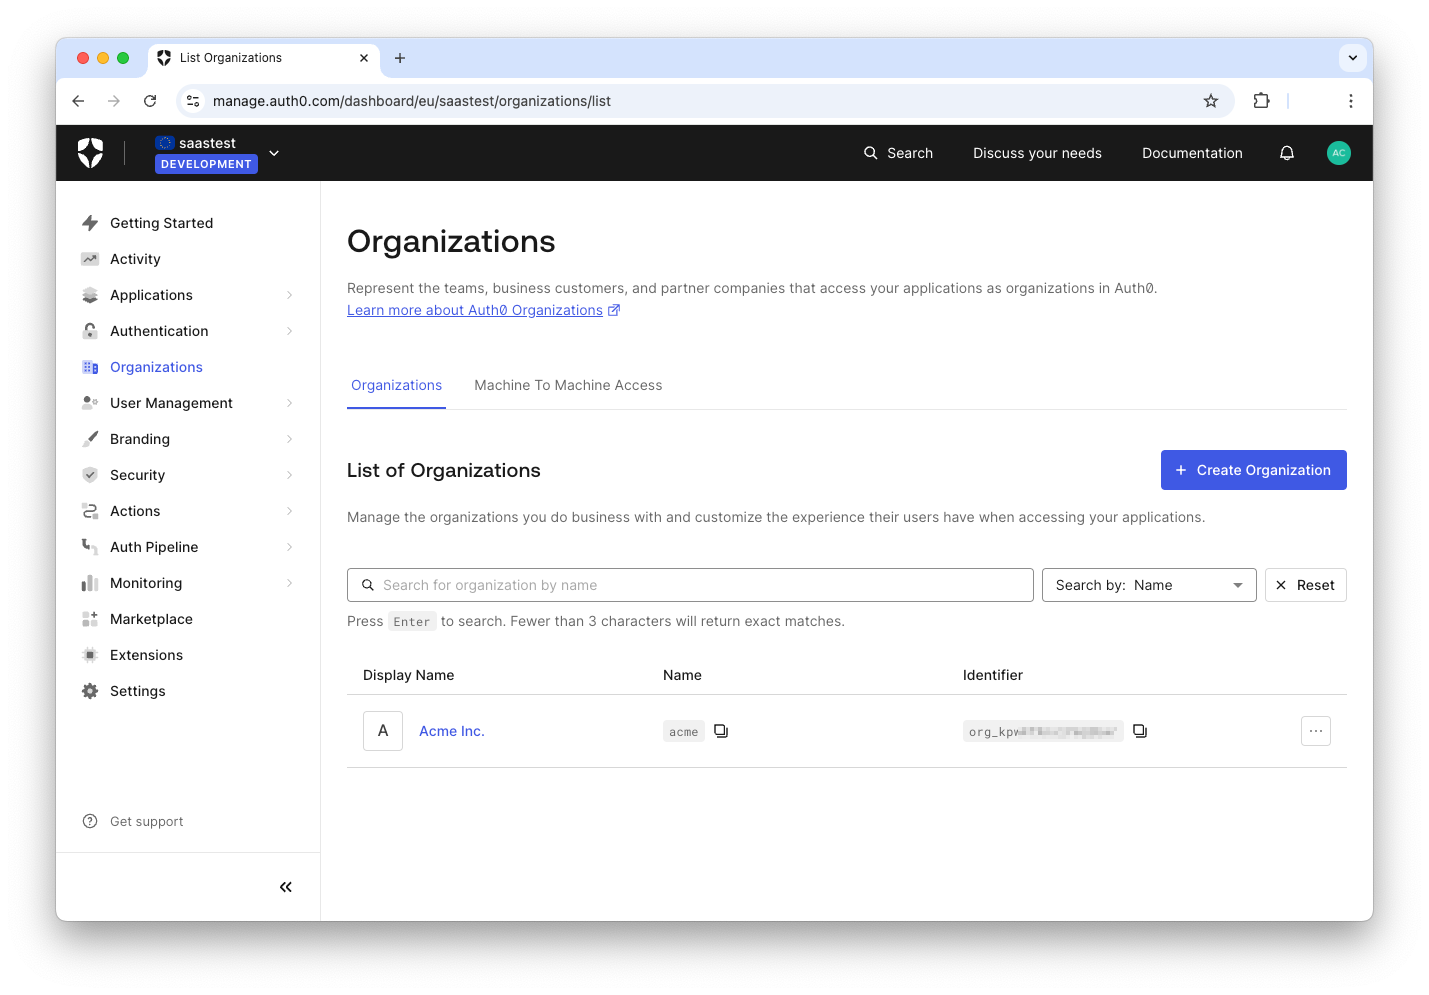
Note the Identifier column. This value will allow you to identify this Organization in your code.
Enable connections for your Organization
Now, open your Organization page again by clicking the link associated with the Organization's display name ("Acme Inc." in our example), and navigate to the Connections tab. Here you can add the connections that determine how users will log in to your application in the context of this Organization.
By default, you have no connections configured. So, click the Enable Connections button and select the connections you want to enable. You could enable just the built-in
Username-Password-AuthenticationUsername-Password-Authentication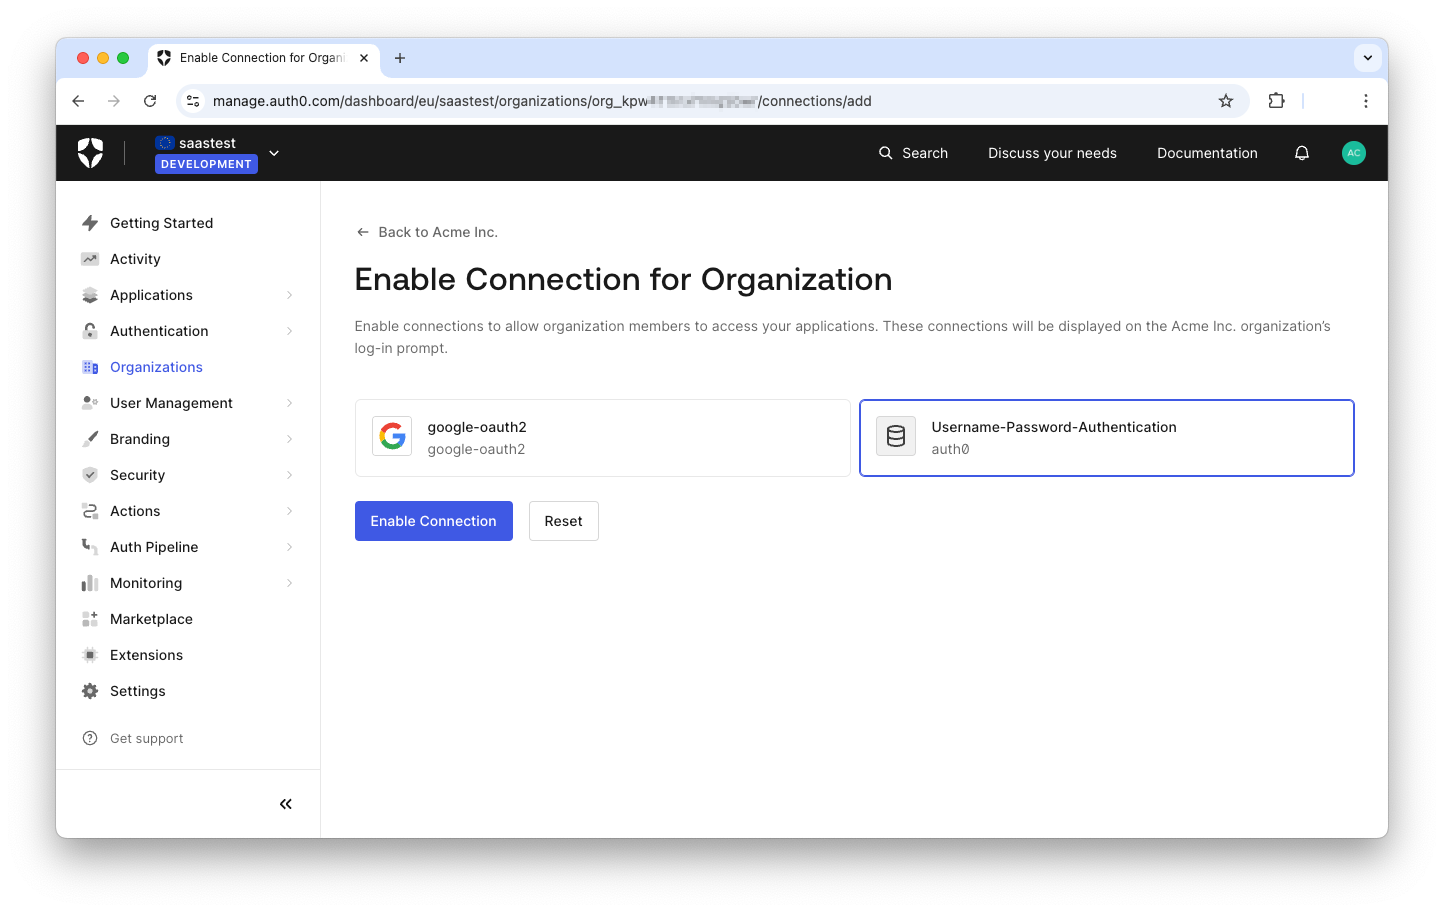
Keep in mind that you can enable only connections that have been already configured for your tenant. If you don't see the connection you want to enable here, navigate to the Authentication menu of your dashboard and configure it first.
Once you select a connection and enable it, you will land on the connection configuration page in the context of this Organization, where you can define how users can join the Organization. This choice strictly depends on the type of application you built and how your business customer wants to manage their users. For the purpose of this article, assume that your application is meant to give your customers control over who can access it. In other words, users cannot autonomously sign up for the application. In this scenario, you can leave the default configuration for the
Username-Password-Authentication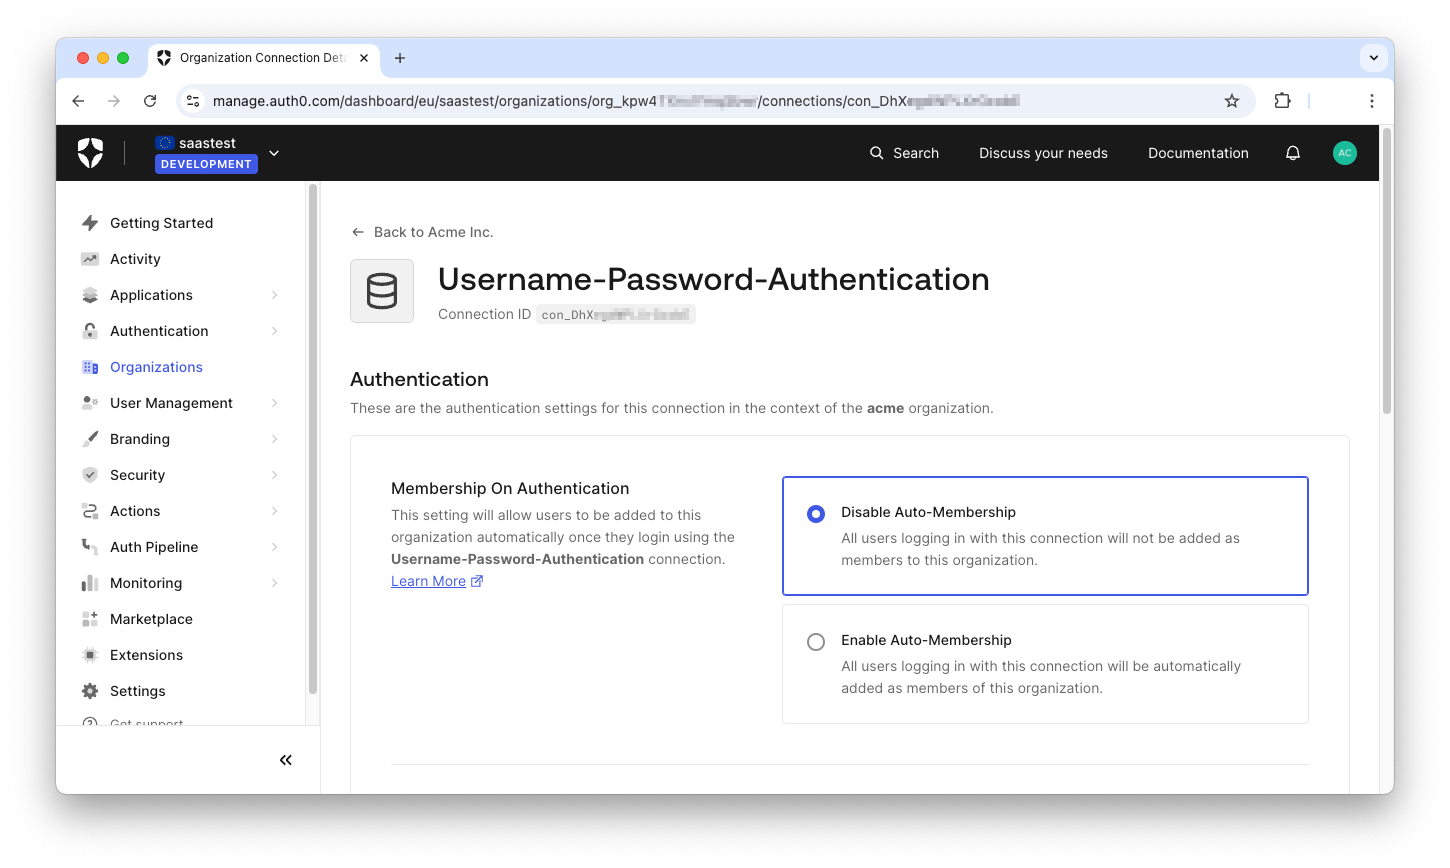
Configure the Organization's behavior for your app
Once your customer's Organization is configured, you need to define how users can access your application via an Organization. Navigate to the Applications > Applications menu and select your application. On the configuration page, select the Organizations tab. A page like the following will show:
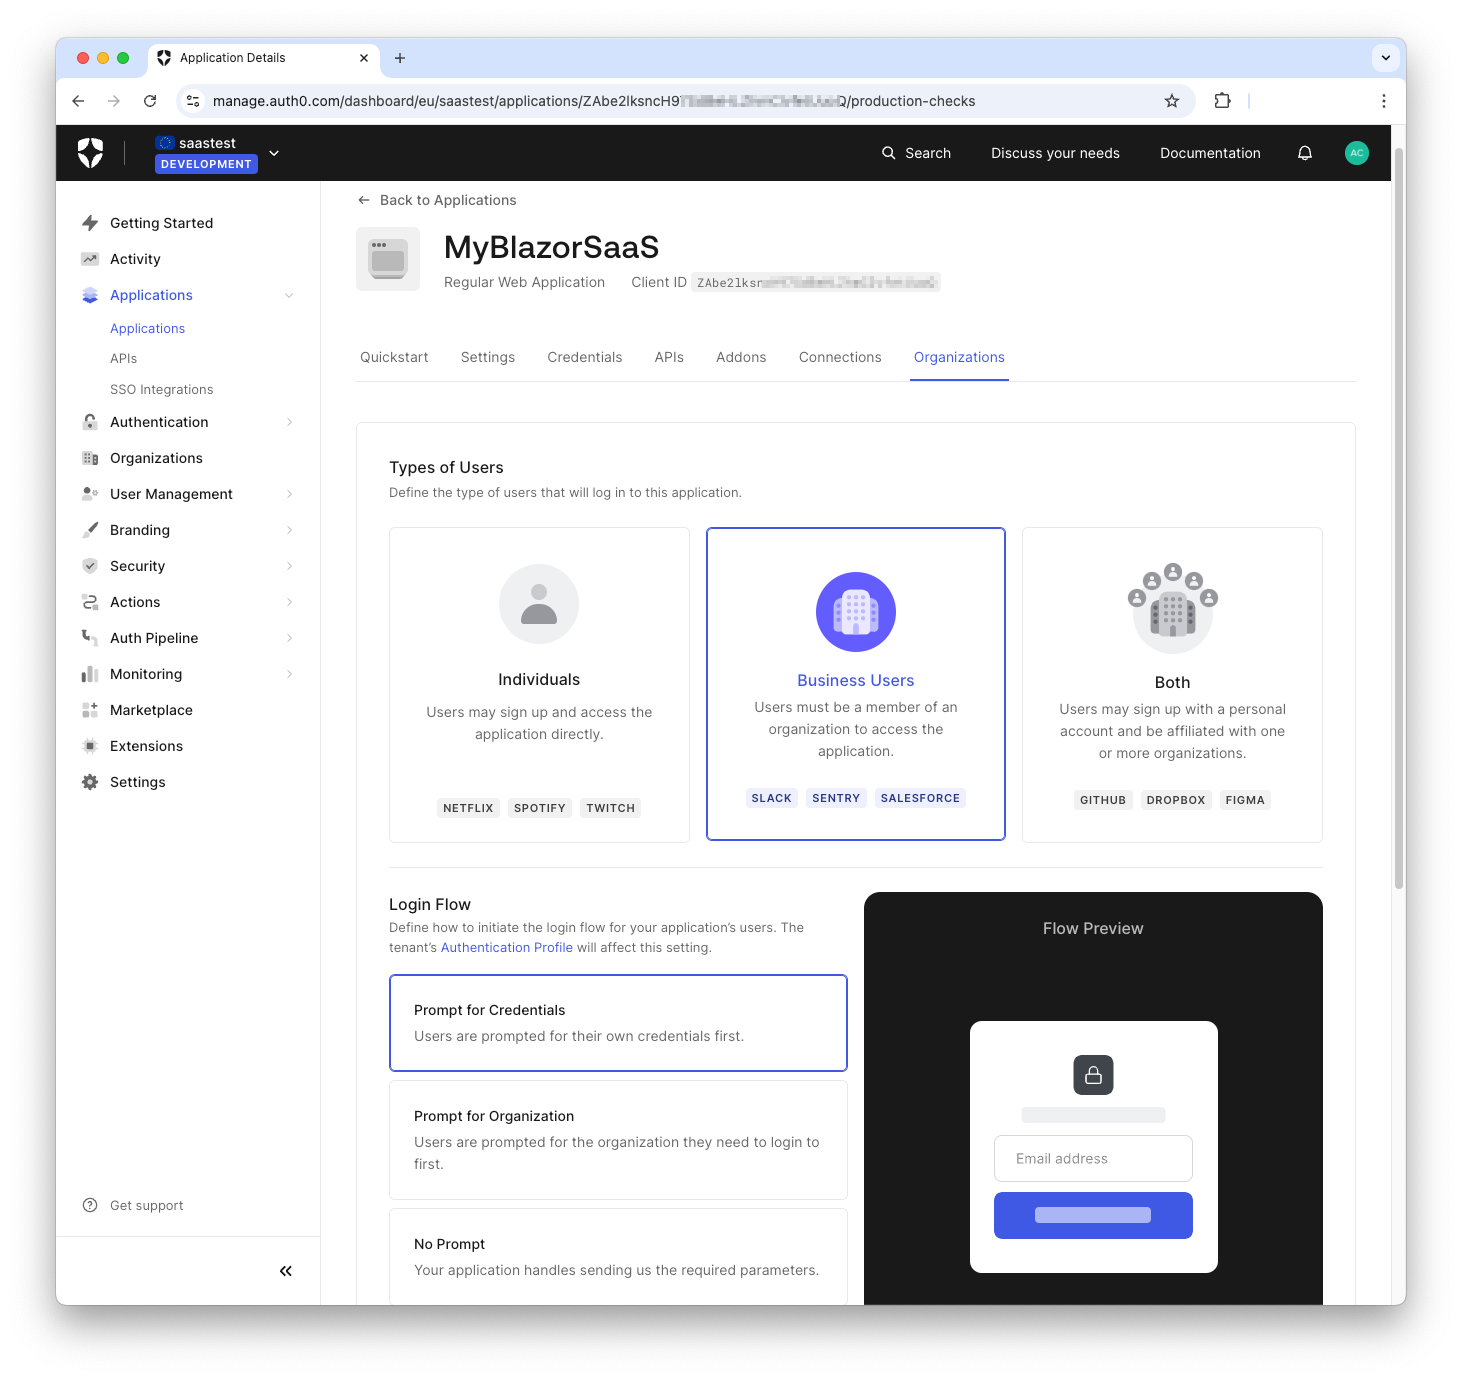
On this page, you define the types of users that can log in to your application in the context of Organizations and the login flow you want to enable. The image above shows the settings you will apply for the purpose of this article. Read the documentation to learn more about Login Flows for Organizations.
Based on the constraints we set above, only members of an Organization can log in to your application. So, you select Business Users as the type of user. Also, you select Prompt for Credentials as the login flow because you want to show the usual login page.
That's it! The Organization configuration is almost ready.
Manage User Invitations
The next step is to add users to the newly created Organization. There are a few ways to accomplish this, depending on the specific strategy you want to use for your application. Based on the constraints defined earlier, you don't want users to sign up for an Organization. Therefore, you will add users to your Auth0 tenant and then make them members of an Organization. Alternatively, you can invite them to join an Organization via email. Basically, the user will receive an email with a link to join the Organization. If the user accepts the invitation by navigating the link, they are automatically added to the Organization.
Let's explore how you can implement the invitation flow.
Configure the invitation link
First, you need to define a URL that matches your application's route and will handle the invitation. Let's say that
<BASE_URL>/account/invitation<BASE_URL>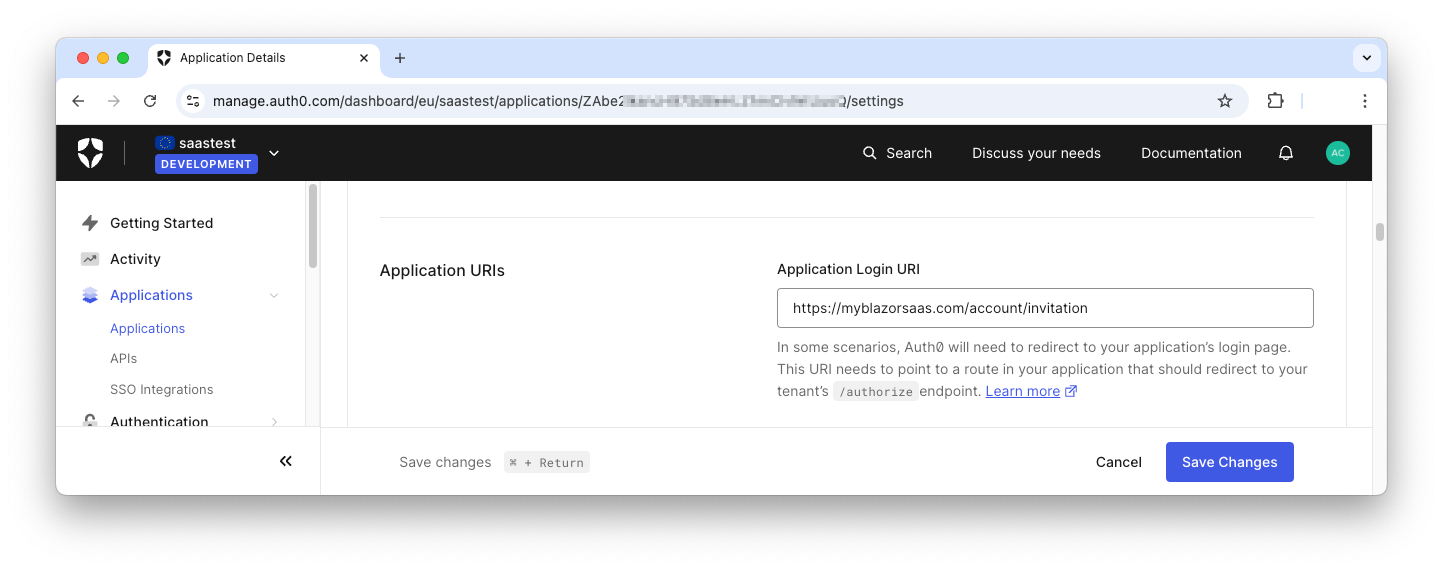
Click the Save Changes button to complete the configuration.
Handle the invitation
Now, when the user accepts the invitation received via email and clicks the invitation link, you need to handle the incoming request. The invitation URL generated by Auth0 has two parameters:
invitationorganizationGo to the
MyBlazorSaaSProgram.cs// MyBlazorSaaS/Program.cs // ...existing code... // 👇 new code app.MapGet("/account/invitation", async (HttpContext httpContext, string organization, string invitation) => { var authenticationProperties = new LoginAuthenticationPropertiesBuilder() .WithOrganization(organization) .WithInvitation(invitation) .Build(); await httpContext.ChallengeAsync(Auth0Constants.AuthenticationScheme, authenticationProperties); }); // 👆 new code app.MapRazorComponents<App>() .AddInteractiveServerRenderMode() .AddInteractiveWebAssemblyRenderMode() .AddAdditionalAssemblies(typeof(MyBlazorSaaS.Client._Imports).Assembly); app.Run();
This code leverages the Auth0 ASP.NET Core Authentication SDK to start the login process within an Organization with an invitation.
You can customize the user invitation experience by adapting the Universal Login page and the email that the user receives. Read here to learn more.
Now your application is ready to handle invitations accepted by the users.
Send the user invitation
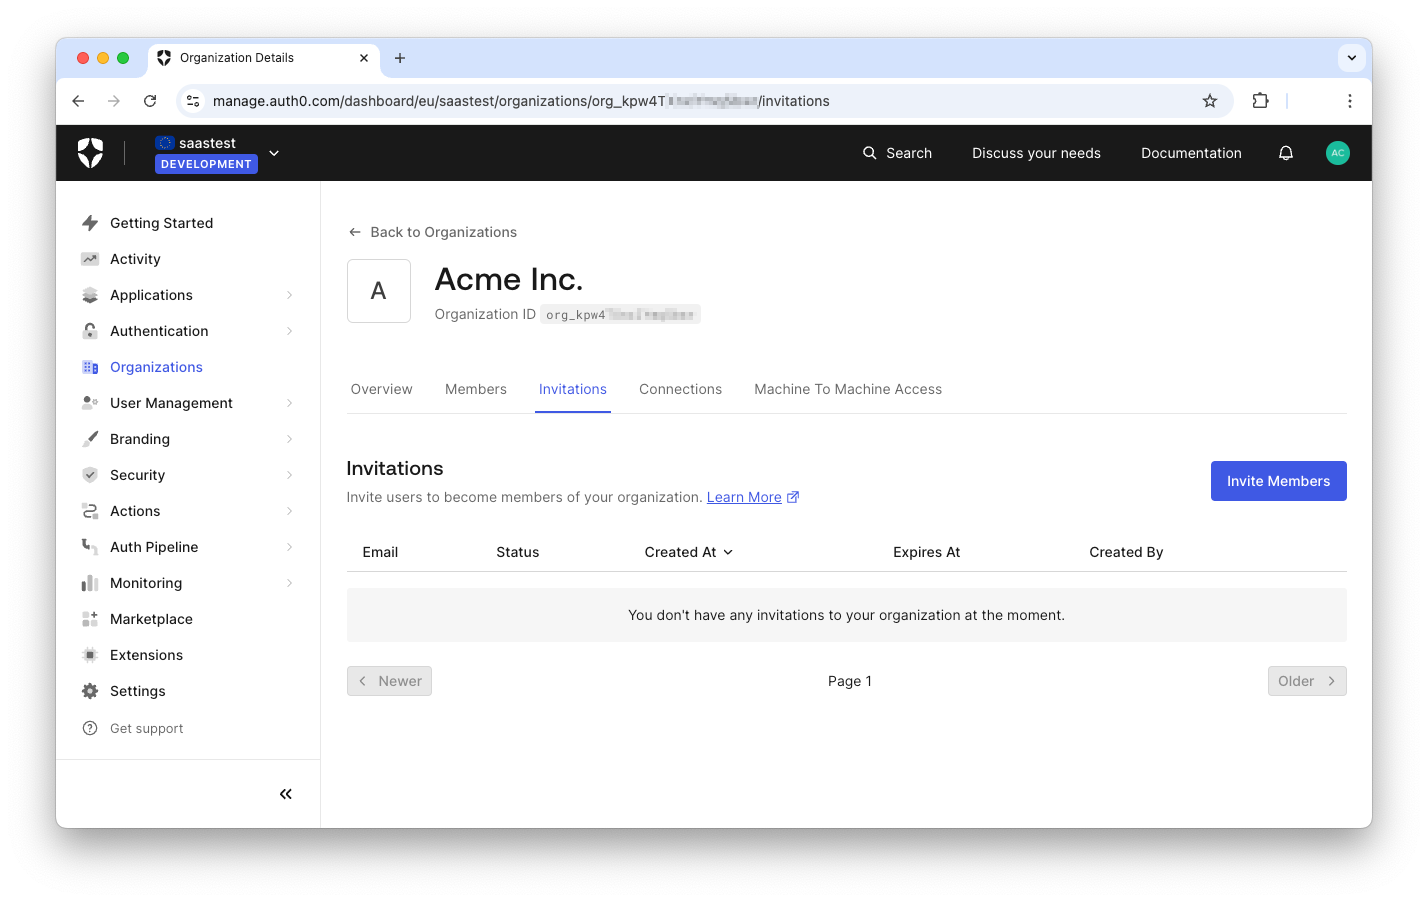
To invite a user to join your customer's Organization, navigate to the Organizations menu item of your dashboard and select the Organization you want to add the user to. In the Organization page, select the Invitations tab and click the Invite Members button:
In the page that opens, select your application and add the email address of the user you want to invite to join, as shown in the following image:
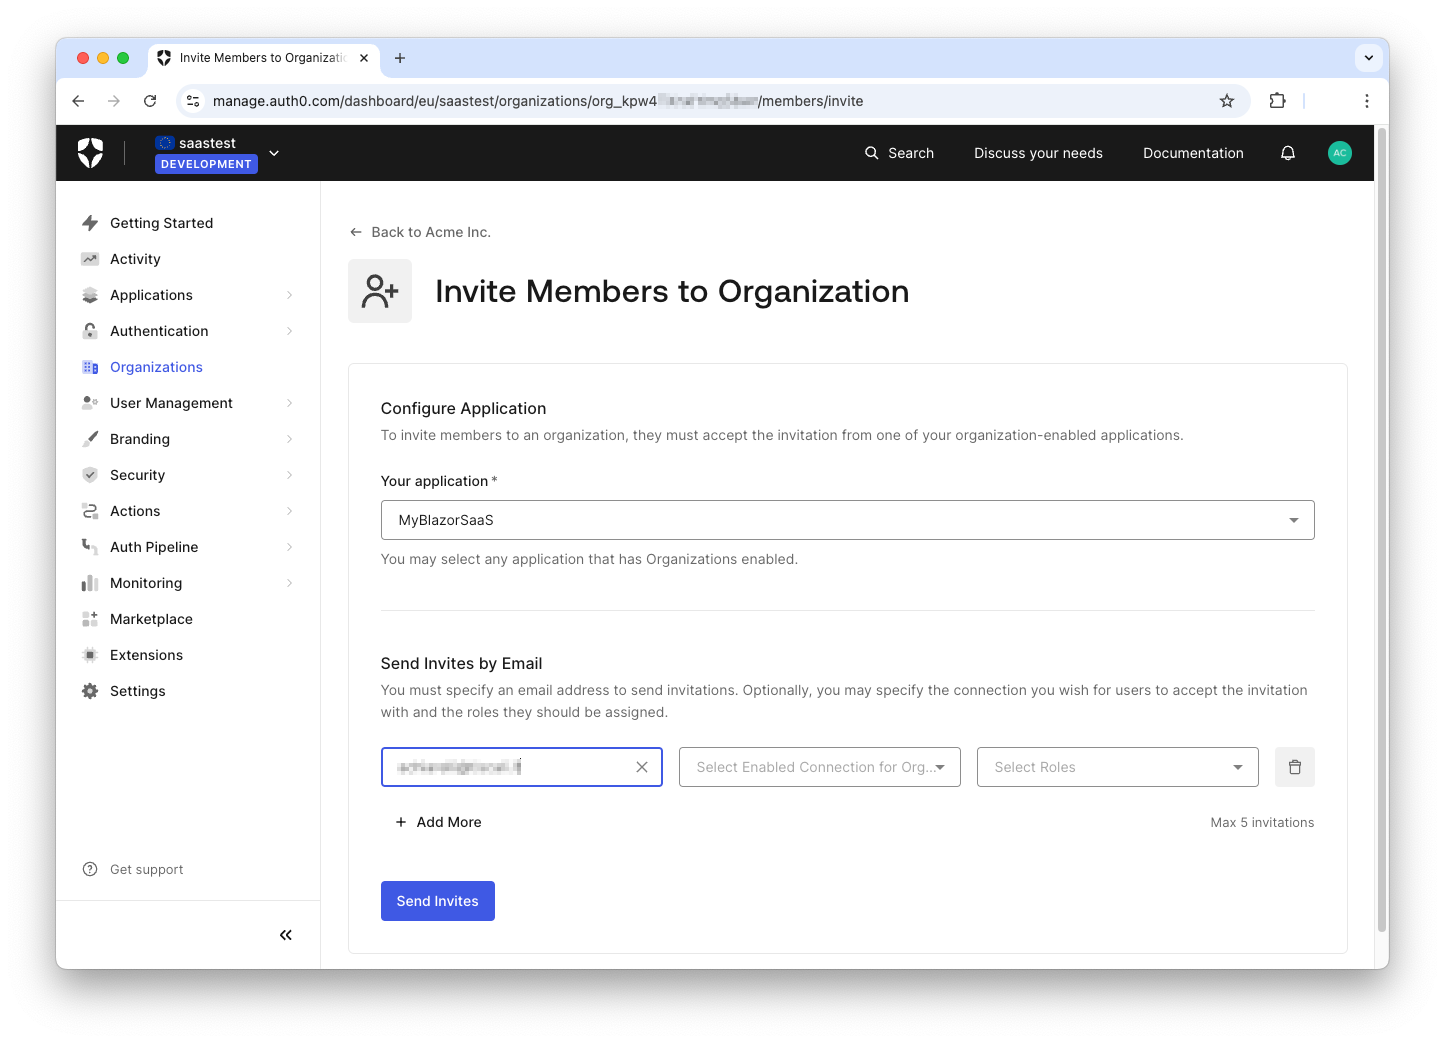
You can invite up to five users at a time from the Auth0 dashboard. You can optionally define the connection with which the user will accept the invitation and the role assigned to the user. These options are out of the scope of this article.
Once you filled out that form, click the Send Invites button.
As a result, an email with the invitation link will be sent to the user and you will see the newly sent invitation in a Pending status on the invitation list page.
When the user clicks the invitation URL received via email, they will be redirected to the sign-up form to join the customer's Organization, as in the following example:
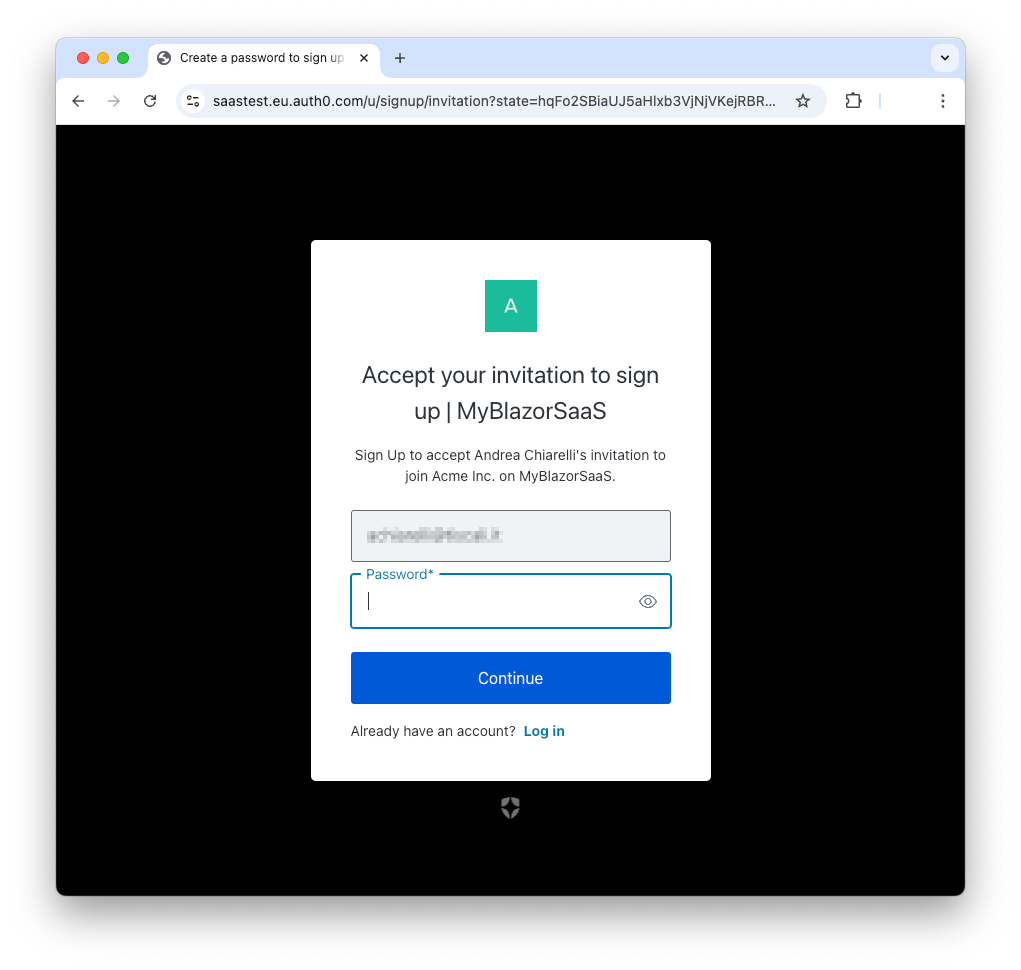
Once the user has chosen a password and created their profile, they are automatically logged in to your application in the context of your customer's Organization.
Authenticate Users in an Organization
As you learned earlier, you can configure the login flow in a few different ways. For the purpose of this article, you applied the Prompt for Credentials flow. This means that the next time the user logs in, your application will authenticate them through the Universal Login page as usual.
In this scenario, you need to consider two cases: your application knows the user's Organization before authenticating the user or it does not know the user's Organization. Let's analyze both cases.
Authenticate users without knowing the Organization
Assume your application does not know the user's Organization before authenticating them. In this case, the code to authenticate users does not change:
// MyBlazorSaaS/Program.cs

//...existing code...

app.MapGet("/account/login", async (HttpContext httpContext, string redirectUri = "/") =>
{
  var authenticationProperties = new LoginAuthenticationPropertiesBuilder()
          .WithRedirectUri(redirectUri)
          .Build();

  await httpContext.ChallengeAsync(Auth0Constants.AuthenticationScheme, authenticationProperties);
});

//...existing code...
Since Auth0 does not know the Organization to which the user belongs, the tenant's Universal Login page will be shown to the user. In other words, the user does not see the login page that you have possibly customized for the Organization. Only after authentication Auth0 will know what Organization the user is member of and include this information in the
org_idSince, in this scenario, your application does not pass the Organization ID to Auth0, you need to validate the value of the
org_idHere is an example of how to validate the
org_id// MyBlazorSaaS/Program.cs //...existing code... builder.Services .AddAuth0WebAppAuthentication(options => { options.Domain = builder.Configuration["Auth0:Domain"]; options.ClientId = builder.Configuration["Auth0:ClientId"]; // 👇 new code options.OpenIdConnectEvents = new OpenIdConnectEvents { OnTokenValidated = (context) => { var organizationClaimValue = context.SecurityToken.Claims.SingleOrDefault(claim => claim.Type == "org_id")?.Value; var expectedOrganizationIds = new List<string> {"org_123", "org_456>"}; if (!string.IsNullOrEmpty(organizationClaimValue) && !expectedOrganizationIds.Contains(organizationClaimValue)) { context.Fail("Unexpected org_id claim detected."); } return Task.CompletedTask; } }; // 👆 new code }); //...existing code...
You added a handler for the
TokenValidatedorg_idexpectedOrganizationIdsIn the example above, the content of the
expectedOrganizationIdsAuthenticate users knowing the Organization
If your application knows the Organization ID before authenticating the user, your code can send the Organization ID to Auth0 so that the customized login page will be shown. To pass the Organization ID to Auth0, you can simply add a line to your code, as highlighted below:
// MyBlazorSaaS/Program.cs

//...existing code...

app.MapGet("/account/login", async (HttpContext httpContext, string redirectUri = "/") =>
{
  var authenticationProperties = new LoginAuthenticationPropertiesBuilder()
          .WithRedirectUri(redirectUri)
          .WithOrganization("<ORG_ID>")  //👈 new code
          .Build();

  await httpContext.ChallengeAsync(Auth0Constants.AuthenticationScheme, authenticationProperties);
});

//...existing code...
In the code above, the
WithOrganization()How your application can get the organization ID before authenticating the user is outside the scope of this article.
In this case, you don't need to explicitly validate the Organization ID because the SDK will do it for you.
Get the current user's Organization
Whatever your scenario is, the ID token and access token you receive from Auth0 will contain the Organization ID to which your user belongs. You can use this value to customize your application for this specific Organization.
You can extract this value directly from the tokens in the token validation step shown earlier:
var organizationClaimValue = context.SecurityToken.Claims.SingleOrDefault(claim => claim.Type == "org_id")?.Value;
In any case, you can extract the Organization ID associated with the current user from the ClaimsPrincipal object of the current User in the AuthenticationState:
private Task<AuthenticationState>? authenticationState { get; set; }

...

  if (authenticationState is not null)
  {
    var state = await authenticationState;

    var orgId = state.User.Claims.SingleOrDefault(claim => claim.Type == "org_id")?.Value;
  }
Try out Auth0 authentication for free.
Get started →Summary
It was a long journey of exploring Organizations, but I think it was worth it.
You learned how to create and configure a new Organization to authenticate your customer's users. You defined the type of users and the login flow for your applications and learned how to configure and send user invitations. Then, on your application side, you modified its code to handle the acceptance of those user invitations. Finally, you saw how to authenticate your Organization users both when you know in advance which Organization the user wants to access and when you don't, and how to get the Organization ID of the current user to customize their user experience.
Of course, the use of Auth0 Organizations we have made in this article is minimal and mainly manual. There is still much to explore to make the management of Organizations and users simpler and more automated. We will explore this together in a series of upcoming articles. Stay tuned!
About the author

Andrea Chiarelli
Principal Developer Advocate
I have over 20 years of experience as a software engineer and technical author. Throughout my career, I've used several programming languages and technologies for the projects I was involved in, ranging from C# to JavaScript, ASP.NET to Node.js, Angular to React, SOAP to REST APIs, etc.
In the last few years, I've been focusing on simplifying the developer experience with Identity and related topics, especially in the .NET ecosystem.