
TL;DR: Managing secrets and credentials used to secure communication between the different components of a cloud solution can be challenging for developers. This can be simplified with managed identities available in the Microsoft Azure cloud. Let's see how to deal with secrets management in ASP .NET Core applications hosted on the Azure cloud.
Managing Secrets Securely in the Azure Cloud
Managing secrets in cloud solutions can be a big challenge. Whether it's a database password or a connection string to access a specific service — these values should be stored securely. In the Microsoft Azure cloud, there is a dedicated service called Azure Key Vault. It is a cloud service for securely storing and accessing secrets. When thinking about secrets, we should have in mind that they can be in many different forms. A database password is a secret, a certificate is a secret, and a cryptographic key is also considered a secret.
Storing secrets in places like a configuration file can expose our application to vulnerabilities similar to the ones due to bad programming practices or bugs. Many developers struggle with managing secrets properly and looking for a solution to test the application locally without worrying about secrets management after deployment. This is where Azure Key Vault and Azure managed identities can help.
In this article, we will explore how to set up Azure Key Vault, store the secret in it, and access this secret from the ASP .NET Core application using Azure managed identity. We will learn how to combine using secrets locally and access them after the deploying to the Azure cloud.
What Are Managed Identities for Azure Resources?
Managed identities is a concept in the Microsoft Azure cloud that eliminates the need for developers to manage credentials after deploying their application. With managed identity, we can access different Azure services securely without storing any credentials like connection strings or passwords. Many services support managed identities.
Managed identities can be helpful when we want to access Key Vault from an Azure Function App or access Azure Blob Storage from an Azure Web App, for example. More examples are in the documentation provided by Microsoft.
There are two types of managed identities:
- System-assigned identity, which is enabled directly on the Azure cloud service. For example, we can enable managed identity for an Azure Web App instance. Once this resource is deleted, the managed identity created for it is also deleted.
- User-assigned identity, which is a standalone Azure resource that can be created independently from the concrete service instance. We can then assign it to one or more Azure resources. It means that we can use a user-assigned identity with an Azure Web App and an Azure Function simultaneously. Resources assigned to this type of managed identity are deleted independently. So it means that this type of managed identity will not be deleted even if we delete the Azure Web App to which this managed identity is assigned.
I recommend watching this short video about Azure managed identities to learn more about this concept. This article will use the system-assigned managed identity for an Azure Web App to securely access a secret stored in the Azure Key Vault.
Azure Cloud Services Configuration
We will use the Azure Web App service to host an ASP .NET Core Web API (.NET 5). We will enable managed identity and grant access to the Azure Key Vault service to read a secret stored in it. Let's see how to create an Azure Key Vault instance and use the Azure Web App services.
Create the Azure Web App instance
First of all, we need an Azure subscription. We can create our account for free on this page. Once we have access to the Azure portal, we can create a new Azure Web App instance to host our .NET application.
In the Azure portal, follow these steps to create a new Azure Web App instance:
- First, we have to click Create a resource from the left menu.
- Then, we select Web App from the list.
- Next, we have to provide a name in the Resource Group section — it can be rg-managed-identities.
- In the name field, we have to provide the name of our Azure Web App instance.
- In the Publish section, we select Code.
- Then, we select .NET 5 in the Runtime stack section.
- We have to set Operation system to be Windows.
- For the region, we have to select the closest region to us — in my case West Europe.
We can leave the other options to their default values.
The following picture shows an example of the configuration for a Web App instance:

Finally, we have to click the Review + create button. If there are no issues, our Azure Web App instance should be ready in a minute. Once it is ready, we can click the Go to resource button.
Enable the Azure managed identity
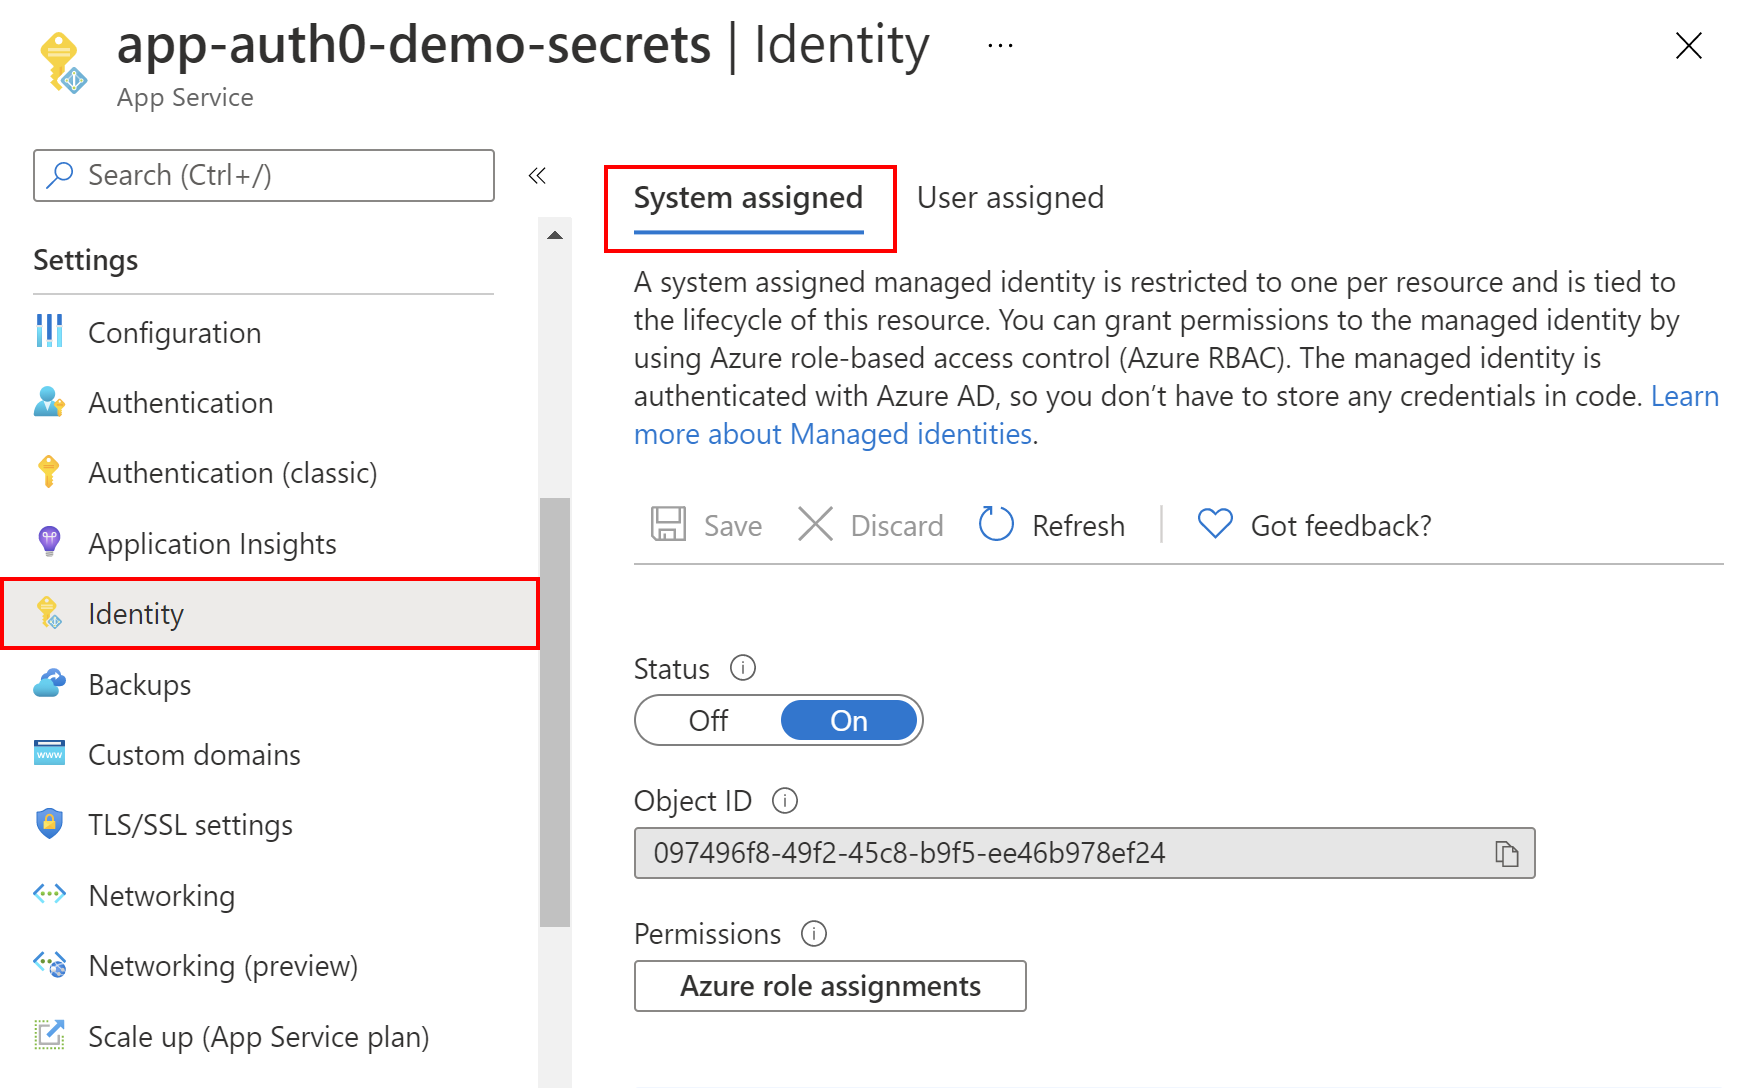
Now, the management blade should be displayed. So, we have to enable the system-assigned managed identity for our Azure Web App. From the left menu, we select Identity under the Settings section. Under the System-assigned tab, we switch the Status toggle to be On. After a few seconds, we should see the Object ID value displayed. Let's copy it because we are going to use it later in the article. That's it! We enabled managed identity for our Azure Web App instance.
The following picture summarizes an example of managed identity configuration:
Create the Azure Key Vault instance.
Now we have to create an Azure Key Vault instance and make it possible for our web application to read the secret from there.
In the Azure portal, we have to follow these steps to create a new Azure Key Vault instance. Once the Key Vault is ready, we can add a secret to it and make it accessible from the Azure Web App we created before.
From the left menu of the Key Vault configuration page, we select Secrets from the Settings section. Then, we click the + Generate/Import button. For the Upload options, we select Manual. For the Name, let's type APP-SECRET. For the Value, let's type Secret value from the Azure Key Vault. We can leave the other options to their default values.
In the following picture, we can see an example of that configuration:

We have to click the Create button to create the new secret. It should be displayed on the list after its creation.
Grant access to the secret
To make this secret accessible from the ASP .NET Core application hosted on the Azure Web App service we created before, we have to grant access to read secrets. From the left menu of the Key Vault page, we select Access policies, and then we click + Add Access Policy, as shown in the following picture:

From the Secrets permissions, we select Get and List. This will allow us to list and read the secret values stored in the Azure Key Vault instance. Then, we click the Select principal link. In the search box, we have to provide the value of Object ID for the system-assigned managed identity we created above for our Azure Web App instance. Once we paste it into the search box, it should be displayed on the list. We have to select it from the list and click the Select button. Finally, we click Add button. In the end, we have to remember to click the Save button from the top of the blade.
This is all. We created an Azure Web App, enabled and assigned its managed identity, and granted it access to secrets stored in the Azure Key Vault. Now let's look at the application source code.


